
 |
| First bedroom in mid-chaos! |
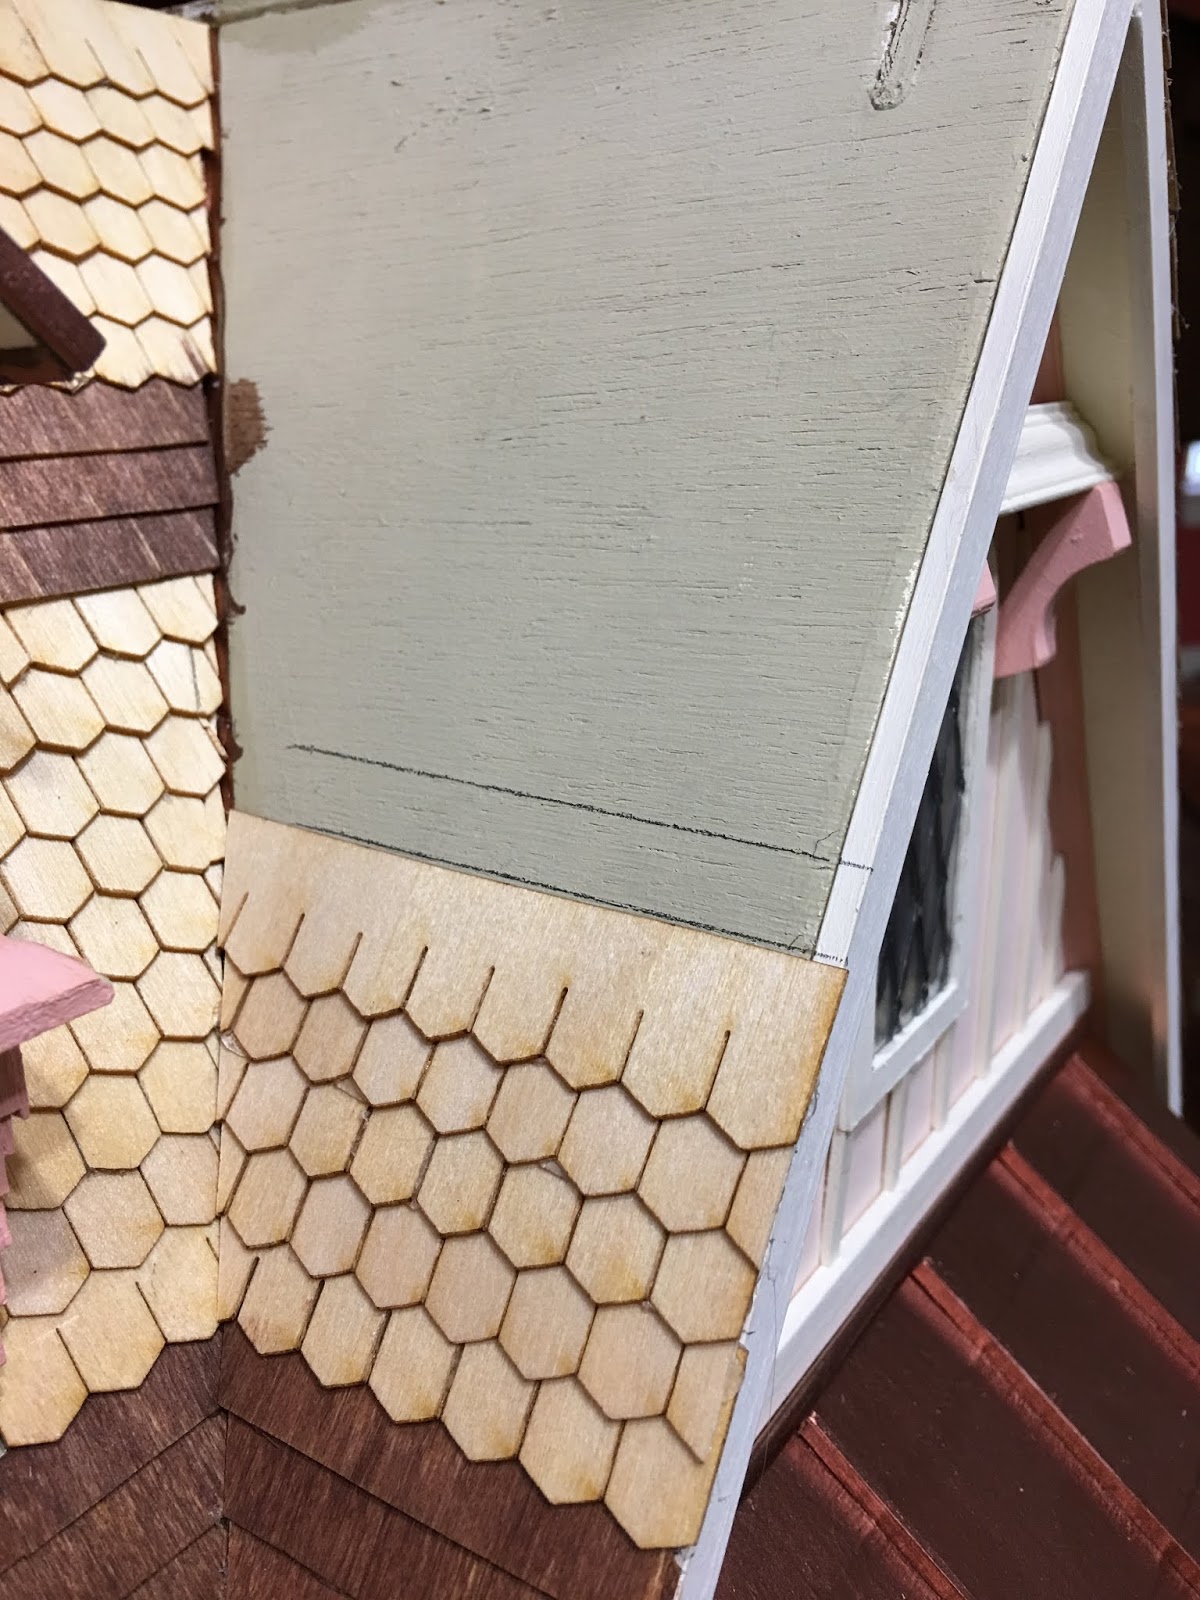
The next step on the cottage to-do list was the roof shingles. I chose to go with Greenleaf half scale speed shingles, because they are faster and seem more in scale on a small structure. Though getting them applied seemed anything but speedy! I thought the hex shaped variety was fitting for a tea loving resident, because they look just like honeycomb!


There were many interesting angles to contend with, so I employed the use of a paper template. Remind me to make templates of the roof sections before I attach them next time, would you? Anyway, I'd draw the line for the top of the next row of speed shingles...
Transfer the mark to the paper template...

Draw a line across the template using the square...

Line up the speed shingle strip and position the ruler at the angle...

Then cut. It worked beautifully ALMOST every time! :O)

Every chance I got between coats of paint or scrubbing or reorganizing the linen closet or tupperware cupboard, I added a few rows...


And eventually, in spite of a few setbacks and mistakes, I was finished!!!

I used Minwax stain markers, Provincial and Cherry, to stain the shingles.


And eventually, I finished that, too. I'll likely keep adding additional coats until I get the depth I'm after, because the shingles seem to drink it up and lighten a bit after they dry.


Now the question was: How to cap the roof and tie in the back shed dormer to the shingled roof? I wonder how many of life's mysteries have been solved over a bowl of cereal? Mine was solved using a cereal box.
 |
| Two roof ridges and one shed dormer meet. |
I measured how far down I wanted the roof cap to cover the shingles, doubled that (to cover each side) then added another quarter inch just for good measure. Then I cut a strip for the long main roof ridge and one for the shorter front roof ridge. Then I folded them in half lengthwise and creased 'em good with my bone folder.


I gave them a good dry fit and made cuts and adjustments for where the two ridges met and for the variance in angle caused by the gable and shed dormer. I also made notches for where the small dormer roofs met the ridge cap. I noticed that a lot of copper roofs have a strip of copper that is welded on top of where two pieces meet, so I cut 1/8" strips to provide this detail. Then everything got a first coat of copper leafing marker.


I used hot melt glue to attach it to the roof for instant grab and the ability to quickly mold it to the shape of the roof. It came out mostly good.

Using the cereal box cardboard again, I continued the strips from the ridge cap onto the shed dormer.


Everything's going to need several more coats and touch-ups, but I am happy that the roofing questions are answered, and the shingling is (mostly) done!


Russ will start the flooring install on the human sized rooms this weekend, then the ball is back in my court. More painting, more cleaning, more organizing, and loads of fun decor type stuff to make for one guest room. I'll share photos of that stuff as it gets more interesting.
Enjoy your last couple weeks of August, and I hope to see you again real soon!
xo xo,
Jodi
Your method for applying the 1/2 scale speed shingles to fit the angles of the roof, was planned and makes perfect sense too! ❤️
ReplyDeleteI am also impressed in the way you have married the two different roofing elements of the sheet copper with the wood shingles; the end results are Really Lovely!
Have fun with your 1:1 project Jodi, but do Hurry back to this one because I can't wait to read the next chapter in your Storybook
Thank you Elizabeth! I am happy that I was able to get a system going to get the angles. Each time there was a lapse in working on them, I had to relearn the method! I prayed a lot about how I was going to merge those roofs, and when the time came, I was grateful that a simple cereal box saved the day!
DeleteI.m back on scrub & Paint Duty on the Real Life house today, but am hoping to steal some time next week for fascia treatments, apex trim, and downspouts!
Hello Jodi,
ReplyDeleteI LOVE it! I really like that you broke the honeycomb with some square shingles...such a wonderful detail, and the colors you dyed them look beautiful. They work in perfect harmony with the copper roof elements. Also, great work on the roof cap. Every time I look at this house I am blown away by all the detail you incorporated, and incorporated so successfully.
Big hug
Giac
Thanks so much for the encouraging words, Giac! It feels so good to be able to find ways to translate all of the flying ideas in my mind onto the project! I only wish I never had to stop working on it!
DeleteOoh! That looks really classy. Great combination of materials. It gives the cottage a rather expensive look!
ReplyDeleteGood luck on the 1:1 renovations!
Thanks Veronique! I imagine that at one time the residence was the gardener's house on a vast and exquisite estate. Over time, pieces of the original property were sold off, and the little cottage was not kept up as before. I hope when I am finished, it will show the evidence of time and element, but also that it is still loved and well maintained.
DeleteWow! I love how that looks. The copper and the stain go together so well and the roof cap is perfect. It feels like this project went really fast! Can't wait to see more.
ReplyDeleteAnd good luck with your 1:1 renovations. Looking forward to seeing the results of those too!
Thanks Sheila! I was so indecisive about the treatment for the roof, but am so glad it's coming along as well as it is. The copper and shingle combination break it up nicely, because for such a small cottage, there is SO Much Roof!
DeleteWith luck, I'll have some 1:1 photos to share in a couple weeks, too. Boy this summer has been a hectic one!
Lookin' good!!! Nothing to see here - I love that pic! hahaha I always use templates with crazy roof angles...keeps the sanity. :D
ReplyDeleteThanks Brae! I know! Why didn't I save myself so much angst and just go re-read the Heritage roof posts before I started the project?!? The secret was right there for the asking! I also can't help but tell on myself - I just hope it's not the first thing someone notices when they look at the cottage!
DeleteAll that hard work paid off Jodi! This is the best roof I have ever seen. Love all the different textures, shapes, shades and colours. I admire your work capacity, with your 1:1 work I will not have any energy left for anything else! I am happy that you are making so much progress in both fields, atta girl!
ReplyDeleteThank you, Alex! I really don't deserve such high praise, but it sure makes my day! :O)
DeleteSo glad you like the roof!
Wow Jodi! They said it all for me and I agree with every word. Thanks for sharing the way you are handling the difficult corners of the roof. So good that you managed to find time to work on this incredible house. I know what hard work real life renovation is.
ReplyDeleteHugs,
Thank you, Drora! The RL work is hard on the body, and I would much rather be doing any task in miniature! But duty calls, so off I go with the bucket of Lysol and a great attitude because of special friends like you! <3<3<3
DeleteYour MIB picture made me LOL.
ReplyDeleteThe roof looks great. Yay for templates!
Thanks Keli! Glad you LOL'd! :O)
DeleteMe encanta como has dejado el tejado. La variedad de materiales y los diferentes tonos que has dado . Está fantástico.
ReplyDeleteGracias Isabel! ¡Estoy tan feliz de que te guste!
DeleteGreat job! I honestly had to look to figure out what you were trying to erase from our memories. :-) Your use of stain to camouflage it was very clever. Love the way the shingles turned out (and I'm very impressed that you could do it while working on your 1:1 renovations) and love, love the copper. I would never have thought to use a cereal box, but it worked beautifully.
ReplyDeleteThanks Deb! This is what happens to me when I don't totally concentrate on something. I used hot melt glue to apply the shingle strips, and by the time I realized my mistake, I was way too many rows in to fight with removing the glue. It sticks GOOD!
DeleteSeveral years ago I saw a blog where the lady used cereal boxes to make all of her trims. I thought why not give it a try, and I'm so glad it worked!
The roof is gorgeous Jodi. I'd hire you for a roofing job any day.
ReplyDeleteI hate working on real life projects, but it is fun to work alongside my husband. They make for good 'remember when' stories.
Thank you Carrie! I am glad you like it, and so relieved that it turned out pretty good! I'd be happy to come down and help you with your roof, dollhouse or otherwise, especially when the fall gloom descends on us here in the Northwest! :O)
DeleteMe and my back and knees complain through the entire process of Real Life projects, but I sure do enjoy the fresh, clean feeling of the end result! Russ and I get along pretty good working together, as long as he thinks he is the boss! ;O)
Hi Jodi! I Love the honeycomb shingles for this cottage! And I agree that the smaller scale looks more appropriate with these little kits. I have never used the stain markers, but they seem to be a really good clean way to stain little things! All the work you are doing on your RL house will be so worth it in the end and soon you will be getting to the fun part... putting it all back together and admiring your work!! I love the pics of the cottage surrounded by all the "stuff"... it looks so cozy and ready for someone to move in! :):)
ReplyDeleteHi Betsy! I'm glad you like the honeycomb effect, too! And those markers are just so convenient compared to the way we used to have to dye the shingles in smelly, messy batches! Believe it or not, I only partially used one of each pen variety to get the job done, too. So economically, it was also great!
DeleteI am so looking forward to being done with all of the construction-y stuff with the RL projects, so I can enjoy the "making things pretty for company" part! And, I can't wait to start making the cottage feel lived in, too!
Oh my Jodi! That house looks good enough to eat! I love all the different textures and colors you've used. They work together so harmoniously. Thank you for sharing!
ReplyDeleteTeresa
beaconhilldollhouse.blogspot.com
Thank you Teresa! I am happy you enjoy the details, too!
DeleteI left you a comment on your blog, but it doesn't seem to have worked. So I'll just say here that I am so excited for you as you begin the journey with your Beacon Hill, and I will be enjoying seeing your posts as you progress! I've got you in my blog roll so I won't miss them!
OMgosh! Love it.
ReplyDeleteI especially love your MIB reference.
Thanks Audra!
DeleteIt's incredible that you've managed all this work on the roof with a RL-renovation going on - chapeau! And it's impressive how helpful a box of cereals can be… a wonderful solution for covering the meeting sides of the roof. Going for the honeycomb shingles was a great choice, I like the idea behind it and colouring them with those markers is a very interesting method. I had to look those markers up to understand what kind of stuff you've used - very clever... and the result looks stunning, although this kind of wood is very thirsty for sure. Best wishes for your further renovation work - may the decoration part aka the fun part come soon!
ReplyDeleteGreetings
Birgit
Thanks so much Birgit! In addition to the real life renovations, my parents have been in town. My dad since mid June, and my mom for about 2-1/2 weeks. It has been joyfully busy, but I am looking forward to having less "To-Do's" on my plate! I managed to work ahead of Russ a bit, so I will definitely carve out some time for minis this week!
DeleteHi, Jodi - Congratulations on a hard job beautifully done! The Storybook Cottage roof looks perfect; I love the way you've added variation to the pattern of the shingles. The roof cap and the copper pieces also look wonderful. You have such skill with all those tasks that require precise measurements and cutting - all those angles! I'm in awe of your workmanship and ability to choose just the right material for the job at hand. This little cottage just gets better and better! I hope you continue to make good progress on your Real Life house changes - that sounds like lots of fun to me! (In spite of the hard work.) I'm looking forward to seeing some of the results of that big project.
ReplyDeleteMarjorie
Thanks Marjorie! I am never as good as I strive to be, so thank goodness for aging and moss to cover up the oopsies!
DeleteI feel so much satisfaction when I can use what I already have or come up with cost saving solutions in the materials, so using things like cereal boxes is double delightful!
The majority of the painting is accomplished, so I just have a bunch of small tasks to complete until Russ has a chance to finish installing the flooring. It's going to be so much fun to share with you the progress once we get to the fun parts!
So glad to find your blog! Just getting into Minatures after a life long desire but things get in the way. You are so talented!
DeleteHi Becky and welcome to the blog! I do know how life and responsibilities can put our dreams aside, but I am so happy to hear that it's finally time for you!
DeleteI think you'll find that our "little" community is full of creative and friendly folks who are eager and willing to share ideas and techniques to shave off some of that learning curve. If you find you need any help or encouragement, you're only a question away!
I can't believe you made the copper roofing out of cereal boxes! It looks amazing. As does the rest. So impressed.
ReplyDeleteThanks Penelope! It feels like such great victory when you use something so simple (and cheap) and love the results! I'm happy you like it, too!
DeleteIt looks gorgeous!
ReplyDelete