

Of course I can never leave well enough alone, and the original floor plan had some issues. First, the house has a cavernous first floor but an "attic" space that no miniature person could stand erect in. I think the kit is intended to be a store, but I bought it thinking of an English Cottage where the elderly female resident loves a good cup of Rosey Lee (tea). That means it needs to be a fully functioning home complete with living area, kitchen, bedroom, indoor bathroom and of course stairs. But where to put the stairway and how to gain more ceiling height upstairs? This lead to many changes - exciting ones, and instead of planning myself to tears, I'm going organic. Meaning: denoting a relation between elements of something such that they fit together harmoniously as necessary parts of a whole. and/or: characterized by continuous or natural development.
 |
| Kit box photo - Extremely Tall Main Floor, Very Short Attic Height |


After considering many options for stair placement, I began by adding two inches to the front of the floor plan. This would allow floor space for a staircase without taking away from the living space. More on the stairs later...

Other improvements came to mind once I had the first dry fit going. The right wall has adorable rounded windows, but it could be better, right? I saw an opportunity to bump out the wall, adding visual appeal to the exterior plus a built in window seat/sofa on the interior. Added space and cuteness!


The left wall has a nice bay window, but wouldn't washing dishes be much more enjoyable with more room and a view? So, I added about an inch and a half to the depth which presented a perfect opportunity for built in shelving. I raised the windows so they'd be just above counter height. Actually, I made the whole opening taller by about two inches, adding basswood to the bottom of each bay. This will become the kitchen sink area.
 |
| Kit Box Photo With Original Bay Window Configuration |


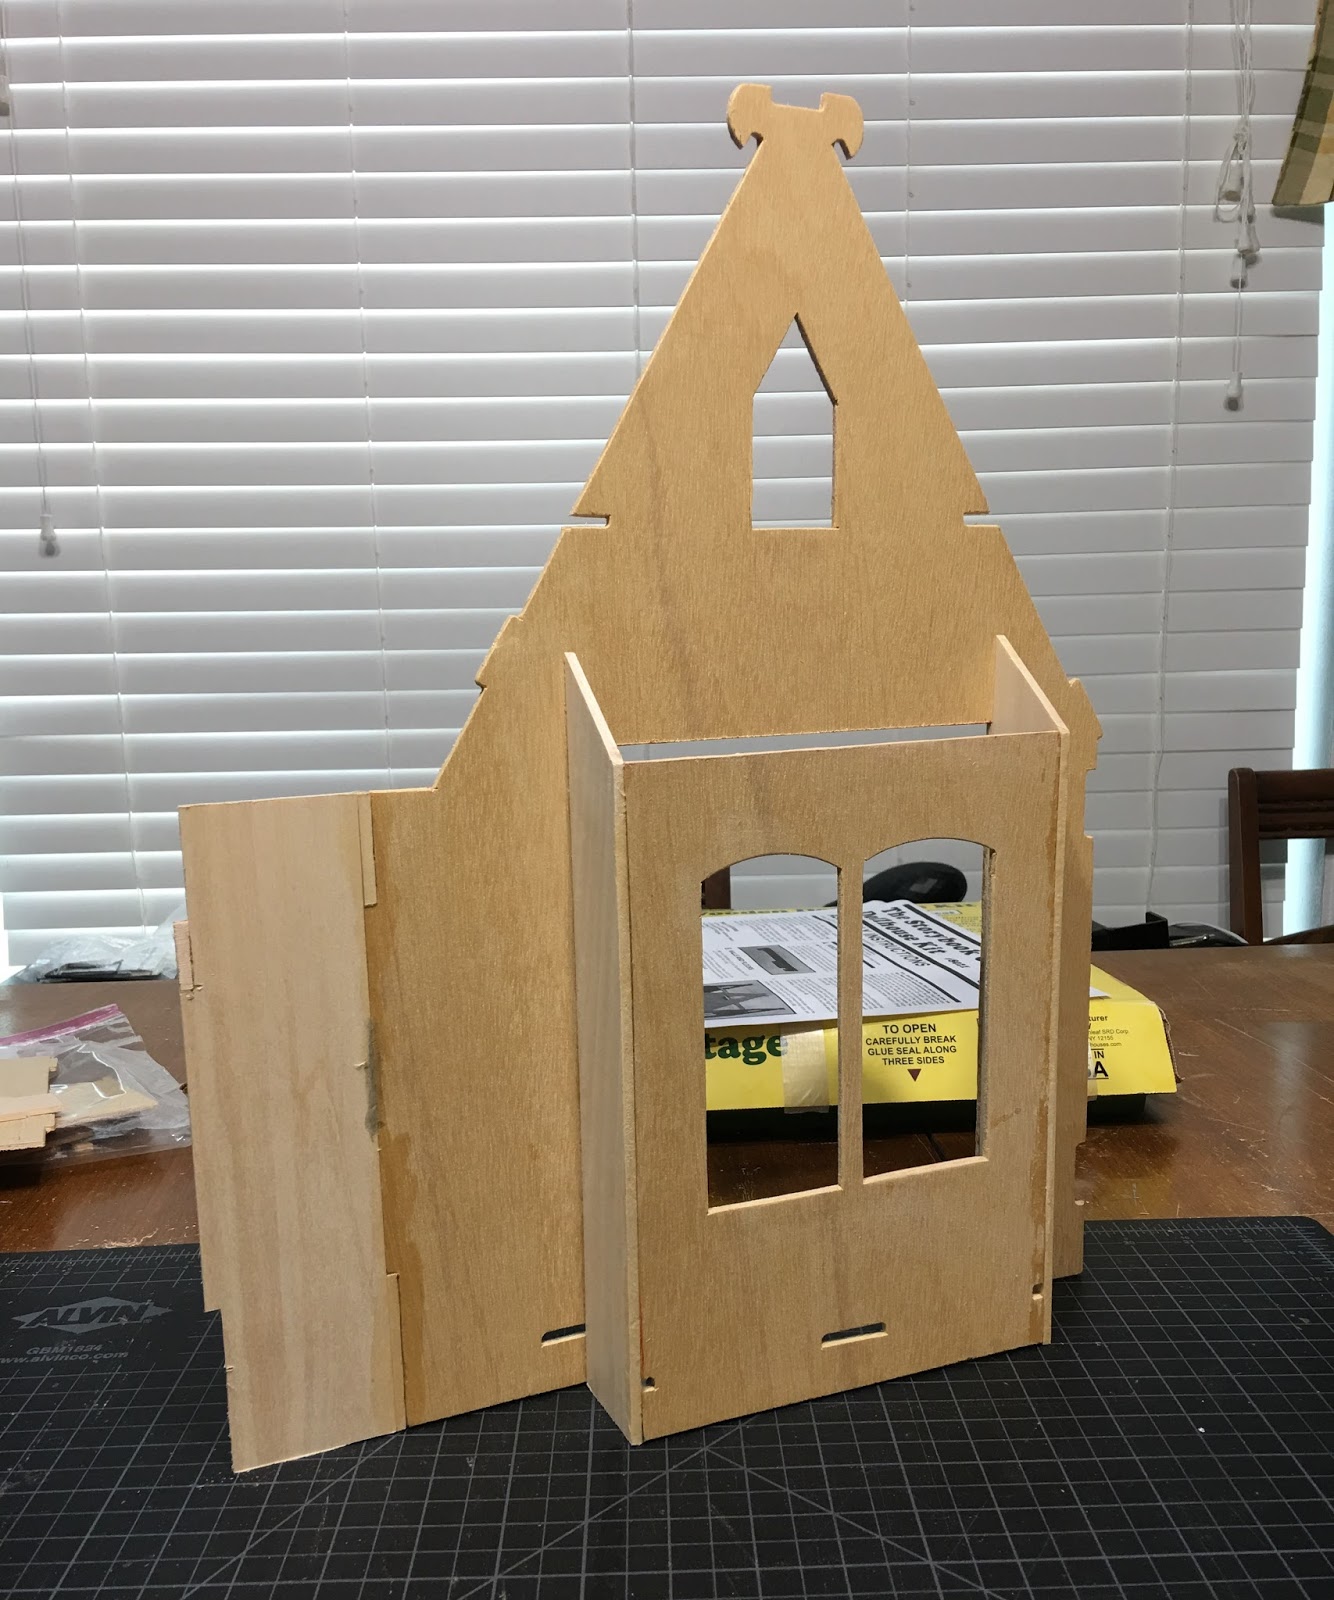
To lower the floor by two inches, I simply added 3/8" basswood strip on each of the three main walls. Notice how much head room is gained - the original floor would have been right at the bottom of the attic window openings.

Then, because the floor sat lower in the apex, I needed to add strips of wood to extend the floor. Making these changes has netted me 2 additional inches of floor space in the front attic dormer and 1-7/8" all across the back opening. I also had to add strips to the sides to widen and meet the roof walls.


The front roof needed an addition to accommodate the new stairwell. That was a real brain teaser because it would have to meet two angled roof lines and be tall enough so a 1/12th person's head could clear the ceiling while climbing the stairs. I pondered this in my head for a couple days, then finally got out some cardboard from a cereal box and played around. Sometimes it helps just to get a good visual. This was the rough configuration I settled on:

Then I used the paper and tape method to create a template. I didn't have any 1/8" pieces of basswood that were wide enough, so I laminated some scraps together slightly larger than the template. It was a little trial and error, but finally I got something that I think will get me 90% of the way there.

Once the roof addition was finished, I needed to make the new front wall to fill in the space. I used the paper template method again, folding it over the angle of the new roof piece. I had a big piece of leftover Greenleaf 1/8" plywood from when I bashed two kits together in 2015, so I was able to recycle that for most of the wall. The MicroLux table saw has paid for itself with all of the cuts I've had to make so far!
I made a dormer window to fill in the area above the new roof line, and I'll add a couple of the windows I bought from Auntie Em's in Glendale AZ last year to brighten the stairwell. Here's the new elevation so far...


The next step will be to finalize the ideas for the stairwell. That means cutting away part of two roof sections then building the interior wall. I don't foresee gluing walls together any time soon - with all of the nooks and crannies inside this little gem the "decorate as you go" method might be the best way forward. But who knows - I am just flying by the seat of my pants with this one and loving every minute of it!

Let's just see where this goes...
xo xo,
Jodi
Wow! You've been busy! I really like all your additions and how much space you're getting.
ReplyDeleteThanks Sheila! The hubs was out of town working this week, so I took full advantage. Staying up late, getting up early and not cooking meals generates a lot of extra time!
DeleteThis is sooo clever! Not just the way you changed the roof slope.. all of it! Super creative, Jodi :-)
ReplyDeleteThanks Marion! Coming up with ideas and then figuring out how to make them work in these giant puzzles is so exciting, isn't it? The Chicken or The Egg decisions that are coming are going to be a real challenge!
DeleteSuper creative and lots of clever thinking and problem solving. Impressed and dying to see it evolve further. M
ReplyDeleteThanks Marilyn! I hope it evolves into something interesting without becoming so complicated that it's not fun anymore! :O)
DeleteI'm feeling a bit nostalgic Jodi because the Storybook Cottage was the very first dollhouse kit I built back in the 80's, but seeing the sensible and practical modifications which you've begun to make on the shell, is nothing short of GENIUS!
ReplyDeleteThe changes in the roofline as well as the modifications to the bays and the extra windows AND the stairs, is going to take this kit to another level; but then that is what you do with ALL Of YOUR OUTSTANDING BUILDS ❤
Organic Forever!!! :D
Oh Elizabeth! What did your Storybook become, and what became of it? I'd love to know!
DeleteThank you so much for the encouragement! I hope the neat things I have planned will actually work. Your builds always inspire me to see what can really come of a little wood and four walls. Maybe I will actually finish this one! Poor New Orleans. The ideas I have for her are just not as exciting to me at the moment. :o)
I made mine into an English Tea house which I called "Tea and Crumpets". It was covered with real stones on the outside with a green, white and black interior. I submitted photos to Nutshell News and got some pictures of it published in one of their annual Kit Bashing issues- a Very Proud moment! :)
DeleteBut I gave it away many years ago after it sat in my garage for far too many years with No regrets either then or now.
Although I am sorry that New Orleans is back on hold for the time being, I am however, with you every step of the way on this one Jodi! :D
An English Tea House? How awesome, and I must have been channeling you when I thought English Cottage and Tea for this kit! :o)
DeleteReal stone? I would have loved to see that and hear about the process Elizabeth! Did you save any photos, or remember the issue number or date? It would be so neat for you to make a post about all of the projects you've done over the years that we are not able to see on your blog!
The New Orleans needs planning to the nth degree, and Jodi just really needs some free flow creativity at the moment. I am not ruling out working on portions of each simultaneously, tho! At this time last year, I thought I'd be working on the Glencroft to get it finished by the fall. Ha! See what happens when I plan! ;o)
Hello Jodi,
ReplyDeletePure awesomeness! I love the changes you have made to the kit. The square inchage you have added will make such a huge difference and I love the bay you added and the way you reworked the original one. The new roofline is really interesting and I cannot wait to see more.
Big hug
Giac
Thanks Giac! We really do fight for every square inch in these dollhouses, don't we! It is exciting to be able to figure out ways to gain them. I hope I can maximize them in a visually pleasing and functional way!
DeleteWell, the changes you have made so far are already awesome.. I always like an interesting varied roof line so big points there and that modified bay with the build in shelves.. I feel another fantastic sink coming on! :D
ReplyDeleteThanks Sam! It is such a good feeling to be able to figure out how to make what you have in mind actually work with all of the roof angles. I would have no idea where to start with the math of it all, so I just stare at it until an idea for a work around comes to mind. Trying it in cardboard helps me to see it in 3D. I've still got some complicated things to work out, so wish me luck that my dollhouse stare downs keep working! ;O)
DeleteIt's so interesting to read and see what what you are able to do with this kit. Always nice to see your bright, out of box, ideas.
ReplyDeleteHugs, Drora
Thanks Drora! I am glad you are here to share them with me! <3
DeleteGeniales los cambios, no parecerá la misma casa ; estoy emocionada esperando ver los avances.Feliz fin de semana:-)
ReplyDeleteGracias Rosa Maria! ¡Espero mantener la sensación linda y casera, y aún así tener espacio para que viva mi pequeña dama!
DeleteHas realizado unos bonitos cambios.
ReplyDeleteGracias Isabel! ¡Estoy feliz de que te gusten!
DeleteYay! Good for you Jodi! It can be so fun to just jump in and fly by the seat of your pants! It is looking very cute so far.
ReplyDeleteThanks Shannon! I am totally going for cute this time, and perfection is a dirty word to me after all those fussy vanities! ;o)
DeleteJust cute, quirky, colorful and filled with adorable things. That's what my soul is crying out for!
Oh Oh OH My!!! You have really let the Genie out of the bottle on this one Jodi! LOL! I Love the alterations you are making... and the "organic" method is the only one that works for me... I can only go so far with pencil and paper... then it needs to be cardboard and string! LOL! The added nooks and bump-outs are giving it so much more character....and I agree it must have stairs!!! You are clearly having a Ton of fun with this one!! I can't wait to see what comes next! :)
ReplyDeleteThanks Betsy! I am creating a real Chicken or Egg situation with all these nooks and crannies, but it will be fun to puzzle them out. No regrets, just fun. I am so happy you are here to see where this goes with me!
DeleteHello, Jodi - You do have an exciting and fun time ahead of you! I've never built from a kit, so seeing all the complex changes that you're making just boggles my mind. I like your "dollhouse stare-down" method of working - and it seems to be getting amazing results. I love the new bay window with the shelves and the (future) sink, and the dormer window is an ingenious idea that adds so much interest to the new roof line. This build looks like a great challenge, and I'm excited to watch your progress as you put together the "puzzle."
ReplyDeleteMarjorie
Hi Marjorie! Your scratch builds, it seems to me, would be much more complicated because you have to engineer how all of the walls tie together, the roof angles etc... I feel like I am cheating a little!
ReplyDeleteThe stare downs do help for me to visualize how the structure will work and how it will look with finishes at the end. But really, I am an amateur at building, so we'll see how it comes out in the end - I may just pull all my hair out coping with the problems I've created for myself! :o)
I am happy you like the additions, and am glad you will be with me on this exciting dollhouse adventure!
I love your bump-outs, like an exploded house! What a lot of space you have gained, and the extra head room is valuable. The nooks and crannies are going to make for interesting decorating. Splendid job with all those roof angles!
ReplyDeleteI'm comforted to see so many people having staircase issues ;-)
Thanks Megan! My hope is to create a home where there is something interesting to see wherever you look - inside and out! And stairs... I always face challenges whenever I need stairs. They are complicated, especially when you have such limited space to make them functional in. Luckily, I think I may have worked them out and am so relieved.
DeleteSo much going on, I had to read the blog post twice. I love the alterations you are making. Fantastic .
ReplyDeleteHa ha! Sometimes my brain gets way ahead of my typing, and upon my third or fourth reading I've added so much more explanation - probably too much or not enough! :O)
DeleteI am happy to have your seal of approval, and welcome any suggestions too!
I bought the same cottage second hand. I immediately took the attic apart and lowered the floor. I'm thinking Gothic Tudor when I look at this doll house.
ReplyDelete