

In keeping with the rustic feel of the Duplex Room Box, I decided on a brick wall treatment for the second shop space. I like the quick results I get with the Magic Systems sticker and mortar kits, so that's what I used.


I want the look of painted brick, so my "grout" and bricks will be warm white. Normally, the under color will end up being your "grout" color so most people use gray or white on the walls and get the kit with the red mortar powder. I got the kit with the white mortar so it would be easier to paint over.

It's kind of fun putting the sticker stencil on. I pre-peel the brick waste cut outs from the backing paper. I've learned from experience that if you don't, they sometimes stick to the stencil while you're peeling and it causes moments of panic that just aren't necessary. Better to mindlessly remove them while Netflix is on.


I actually forgot to take photos of peeling off the sticker - bummer because it's a fun and gloppy mess to look at! Then, I forgot to take photos before I painted the bricks. :o/
I end up with some rough edges on my bricks from when I peel the sticker stencil away. I solve most of this by letting the bricks get almost dry, then just gently rubbing my thumb and finger over them. It works great! I did manage to touch a couple of spots before they had set and kind of messed up some bricks. Notice the lower back corner area on the photo below. Oops!

I thought it would be fun to experiment with some different products for the wood floor (I am using the same Houseworks wood floors I used in the first shop). I took a scrap piece and tested the following products:
- Minwax Stain Marker, Provance
- Ranger Alcohol Ink, Pebble
- Ranger Oxide Re-Inker, Vintage Photo
- Ranger Oxide Re-Inker, Walnut Stain
- Ranger Distress Stain, Hickory Smoke
- India Ink & Isopropol Alcohol


The alcohol ink was really interesting! I love how it colors the wood and am definitely going to do more experimenting with it. I think it might be great on wood furniture. Getting color without adding layers of paint could be so good!

The re-inkers were interesting, and while I like the rich colors, it may be better suited as a wall finish. It stayed a little greasy feeling, too.


The Distress Stain was my favorite of the bunch. What you are seeing is from just one coat. It really brings out nice highlights in the wood, and the color could complement a number of color schemes in a room.

A close second was the India Ink and alcohol mixture. The model railroad website where I read an article on it said to use 1 to 2 teaspoons per pint of alcohol. I didn't want to experiment with that much, so I added about 1/3 a teaspoon to about 1/3 of a 16 oz bottle of 99% alcohol. The first coat barely did anything but wet the wood floor. So, I added the other 2/3 teaspoon and put on one more coat. I think this could be really interesting. The ink tends to pool a bit together on the wood, which really leaves a nice aged patina. I think with a couple more coats this could be a fantastic way to get gorgeous weathered boards!

So I decided to use the Distress Stain. It dispenses itself through a sponge on the top of the bottle. Think Bingo dobber. It kind of snagged here and there on the wood floor, even though I had it sanded smooth to the touch before starting. I don't see why you couldn't apply with a paintbrush, but I didn't try. I really love the way it came out!


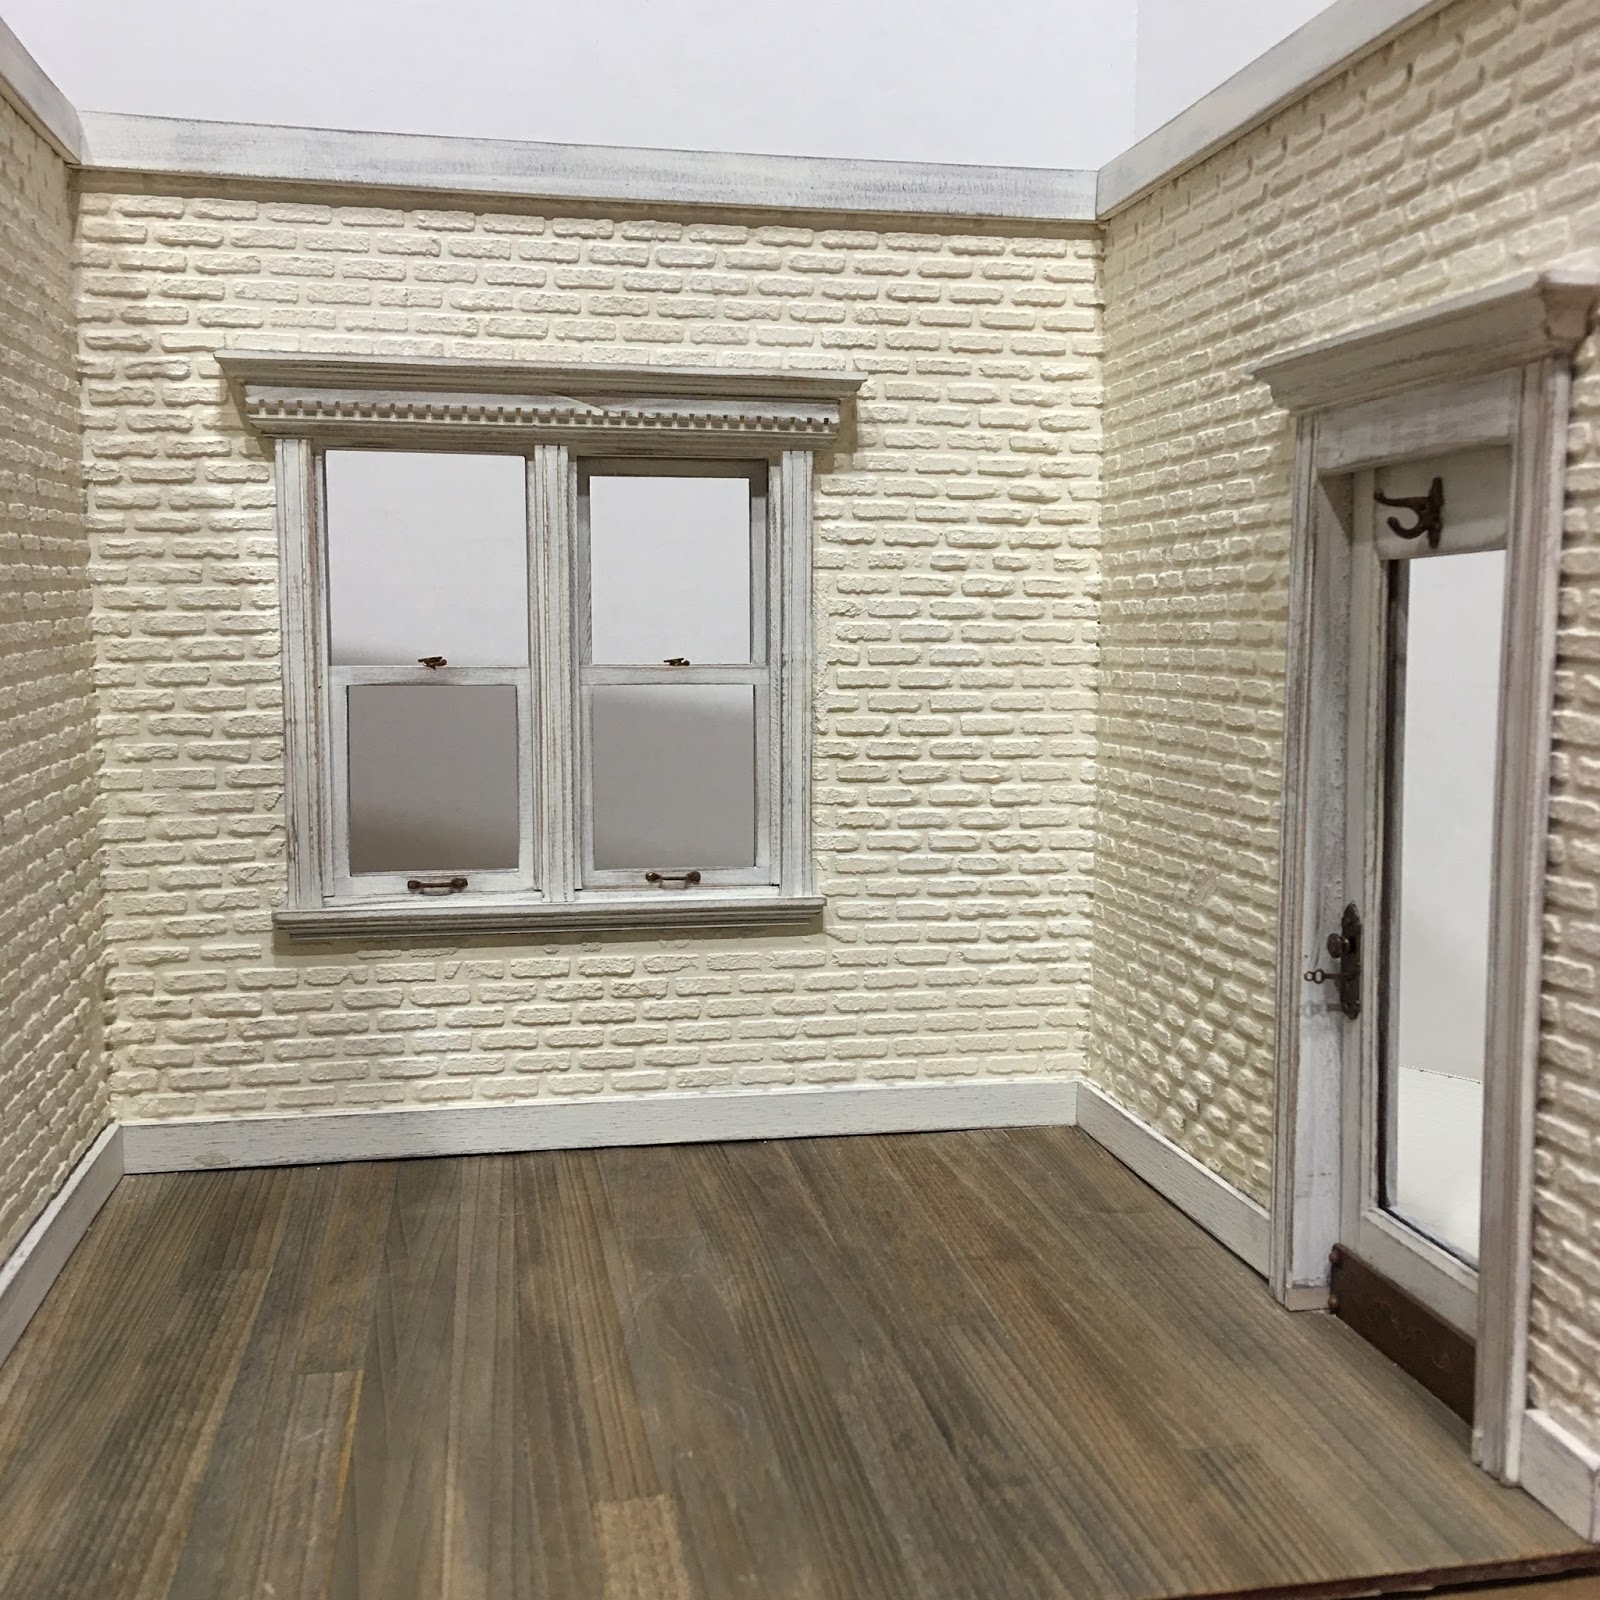

Then I added the baseboards, crown molding, window and door (hinged in the same manner as the first room).


I may add a bit of ageing to the bricks, but for the most part it is done! Now I get to start making stuff to go inside! I have so many kits that I really want to do, so many things that I really want to try! I think that's going to be the focus for the end of 2017 and into 2018.
And maybe still, before Christmas, I can post some photos of Ellie and Jim enjoying the season in the Sweet Christmas Cottage!
Peace and love to each of you!
xo xo,
Jodi
jodi, these tips on water-free stain products are super! many thanks...
ReplyDeleteand the floor looks great - ship plank like.. very modern ;-)
Thank you Marion! I can't wait for more testing, and of course I'll share any interesting results with that as well!
DeleteLovely :)
ReplyDeleteThe floor turned out great, thanks for sharing your experiment.
Thanks Keli! So many ideas, so little time! :o/
DeleteHello Jodi,
ReplyDeleteI love the way the brick came out. The shop looks very fresh and modern and the finished floor is perfection. I can't wait to see these shops take shape...they are already amazing spaces.
Big hug
Giac
Thanks so much, Giac! I am also looking forward to lots of filling and photo shooting. It could be fun if I can work out all the lighting challenges. If all goes well, I will become better informed and so will my readers!
DeleteI love your floors, good choice. And the bricks look great!
ReplyDeleteThe re-inkers look a little flat to me, not much variation. I might have to fool around with the Distress Stain because that look is just gorgeous.
Thanks Sheila! Yes, the re-inkers are a little flat, aren't they? When I first applied the walnut, it had this amazing bluish sheen that disappeared as it dried. If I can figure a way to capture that, it could be stunning. I'll keep experimenting and share what I find...
DeleteThe brick walls are superb, the floor too. I love how they look together. Thanks for showing how to use the stencils.
ReplyDeleteHugs, Drora
Thanks Drora! There are some other types of stencils I'd like to try - ones that end up costing a lot less to achieve a brick look, and seem like less time than the egg carton treatment. I will share those experiments as well in the coming year. One of the drawbacks of the Magic Brik kit is that it can be a hit to the budget, especially when there is a lot of area to cover.
DeleteLove all of these finishes! Perfect detailing as always. :D
ReplyDeleteThanks Brae! I am truly learning from the best! ;O)
DeleteOooohh.. *claps* Love this... that distress stain is wonderful.. I'm going to have to look for that over here.. Have been contemplating the india ink mix for a while but this looks better and easier.. always good! :D
ReplyDeleteI'm always scared of that magic brick stuff, it's seems like something that I would really mess up. lol.. you certainly have the knack for it though. That little spot in the corner is only noticeable because you pointed it out and anyway it's in a good spot to be covered by furniture or accessories. :D I love all the distressing you have done on your woodwork and the little pulls and locks! Adorable, can't seem to get the locks in Oz.. I think I'm going to look for findings that may be a good substitute. Do you paint them or do they come in that colour? I'm really looking forward to seeing how you style these rooms up, and aren't they going to be great backdrops for photoshoots! :D
hanks Sam! The stain is pretty, but india ink may be a little more cost effective if you've got a large area to cover. The stain is about $3 US an ounce! Yikes!
DeleteThe Magic Brik is pretty expensive too - especially shipping to OZ. I have seen brick reusable stencils and plan to try some in the coming year. Making up homemade texture paste to use with the stencil would be cheap enough to make you feel better about testing for sure!
I am definitely going to have to employ the old "smoke and mirrors" with the messed up areas of brick!
I got the lock in an eBay lot of hardware several years ago, and I think this is the first time I've actually had the opportunity to use them! All the hardware was brass, so I did paint them. Maybe soon the mini hardware makers will realize we want realistic looking options and we all don't do Victorian era dollhouses? One can hope...
I am hoping that all the ideas and plans in my head come to life, too! There is so much I want to try and I feel like there is never enough time for all of it!
Such a gorgeous base to play with now. I've bought so many types of stain trying to get that weathered look and failed. I'm so happy to know about these products, thanks for sharing! I love the colour you picked for the brick too. I'm just about to go on a My Miniature Madness blog binge reading haha and catch up on everything I've been missing... I hope the door is included because it is fabulous. Love all the trim. And reading your reply to Sam, maybe we need to get on 3D printing these? ;)
ReplyDeleteThanks Kristine! Me too with the disappointing stain searches. Good though, because that's where 'out of the box' thinking leads us to new discoveries! I hope it helps you find just the right finishes, too!
DeleteYes - I think some new contemporary mini hardware items are much needed! Your faucets are gorgeous, and your design sense divine, so I'd love to see you have a go at them!!!
Me encanta como han quedado las paredes y el suelo.
ReplyDeleteSe ve genial.
Un abrazo
Gracias Marian! ¡Estoy feliz de que lo apruebes! : O)
DeleteLa pared ha quedado muy bien y las terminaciones de las ventanas me gustan mucho. Después de todos las pruebas, has elegido un bonito suelo, aunque las verdad, casi todos están bien. El contraste con la pared queda genial.
ReplyDeleteGracias Isabel! Me gustaron muchos de ellos también, y cada uno se adaptaría a un estilo diferente. ¡Tanto para probar y tan poco tiempo!
Delete¡Ha sido divertido molestar a las ventanas, y fue un proceso tan fácil que todos pueden divertirse!
Fantástico, tanto las paredes como el suelo ,los dos están en perfecta armonía. Besos:-)
ReplyDeleteGracias Rosa-Maria! ¡Estoy feliz de que te guste también! : O)
DeleteI love everything in this boxes, the walls and floor are superb! the windows, door, the colour scheme. This is a winner!
ReplyDeleteThanks Alex! I hope it gets even better as I fill it up! ;O)
DeleteHi Jodi! The flooring looks amazing! Thank you for sharing your test strips and all the different materials! I would not know what to be looking for in the stores! :( It is really overwhelming sometimes trying to sort through all the possible options! I have never used those brick kits.... but it looks like it works really well! I am amazed at how quickly you have pulled together two really interesting and elegant "backgrounds" for displaying minis! This is really fun and educational to see!!! Now I can't wait to see some of those minis.... Oh, and Ellie and Jim, of course!!! :) Merry Christmas to you!
ReplyDeleteThank you Betsy! I am happy that you found the stain experiment and the build interesting, and especially that it may help you!
DeleteI am working on Jim and Ellie photos, hopefully, today!
Merry Christmas to you, too!
Your experiments re: the various stains is Invaluable Jodi and Thank You for sharing the results.
ReplyDeleteI'm like Betsy in that I have seen it used but have never tried the stencil technique before but you have made it look both easy and fun and it is without a doubt- Effective!
And I have to agree with your final choice for the floor, especially at how Fantastic it's looking with the painted brick walls, windows and door- Fresh, Informal and oh so BEAUTIFUL! :D
elizabeth
Thank you Elizabeth!I have really enjoyed all of these processes so much! Getting to share them is like the cherry on top!
DeleteI really do hope they will make a nice neutral backdrop for the items to be photographed inside. Either way, I know I will learn and grow and with luck, help others to do the same! :O)