So I wanted to have a turntable for the little 1/144th scale dollhouse in my Sweet Christmas Cottage. I went to sleep last night thinking about how the ones they sell for 1/12 houses worked, so I could come up with a design. I figured I'd need a stable base with a spinning top that somehow fit in to it. Here's what I came up with.
Supplies:
Wooden Craft Circles - the pack that comes with three sizes
Wood Glue
Xacto Knife
1/2" Round Handle - from a paintbrush or the like
Sandpaper
Finishing Supplies of your choice
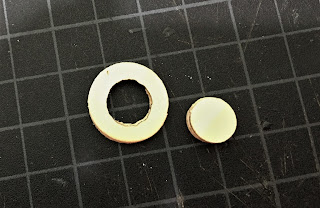
Start with 2 large, 2 medium and 3 of the small sized circles.
1. Trace the small circle onto the center of 2 of the medium sized circles, then carefully cut out with your Xacto knife.
2. Glue the 2 medium circles together. Glue the 3 small circles together. Let dry.
3. Find a round handled object that you can slide your medium circle onto.
4. Attach sandpaper onto the handle with double sided tape, then sand the center smooth. Sand the rest of the circles and round the edges a bit, just to knock off their sharpness.
5. Glue the medium circles, centered, onto 1 of the large circles. Glue the small circles, centered, onto 1 of the large circles. Let dry.
You can simply stain or paint at this point, then move on to step 9.
6. For an aged effect, stain both pieces. Let dry.
7. Dry brush the color of your choice onto the circles, leaving the centers bare as pictured... Let dry.
8. Apply a light coat of antiquing wax. Let dry. Buff to your preferred level of shine.
9. Cut a similar sized chunk of wax (preferably from a scented candle as they contain oil) to the center opening of the top circle. Apply wax liberally. Repeat on the shaft of the bottom circle. Remove excess wax crumbs. This will help the top and bottom circles to spin smoothly.
Place the top onto the bottom and there you have it! Works like a charm! If you secure the bottom circle to the table, and the top circle to the house, it seems to spin nicely and remain stable.
This is a very first prototype, so I am sure you can improve on the design! Like Kris always says - expand on it and make it better! :O)
Have fun,
Jodi


Aren't you the clever little elf! Well done Jodi! ♡
ReplyDeleteThanks, Elizabeth!
Deletesooo clever... !!
ReplyDeleteThanks, Marion!
DeleteHello Jodi,
ReplyDeleteThat was a great way to put the turntable together. It looks just right. Well done!
Big hug
Giac
Thanks, Giac!
DeleteAwesome! I love how it looks and it's so cool that it works too. Working minis are the best.
ReplyDeleteThat is just brilly bobs! I can say no more..... Marilyn
ReplyDeleteThis is a great post and well done you! Cheers, Alayne
ReplyDeleteThanks, Alayne!
DeleteMarvelous! :D
ReplyDeleteThanks Brae!
DeleteVery clever, love the idea!
ReplyDeleteThanks Megan!
DeleteMuy buena idea y muy útil.
ReplyDeleteGracias Isabel!
DeleteOooo clever! That looks great!
ReplyDeleteA bright idea! The turn table is simply fantastic! Thanks for sharing.
ReplyDeleteHugs, Drora
Thanks Drora!
DeleteThis is too cute!!!!!
ReplyDeleteThanks Sam! :O)
DeleteHi Jodi! This turntable is a Wonderful idea!!! You have done such a fantastic job of showing how you made it, not to mention Dreaming it up in the first place! It really looks both functional and pretty with the tiny house! I am going to have to give this one a try! I Love it when people share their creative ideas! Thank you!!! :)
ReplyDeleteThanks Betsy! :O)
DeleteHow did I miss this post? Ingenious! What a clever little mini mind you have. :D
ReplyDeleteThanks Sam! I think I am going to try reducing the number of circles to see if it still functions with a lower profile.
Delete