Search My Blog!

Use the Search box below to find keywords that you're looking for quickly and easily!

Search Feature

Showing posts sorted by relevance for query threshold. Sort by date Show all posts

Friday, December 15, 2017

Eliminating A Trip Hazard


Now that's what I call a trip hazard. And, it just doesn't look very realistic. So what to do? Well, there are a couple options I considered. One was to raise the floor up. The ceiling height of the Duplex Room Box is just over 10", so that wasn't an issue. I could have added some 3/16" floor joists, attached the wood floor to poster board and laid that on top of the joists. Or, I could eliminate the threshold and run the wood floors through the jamb. The only issue then is, how to secure the bottom door hinge, if I still wanted the door to open, and I do. So here's what I did...


Pulled the pin and prevented myself from losing track of it by taping it to the floor.


Poked a pin vice through the original hole to mark the spot for the new hinge hole.


Because the pin hole ended up so close to the edge, I added an extension strip to the doorway.


Then drilled out the hole.


To remove the threshold from the door frame, I clamped it to my miter box and sawed through each side.


I like to tape a scrap piece of wood into the bottom of my miter box. I don't like the using the grooves to hold my wood - it's never as steady as holding it up against the fence. Plus, having the scrap wood underneath prevents me from sawing through the metal, ruining my miter box and my saw blade!


Now that the threshold is gone, there's a gap.


Good place for a kick plate!


I cut and sanded a piece of 1/16" basswood to fit, then added pearls for rivets and a sticker as an embellishment. I painted a base coat of brown wash. followed by an aged bronze metallic coat followed by another brown wash. I dabbed with a Bounty paper towel and it left a cool pattern on the paint.


To install the door, I exchanged the original pin with a nail that was about the same gauge but a bit longer. I applied a little glue to the end of the nail before sliding it into the door, then tapped the head flush to the floor with an awl.


The door closes and opens perfectly and feels very sturdy! This method may present some bigger challenges on a real dollhouse with thicker wood and multiple floors. I guess I'll have to deal with that when I start back in on the New Orleans...


Door and windows finished and installed...


Dusky dark...


One side of the duplex is ready for whatever comes next! But first, the second duplex space!

And maybe, some photos of the Sweet Christmas Cottage with Ellie & Jim?

Back soon!
Jodi

Friday, April 28, 2017

The Word For The Week Is...

The word for the week boys and girls is TRIM. ~T~R~I~M~ TRIMmmmmmmmm...
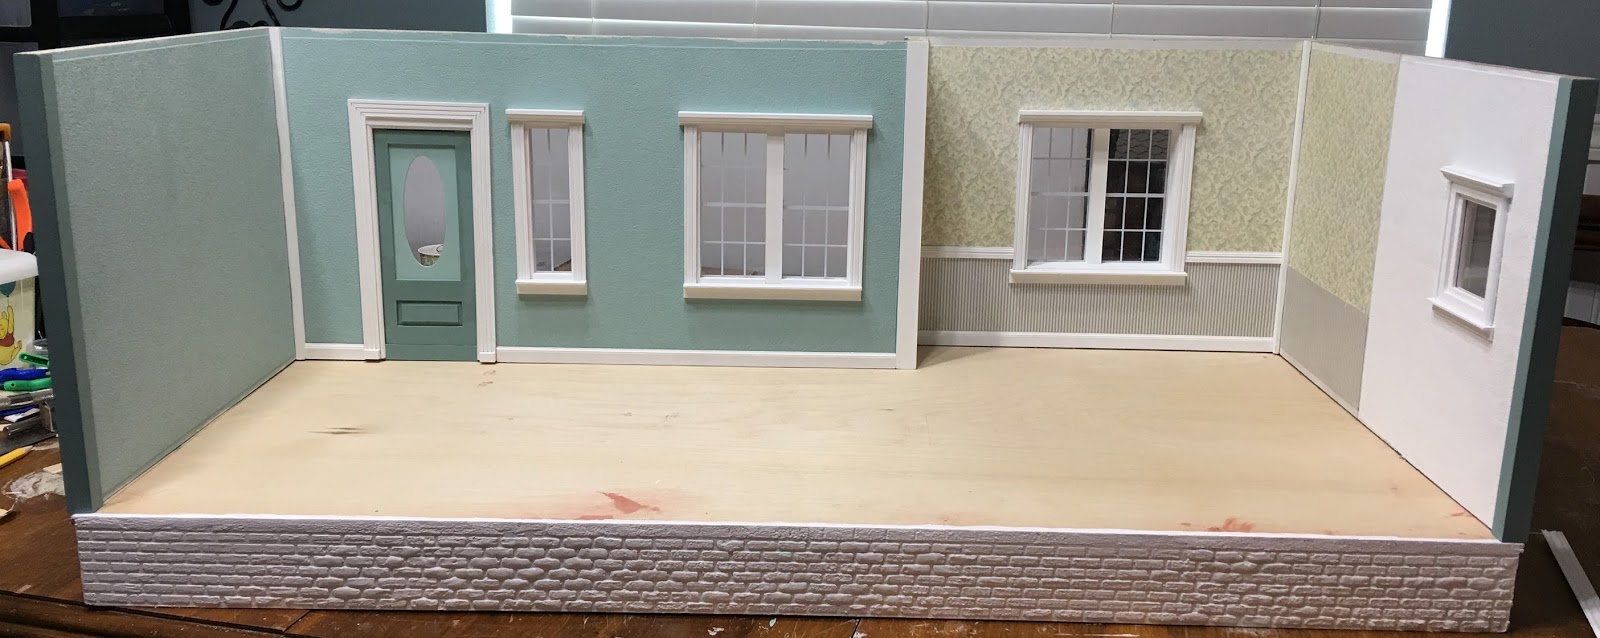
Got the window trim for the first floor installed. I'm kind of liking this Batrie style construction (a.k.a. layer cake) because you can finish stuff off as you go along, and don't really have to contort yourself to reach into the rooms to add wallpaper, trims etc... I studied some window trim photos online, looked at my stash of trims, then made something up as I went along. The funny thing is, in the end, the window coverings will hide a good bit of the effort!


Do the thresholds on mini doors kind of bug you? They don't really look like our real ones, and if the flooring is consistent throughout the house they just seem kind of unnecessary. Except of course if your doors happen to swing using a top and bottom pin rather than actual hinges. If you want them to be operational, you have to make them hinged or figure out how to install a pin up through the flooring below the door. For my front door, I did a little experimenting to see if I could actually get rid of the bulky threshold. I ended up gluing it shut permanently, which is A-OK by me.


This is an old Hofco door I acquired on eBay eons ago. The front door that came with the kit really looked like an interior door. It certainly was not worthy of a kit named the New Orleans. One of the problems Opportunities with using the new door was that it was significantly taller and wider than a "normal" dollhouse door. No worries - Just widen the doorway a little. But, because of the fancy pediment on top, if I installed it flush to the floor the small sidelight window trim got in the way. Another great reason to get rid of the threshold and raise the door to clear the sidelight trim.


To correct the shortness, I added a piece of wood the thickness of the door and the height I needed to make it meet the floor.


Once I painted it and added additional trim pieces to the door, it looked like it had always been that tall! (note that the baseboard trim could now be installed.


I still have to install the outside door trim, but I'll wait until I do the porch flooring. That way, I can slide the flooring under instead of having to cut the flooring to go around. Smart cookie or just made a lot of mistakes experienced? I'll let you decide...


I got as much of the baseboard and chair rail trim installed as I could before actually gluing the walls together. The kit is unique in that it has routed corner moldings which actually join the walls together. The result is corner molding on the interior wherever the walls meet. This makes installing the trim a little tricky. It's great in some aspects because you don't have to miter the trim for the corners on the chair rail or baseboards. But - when it comes to thicker trims like the crown molding, you have to engineer it a bit. More on that in a minute...


So, I stopped there with the trims and moved my attention to erecting the walls and getting them glued and nailed onto the foundation. After all, you can't really miter crown molding for walls that are not even attached together yet.


I thought maybe it might be better to add the flooring before I glued the walls down. Less tracing and maybe accidentally cutting something too short... I had four sheets of Houseworks Walnut flooring saved for this project, and it's a good thing I did. I have a lot of wood veneer sheets, but not many of the same variety. So, small flooring jobs are great, but with this much floor space, I am glad I had them in the stash. Note to self: This is why it is GOOD to stock up when supplies go on SALE!


I ran all of the flooring the same direction as the foundation joists, which in real life is a big no no. But hey - that's why we love minis, right? My house, my rules! This was a lot easier for installation because I did not have to create staggered boards at the seams - a real pain in the @$$ job that sometimes does not go so well. I also had to strain my varnish using a coffee filter. Does anyone else get dried specs like I do? Even in fresh bottles?


I tried the ultra matte finish the first time and it was really blah, so after a sanding I applied a satin. Yes, after straining that one, too! After it was good and dry, I glued and nailed the walls to the foundation. I put the ceiling/second floor on with weights to help everything seat flat. Kind of neat to see how it will look with the next floor on!


Now it was back to trim work. I had to add strips of trim to fill the space between the corner moldings. That way, I could add the crown molding just like any other job.


Until I install the two interior dividing walls, I still can only get so far with the crown moldings.


They are glued together, finally, but I am still in the spackle/sanding cycle for a few more days. It's the drying time that really slows you down.


Meanwhile, I am working on the plans for the new fireplace wall, and will hopefully start on those this coming week.


This weekend my folks are having a huge garage sale. I'll be trying to convince complete strangers that they really need to buy stuff. The more they buy, the less my parents have to take with them to AZ!

Hope you have a wonderful and productive weekend!

xoxo
Jodi

Thursday, February 20, 2020

Pound Cake: Flooring Trials

My prediction last post of trial and error with the second floor flooring was pretty accurate. My first idea was a complete failure, but as these things often go, it was in the learning from that experience that I came up with a new idea to try. Let me state emphatically that the methods for achieving my goals here are probably not the smartest or best use of the technology, but only how I got around the challenges using my limited faculties and on hand supplies. Mostly, I just wanted to "Get 'Er Done" by any means necessary!


My first plan was to create a patterned tile floor in Design Space and use the Cricut to cut it. I was going to use chipboard in two thicknesses, a thinner one for the "grout" lines and the thicker for the actual tiles. I was planning to paint the tiles but did not know at that point whether or not I would actually grout the tiles in the traditional way, or just suggest grout with an offsetting color. But first, I had to design and cut the floor.

I found a tile design online that I thought would be nice for the small corner powder room and was also in keeping with the old time style of the building. It is made up of  honeycomb shaped tiles, so I found a similar clipart pattern online and imported it into Design Space. The grout lines of the image looked to be about the right thickness and proportion.

Powder Room Tile Inspiration
Honeycomb clipart

From there, I took careful measurements and created the shape of the bathroom floor using the shapes available in Design Space. Then I filled in the honeycomb pattern, incorporating a rectangle border which, hopefully, won't be completely covered by the baseboards. The powder room door's threshold will be on the diagonal line and will partially cover tiles here, too..


My first cutting attempt on .37 mm chipboard told me I'd have to rethink my plan. It takes so many passes with the knife blade to cut through the chipboard. Having the tiles so close together to create a 1/16" grout line causes a mess of delamination of the cardboard after only a few passes.


Back to the drawing board. What if I used a much thinner material that only required one or two passes, like kraft board? Would there be enough of a height difference from grout to tile to look authentic enough? I just happened to have an almost new pack of Cricut Kraft Board in a sample pack which contained 30 sheets of white, black and natural. This seemed worthy of a try, especially the prospect that with black grout and white tiles, I may not have to paint anything at all!.
The kraft board cut perfectly with only two passes, the default setting for Kraft Board in Design Space. It also calls for the standard fine point blade instead of the knife blade. I was able to cut the backer board in natural, the grout lines in black and then the tiles in white. I printed the white tiles twice so that I could double stack them to make the grout lines deeper.


Laying the tiles was like doing a fun puzzle. Because of the grout lines, each tile fit perfectly into place


Here's the floor sitting in it's place on the subfloor. To give you an idea of the size of the powder room, with square walls it would be 5" x 7". The tiles are 1/2".


Now that I knew the concept could work, I went ahead and created the tiles in the same way for the rest of the second floor. The way I have the space laid out, you come up the stairs into the stove and baking (right) side of the bakery. It is separated by an 8" long wall from the sink/dishwasher and cake decorating (left) side of the bakery.


Since the Cricut will only cut widths up to 11.5 inches, and because the areas of the bakery kitchen will be separated by a wall (made of 3/16" foam core), I divided the tile floors for the rest of the space in sections, though the tile design will be the same on both sides. For the sink/cake decorating side, I cut this shape:


For the Oven/Baking side, it is 15" deep so I had to create an additional narrow strip section and join them after cutting. I made extra whole white tiles to help camouflage the join in the back, but will use some type of threshold in the open doorway between the two sides of the kitchen where these tile pieces join.


I created the tiles in Design Space the same way as for the powder room, only this time I used a square diamond pattern and made the tiles 1" square. I again left the grout as a single layer, the white tiles double stacked, then printed 1/4" x 1/4" square black tiles to apply in all of the corners.


Here are how the floors look just laying on top of the subfloor. Where you see wood now are where the walls are planned. I will do some experimenting with shiny finishes for the tile floors on scrap tiles before I commit to applying anything to the real floors. Better safe than sorry, especially after all of the work to make them happen!


But first, while my daughter and I spend a long weekend celebrating my mom's 70th birthday with her in Arizona, these pieces will be under boards and weights to make them stay good and flat!

See you next week!

xo xo,
Jodi