

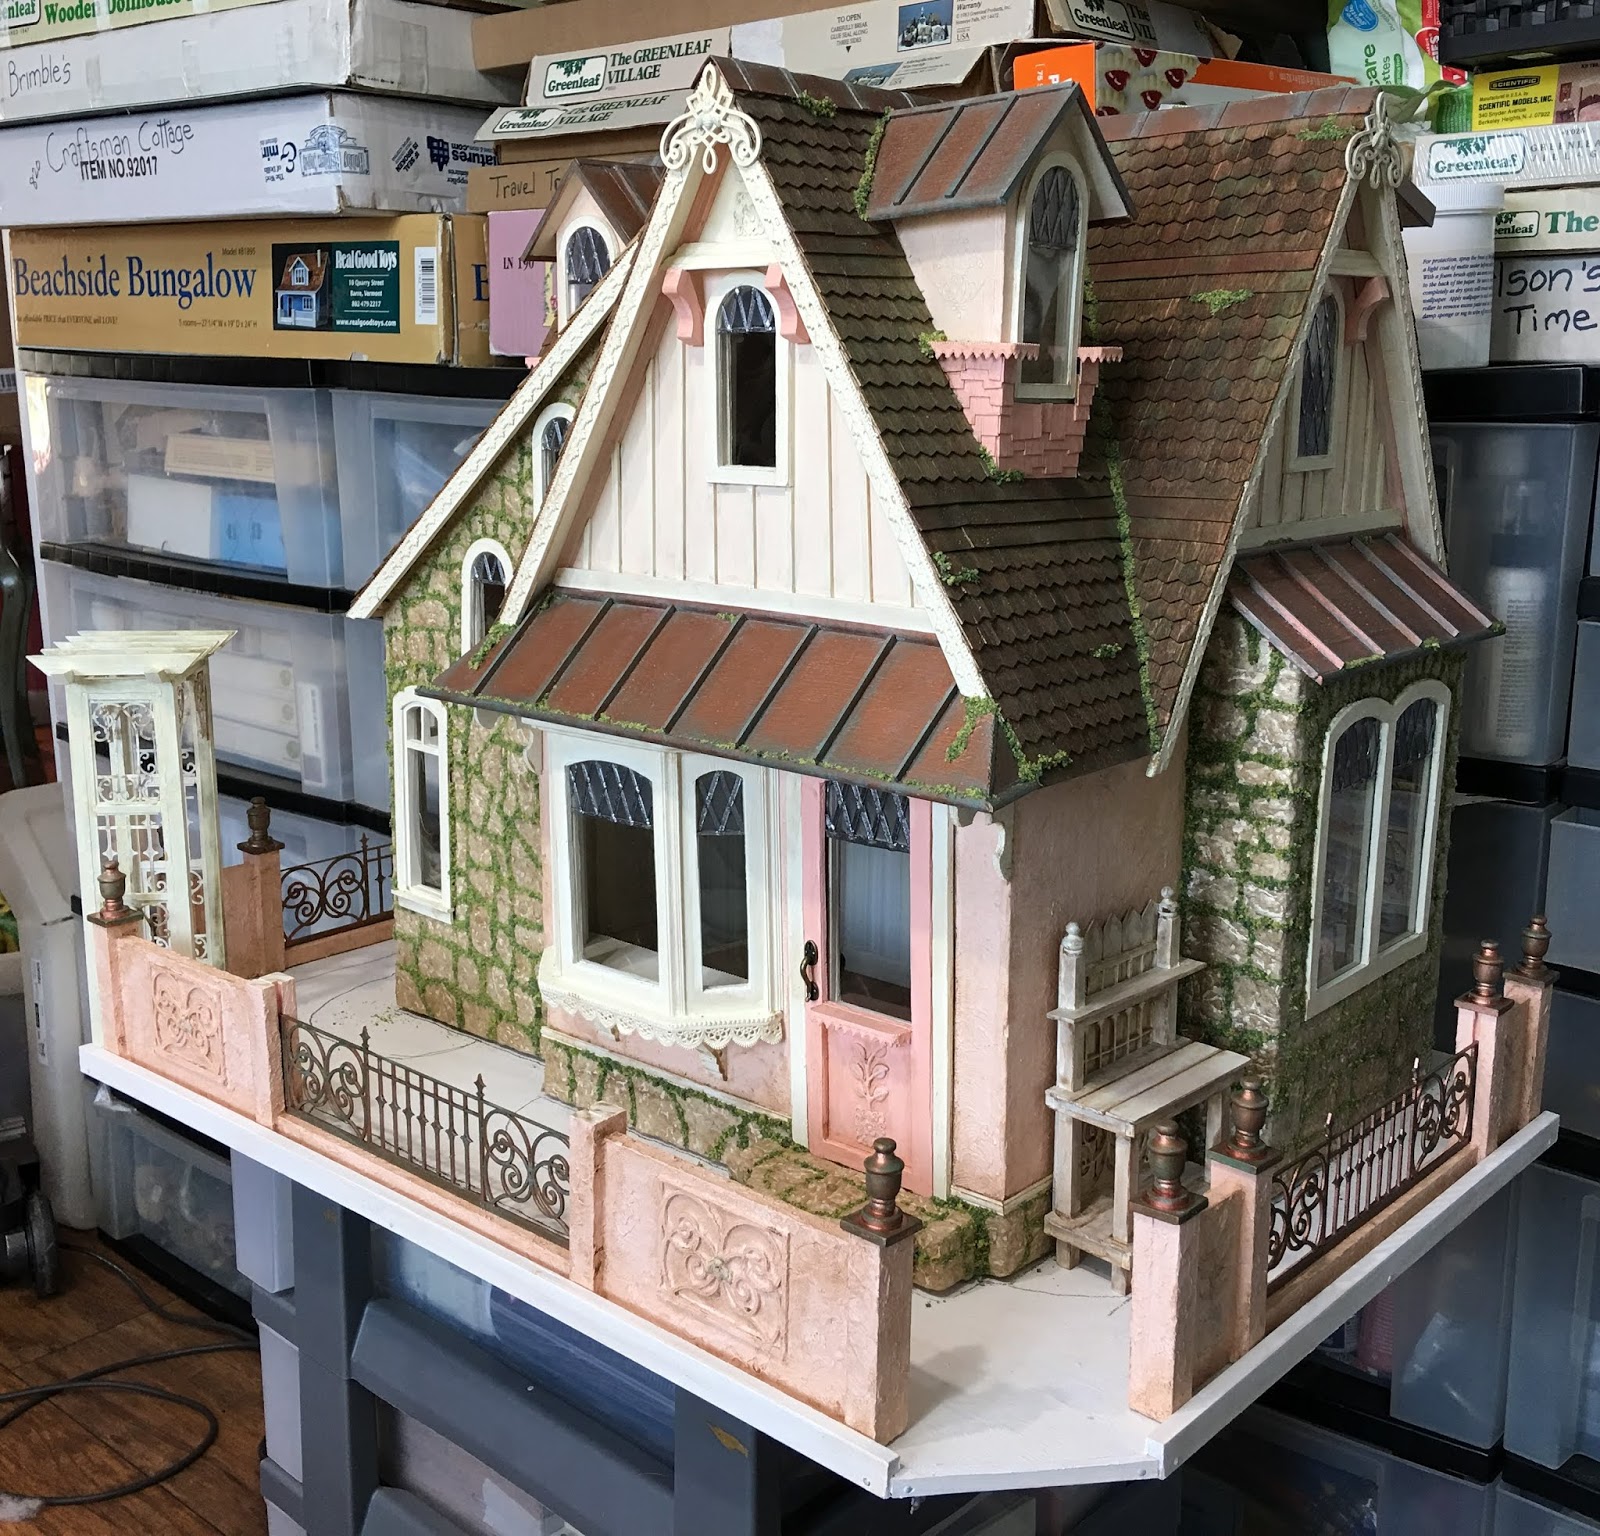
I used a scrap piece of 1/2" plywood and cut it down to size with my scroll saw. The table is an oblong shape, so to save potential bruising when dusting, I cut off the corners. It also gives it a bit of a tea tray shape, so maybe I could add some handles to the left and right sides. I glued 3/4" edging to three sides, and 1/2" to the back (dollhouse opening) and where the gate and arbor will be so visitors won't trip coming into the yard. I secured it further by drilling pilot holes then adding nails. Once that was done I gave it a coat of gesso. Before I permanently attach anything, I'll cover the bottom with felt to protect the table it sits on.

Next, I needed to figure out the fencing. I am trying my best with this project to use up all of the supplies and materials I have (so far) purchased and (not yet) used since my foray back into minis. I've had some JMG Miniatures laser cut fencing in my stash for at least a couple years now, and finally, had an opportunity to use it up. I didn't want a high fence to block the garden, so I cut it in half and framed it with 1/8" x 1/16" basswood.


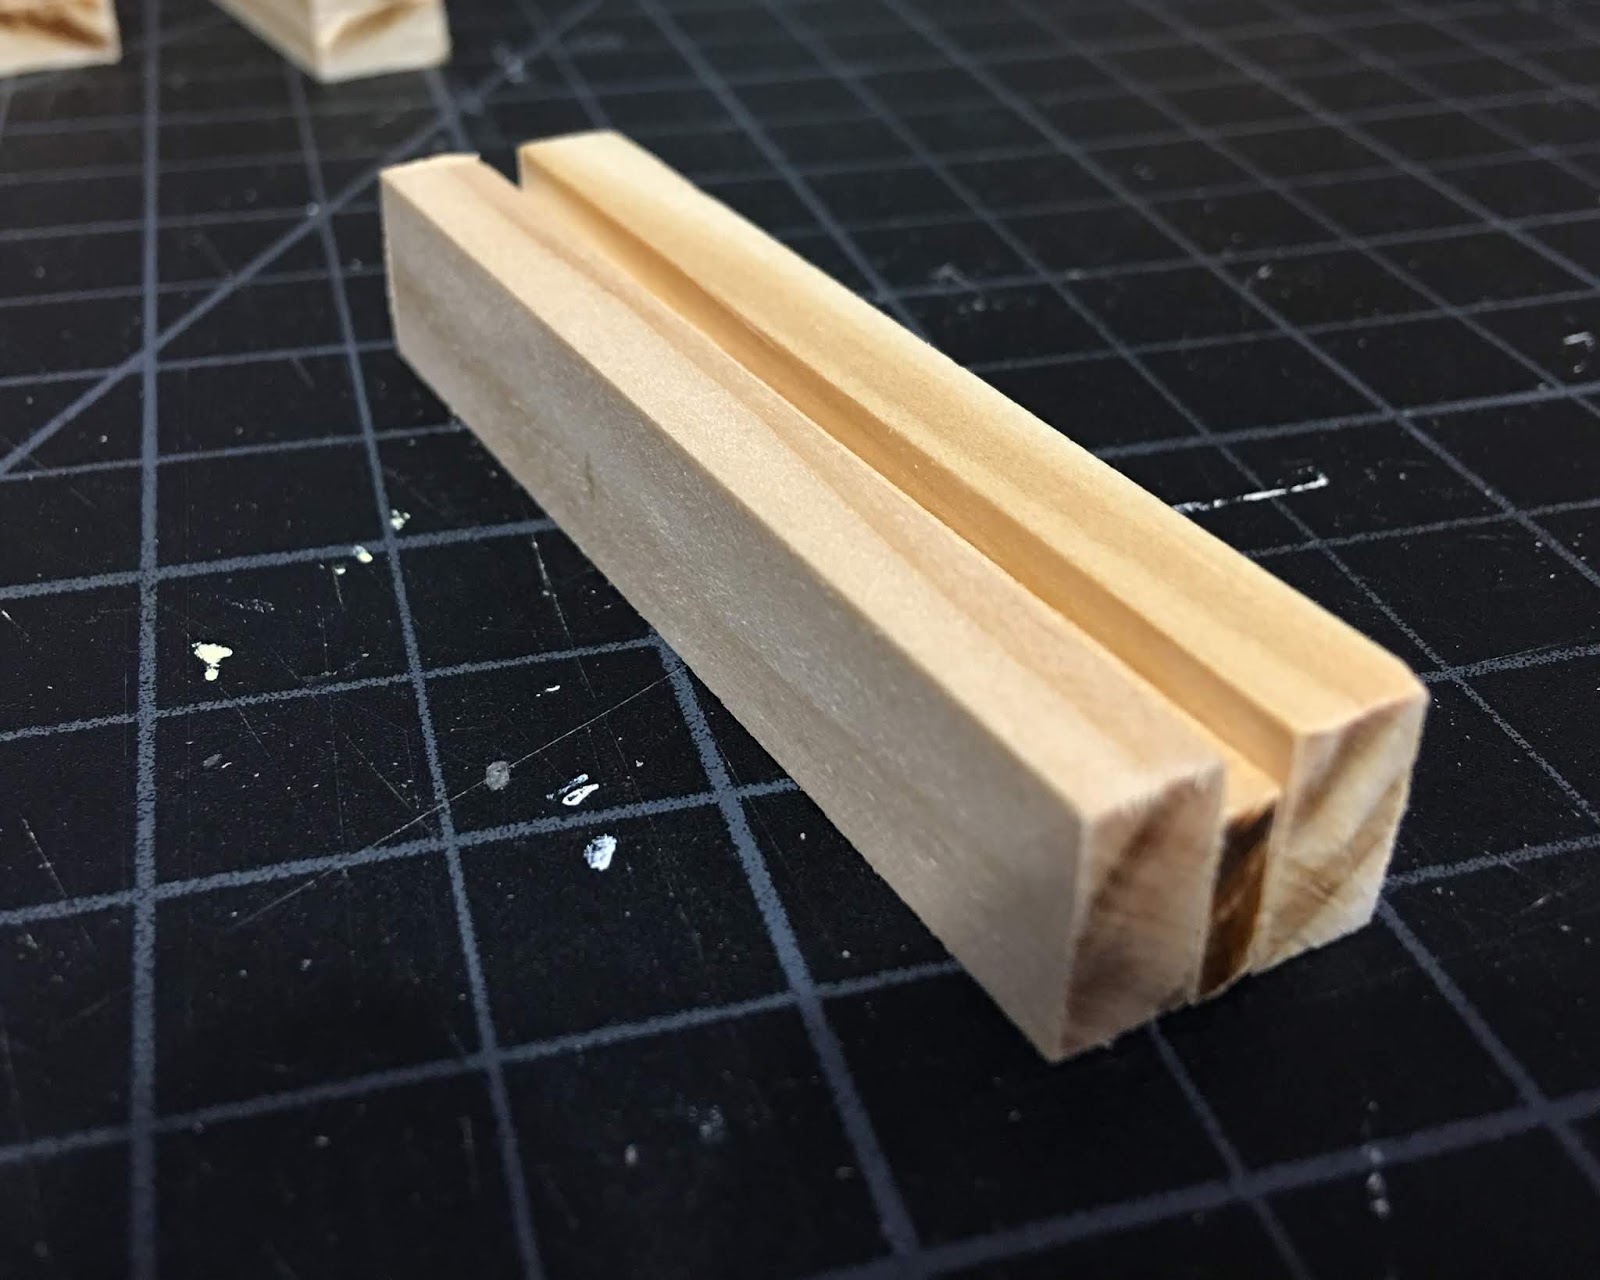
I wanted fancy "copper" fencing framed in with solid fencing on either side, but with so little glue area on the "copper" sections, I needed a way to make them more solid. Santa didn't get me the router table I wanted last year, so I still have to improvise to make dados. By sandwiching a piece of 3/8" x 1/8" basswood between two 1/2" x 1/4" pieces, I create my own 1/8" dado - perfect for my fence to slide into. The bottom rail is 1/4" x 1/4", sandwiched between the two fence posts, and the "copper" fence slides in and rests on top.


For the solid sections on either end of each fence section, I used 1/4" scrap basswood and added another fence post to each end. There was enough gluing surface here so that these posts do not need dados. To the two outside side sections, I added the tea tree embellishments. To the two outside front sections, I added some of the left over laser cut fencing - the other half of the "copper" sections. These each got a bee embellishment. Each post also got a cap and a finial.


I underpainted each of the solid fence sections in Cameo Blush, then treated them to a layer of stucco. The "copper" sections, as well as the post caps and finials got a treatment of copper leafing pen.


I'll share photos later in the post of the completed and aged fence sections, but first, the arbor. I've been looking for a long time at many of the pre-made and kit arbors available in 1/12th scale. None of them really excited me, and not really knowing how much space I had, I was afraid to order one and not use it. That's how I got so much stuff in the first place! So, staying true to my "use it up" plan, I made my own, custom fit for my opening - 2-5/8". And, I saved myself $20-$30!
I printed off a photo of a pre-made arbor with a basic design, just to see how everything fit together. Then, using more of my leftover fence pieces, I made a fancy panel for each side. I was able to dado the top rails using my scroll saw so that the roof slats sat firmly in the grooves.


To make it's finish commensurate with the cottage and garden, I first colored all of the wood with a brown ProMarker. So much nicer than oily, nasty stain! Alcohol inks would work great here, too. Just have to work fast because the alcohol inks evaporate so quickly. Just squirt out a little at a time in a disposable cup to work with. After that it got a good coat of Vintage White, let it dry, then a coat of DecoArt One Step Crackle. Once that was dry, I gave it a good coat of a mixture of Folkart clear and antiquing wax. Whatever reaction the three products had together, it gave it a mossy, peeling paint, worn out sort of look. I love it!
 |
| Before aging of arbor and fence sections. |


The opposite corner of the landscape board will have a simple gate. This will be the more utility area - the perfect spot for a potting bench! I saw the real life blue one pictured below from Flower Patch Farmhouse, and there was just something so simple and cute about it. It looked easy enough to make, and like another opportunity to use up some more of my laser cut leftovers! It's just a simple frame made with 1/4" x 1/4" basswood as posts and support pieces, 1/4" x 1/8" basswood for skirting, and 1/2" x 1/16" basswood for the fence slats, shelves and bench top. The leftover fencing pieces are what I based my width on, and the overall measurements are 3" wide x 5-1/2" high x 1-1/2" deep. The bench top is 2-15/16 high. The knobs on the posts are leftovers cut from a headboard that I recovered in fabric a few years ago.


And here it is after getting the same aging treatments as the arbor. I can't wait to accessorize! Oh! You can also see the fence and finials with their verdigris and patina aging treatments.


Next up will be the planters. I'm still mulling designs for them in my mind. Ideally, they'll be removable for planting, and so they can be out of the way for the grass? cobblestone? paver? installation. Meanwhile, I'm still contemplating a compass point, where the moss should grow, how to proceed with the aged copper roofs. And do I really care that sun loving and shade loving flowers should be in different areas? It is only a make believe Storybook, after all!
May all your decisions be easy ones, and may you always make the right choice! :O)
xo xo,
Jodi
wow! this is getting better and better, jodi :-)
ReplyDeleteThanks Marion! Can't wait for the next update on your build!!!
DeleteI love that fence! Gorgeous! And the arbor and potting bench are just beautiful. Truly a testament to your creativity!
ReplyDeleteI really enjoy how the copper is aged on the fence. Just enough to show but not enough that it's totally green.
Thanks Sheila! Somehow, the fence and finials were less intimidating than those roofs!
DeleteYou are doing an amazing job! Love all of it so far. I can’t wait to see it finished.
ReplyDeleteThanks Cathy! Though I'm having a lot of fun with each part of the project, I am excited to start adding flowers to the outside and treasures to the inside!
DeleteI'm falling In Love with your cottage EVEN MORE...
ReplyDeleteif that's even possible❤️
Awwww... Thanks Elizabeth! 💕
DeleteA big WOW!!! I love the fence, I love the arbor and I love the photos. All beautiful and perfectly in style. It gets more amazing with progress. You are so creative and inspiring. it's good our miniature world has talented persons like you.
ReplyDeleteHugs, Drora
Oh Drora I am so glad you like everything! And you inspire me so much, as well! Soon I'll be perusing your blog for making the egg carton planters! I hope I can do as nice a job as you do with them!
DeleteFabulous addition to the cottage. Love every little thing you've done. The aging on the copper finials (and wood) look great .... so similar work on the roofs??? I do think there is too much moss on the walls of the house. Rub most off it off and then dirty up what remains between the stones. Old mortar between stones always gets 'grubby' and often has a very tiny dirty looking algae growing on it. Every other single thing is just beyond perfection for me. You have such a clever brain/eye for seeing the potential in bits and bobs and how to use them.
ReplyDeleteThanks for the excellent ideas and encouragement, Marilyn! I rubbed all I could with my finger, and am contemplating the "grub" you suggested for some of what's left. If I've learned anything here, it's to seek advice and think before I act whenever I am unsure.
DeleteHello Jodi,
ReplyDeleteI am just enchanted by these pictures. The fencing is absolutely perfect for the style of the house. Everything works so well together. The finishes and the ageing are fantastic and while the build look so realistic, it has such a fairy tale feel to it. I am in love with it.
Keep up the amazing work.
Big hug
Giac
Thanks so much, Giac! It is ending up so much more Victorian than I originally intended, but I'll just keep going with the flow. I'm so happy that you like it! I can't tell you how great it feels to assuage some guilt by using up the vast materials I already have on hand. A lot of which was readily available and Victorian style.
DeleteHow wonderful to come online this morning and see your house with that beautiful fence! I love how you have taken all the little bits and make them come together so elegantly. The aging is perfection! Sounds like a lot of steps, but the result looks so realistic. The potting bench is adorable, and really fits the space where you've placed it. Great additions to your home!
ReplyDeleteThanks Deb! I'm happy that you like everything, because I debated with myself so much over just plain picket fencing etc. Rummaging through the supply drawers and finding the laser cut fencing lead to where they ended up. I hadn't originally planned on a potting bench, but once I started looking, I was compelled to make one!
DeleteThe garden will be a magical place because you have such vision when it comes to design and the the ability to follow through with just the right products and tools. You should write a book. I thought the cottage was amazing, and with with a garden, it will be award winning. Can't wait to see how you fill it with plants. I also visited your store. I love that you creating miniatures, especially the shower parts. My next project will be a rustic cabin with an outhouse, so I won't be needing shower parts, but I am also building a house for my 6 year old granddaughter and I'll talk her into a shower. Your shower pieces are much needed in the mini world.
ReplyDeleteThanks so much, Ann! I am so glad you like the idea of a garden for the cottage, and though it will be small, I just had to have one!
DeleteWhen I very first got back into minis (after nine years away), I made my dad a fishing cabin that was also a lamp. It was a tremendous amount of fun, and I loved working in that style! You're going to have so much fun with it!
I am so green with envy that you have a granddaughter to work on minis with! Absolutely no one in my physical life cares about or gets minis at all! And there is no hope in sight of grandkids for me. Treasure that time together!
We are so lucky that more and more people are designing contemporary things for dollhouses, and Shapeways is a great way to get them!
My cabin is a childhood memory, my grandmother's log cabin built in the late 1940s, early 50s by my grandfather and family and friends. She named it Shangri-La. I have such wonderful precious memories that I am going to build a replica. I have been collecting furnishings. Of course I'll be blogging about it. Lily's dollhouse arrived today and she found it on the front porch. I haven't unboxed it yet, but she will be very hands on--the other two--her sisters--aren't all that interested. I love you houses and I admire your work and I learn so much from you. Thank you for your kind response.
DeleteHow wonderful to memorialize the family memories from Shangri-La in miniature! I'm looking forward to watching your progress, and have added your blog to my blog roll so I won't miss a thing! Now I also get to catch up!
DeleteI bet she was so excited that it arrived, and probably won't stop bugging you to get started on it! 😊
Thank you for your kind comments! I am so blessed to have such wonderful and supportive fellow mini friends!
¡ Wooo fantástico trabajo¡, será un jardín de ensueño.Feliz fin de semana:-)
ReplyDeleteGracias Rosa Maria! Espero que así sea, pero ¡tengo muchas flores y plantas para hacer!
DeleteSimply so very, very pretty! I have been enjoying the snippets on Instagram but seeing it all together and how you made it is just awesome. The 'stash-bash' and use up approach so inspiring.
ReplyDeleteHappy gardening.
Anna
Thanks Anna! It feels really good to be using up some things, and it forces you to get really creative, which in the end is so much more satisfying for me.
DeleteI really love it! It inspires me to start thinking about the garden for my Willowcrest although I am not to that stage yet.
ReplyDeleteI love the feel of the cottage and garden and I look forward to the planters etc...
Hugs,
Véronique
Thank you, Veronique! You can always think and plan and dream, no matter what stage you're at! That's what pushes me forward - the next fun thing!
DeleteI am looking forward to filling all the planters and flower boxes, but not so much the flower making. It takes sooooo long!
I absolutely adore your fence and the potting bench. I can see the garden in my mind's eye already.
ReplyDeleteThanks Megan! I hope I can make the most of the limited footprint!
Delete¡Es precioso! Cada uno de los detalles: valla, entrada , la mesa de trabajo hace que todo resulte encantador.
ReplyDeleteGracias Isabel! Es muy femenino, y así es exactamente como quería que se viera toda esta cabaña. ¡Estoy tan feliz de que te guste también!
DeleteYour work is absolutely beautiful.
ReplyDeleteThank you, Polly! There is so much inspiration that comes from other miniaturists like you! I love your bathroom, especially the wallpaper, tile floors and vanity! Just gorgeous!
DeleteLove what you’ve done 😉. Do you have a tutorial on how to make the Trecal (Sorry for the spelling I hope you know what I talking about)
ReplyDeleteHi Marie - Thank you! I don't have a step by step tutorial, because most things I make up on the fly, and half the time can't remember what I've done. I think you may be asking about the arbor? Is that correct?
DeleteWoww...Un patio fantástico para una gran casa. Estoy deseando verlo terminadol.
ReplyDeleteUn abrazo
Gracias, Marian! Estoy deseando ver todas las flores, ¡pero no las estoy haciendo! : O)
Delete*Swoon* Oh my, this project is utterly GORGEOUS!!!!!
ReplyDeleteEverything is stunning and my jaw is on the ground.
Hats off to you..... I love it!
Thanks, Sam! :*
DeleteOhhh! What can I say? I love everything you do! You are becoming very good at ageing things, they look fantastic! This house is becoming one of my favourites with all her little and gorgeous details. It amazes me your ability to put things together to make extraordinary pieces. I am very excited to follow this part of your built, gardens!! I love them, and small and all I know you will make wonders with this one, it is happening already.
ReplyDeleteThank you, Alex! I hope I don't disappoint you when it comes to making the garden and flowers! I have pretty limited experience, so this will definitely be more ambitious than my skills are ready for!
DeleteOh, how great work you have done!!! Regards from Finland!
ReplyDeleteHi Kristina! Thanks so much for your lovely comment! Your needle work is beautiful, and I have added your blog to my list so I can catch up!
DeleteI could look at these pictures for hours - it's amazing what you've done out of the materials you had at hand. The fence (thanks for the wonderful pictures how you've done it), the arbor and that stunning potting bench - pure beauty, but still friendly and inviting. And according to my opinion you should hurry to get yourself some handles for that base - it's a great idea to give the base the appearance of a tray. Not only that it would fit perfectly to the whole story behind your awesome cottage - but it would also be handy for carrying. ;O)
ReplyDeleteGreetings
Birgit (who's looking forward to see all of this in bloom)
Thanks so much for your kind and thoughtful comments, Birgit! It's a lot of fun to try and come up with functional things from pieces of leftovers. I may just have some handles around here somewhere...
DeleteYour fences look spectacular. I love the finish on the trellis . Can’t wait to see the garden spilling over with flowers.
ReplyDeleteThanks Keli! Me, too, though I am not very good (or patient) at making flowers!
DeleteHi, Jodi - You are so right about the sacrifices that have to be made due to space limitations, but your garden area doesn't seem at all crowded or "squeezed in." It was a brilliant idea to cut off the corners of your base board; I love the way the angles lend so much more interest. I also am impressed with your ingenious idea for creating the dados for the fencing - that works beautifully! All the embellishments that you've added to the fencing look just right. In fact, the entire fence is so well done, including the details and the colors, that it all works together to create the perfect fence for this cottage - like something right out of a storybook! I can hardly begin to tell you how much I love the arbor and the potting bench. You've done amazing work on both, proving once again that your talent and your skill surpass the usual and the ordinary. And you make it seem so easy! Thank you for the information you provide about different products that you use - I tend to fall back on the same old things instead of looking for something new and different. Now I'm motivated to explore some new possibilities! I'm looking forward to your next post.
ReplyDeleteMarjorie
Thank you, Marjorie! It makes me happy that you like the fence, arbor and potting bench! It's a lot of fun for me building things, and figuring out how to make them work. The problem is, they are usually done in single pieces, and such a long time between them and the next idea, that I forget how to do things. Ah well, it's just for fun!
DeleteI have never gone to art school, or learned properly about materials and products, so I tend to try a lot of new things. When I read about or see a new product, I have to try it. I learn by doing, so I make lots of mistakes, but it's all part of the fun. I hope the next post won't be disappointing!
Dear Jodi, I LOVE love love love love what you are doing with the garden!!! The walls are just gorgeous! They have the right amount of lacy and open mixed with solid and formal! I think the mix is Brilliant!!! And the lovely adornments on the solid parts are just one more layer of delicacy.... the icing on the cake of this utterly charming property! And the way you built your own arbor..... I have been planning to do a similar thing for the Folly Garden entrance... I have a wrought iron one... but it just doesn't fit right! So now I know where to come for a good tutorial! LOL! And the potting bench....!!! Oh My Oh My I want one of those!!! You are just pulling out all the stops on this build and I Love every little bit of it! And I must confess that I am starting to love your "moss gone wild" stonework... especially with all the visual interest in the foreground... I don't think you should change a thing!!! See... you knew it was the right thing to wait and see! Keep up the wonderful creative awe inspiring work! :):)
ReplyDeleteThanks so much, Betsy! It makes me so happy to know that you like everything! The arbor and potting bench are really a simple design, and with your creativity, artistic and building skills, the Folly is sure to be adorned with gorgeous versions of your own making! But if you really do think a tutorial would be useful, I'd be glad to do it. And the moss really is growing on me, too, lol!
ReplyDeleteHi Jodi, the softened corners is really such a smart idea. I have so many knicks and bruises from bumping into these projects! The fencing is beautiful and I love the copper colour. Your small landscaping trick has given me hope that maybe I can squeeze in a small outdoor space with my build. I think it would be so fun, especially to make an arbor like you did. I can’t wait to see all the plants and greenery. As always you’ve aged and weathered these new additions to perfection, it looks simply lifelike.
ReplyDeleteThanks Kristine! I am constantly littered with bruises from banging and bumping into things all of the time, so wherever I can avoid it happening, I do! My right arm is currently completely scraped up, and I can't remember why!
DeleteYou can definitely add a small landscape board to your project without making it much larger. The landscaping just adds so much charm, even if it's just a few shrubs under the windows! And with your design talent, you could create a stunning arbor to laser print! I super hope you do!!!
I have no idea what I am doing with the aging, as Russ would say, I'm just spitballing! But thank you!
This is amazing, I love your cottage!
ReplyDeleteThanks Ketsia! I'm so happy that you're here!
Delete