Search My Blog!

Use the Search box below to find keywords that you're looking for quickly and easily!

Search Feature

Sunday, April 29, 2018

A Little News...

I know - I missed my "usual" Thursday night post, but I swear I've been working! I'll post some progress photos in the next couple of days on the Storybook - I got it primed and papered this week...


But for today I'm mainly just here with a little news.

I decided that I would like a little mini money in order to buy a couple special pieces for the Storybook Cottage. So, I have listed five of the vanities on eBay, with plans to list an additional five next week and again the week after. I have no idea what to ask, so I gave a ballpark Buy It Now in case there is a soul out there who just loves a particular one, and then the option to bid with an opening of $.99 in case my ballpark was way out in left field! ; o)

Here's the listings link:

https://www.ebay.com/sch/m.html?item=123106878822&ssPageName=STRK%3AMESELX%3AIT&_ssn=tiny-little-smithy&_sop=1

And here are the first ones going up...


And if anyone wants to share where I might find some good artisan teapots, I'd appreciate the scoop. Seems like everyone took everything to Chicago, so they'll be thin pickin's for a while.

Back soon! Promise!

xo xo,
Jodi

Thursday, April 19, 2018

The Storybook Cottage Facade Remodel Is Complete! I think...

When last I posted, I was thinking about popping out a dormer on the back roof to maximize the limited usable space in the upstairs. Well, the thinking turned into doing, and now I believe I have a functional floor plan!


I began by staring again, at the back roof,  for a long time, until finally I understood the solution. I wanted to maintain the roof line of the gables on either end, so by slicing out a middle section I could keep the gables and have my dormer.


Left at this angle, it would have made for interesting architecture on a more modern structure.


But to keep with the cottage-y feel, I cut down the new dormer wall to get an angle more in keeping with cottage style.


Then it was just a matter of making another template from paper to get the right angles for the side walls.


The new MicroLux table saw that Russ gave me for my birthday, as well as the trusty Dremel scroll saw, has made quick work of all these cuts! The 1/8" basswood pieces are easy by hand with the grain, a little more difficult against the grain, but the kit plywood seems to have petrified! I would have given up trying if not for the power tools!


With the dormer finished, the next thing to tackle on my list was the interior walls. I started with the wall that divides the living and dining rooms from the kitchen, replicating the rounded doorway. The appliance stand ins lead me to believe that my resident will have a nice and functional kitchen space.


Next up was the wall that divides the bedroom from the bathroom upstairs. With more usable floor space and a new vertical wall, the bathroom seems totally adequate for a small cottage.


The bedroom will also have more usable space than I had hoped for! The captain's bed that came with the kit is super cute, full of awesome finishing potential, and fits the space perfectly!


There is even room for a dresser and a comfy chair on either side of the bathroom door!


So with these final additions, the structural changes are completed, and I can begin the priming and finishing of surfaces! I think...


Thank you all for the lovely comments and encouragement during the first phase of this project! I hope, like the beginning, it's going to have a Storybook ending! :O)

xo xo,
Jodi

Tuesday, April 17, 2018

The Storybook's New Facade

As you can see, the remodeling of the Storybook kit has continued. A dormer on the right side of the front attic, new windows for the stairwell, and the upper windows of the house have been rounded to match the rest.


Can you still recognize the original?


I continued adding tabs and retrofitting the parts of the kit with new pieces of wood, filling in unnecessary slots, as well. All to make the new plan fit together as smoothly as possible, even adding bracing under the floor for added stability. This will be nice when I get to the final fitting and gluing stage - the floor sits on it's own so the slots in the walls aren't the only support. Ever had a wall come crashing down while trying to glue? Me too, but no more!


I worked a lot on the stairs, the stairwell, and the doorway openings on either end - both rounded at the top to keep with the cottage-y theme. The display shelf is placed strategically across from the upper stairwell windows so you can get a peek. It was very tricky to get all of the angles right, so a good deal of finish trim work will be necessary.


Peek~A~Boo stairs - I can still see you!


This is how the inside looks with the new additions. I got the base for the living room window seat/sofa started - three perfect basket cubbies!


The interior floor plan is a little too open concept for an old cottage, so my next step is designing/building/installing some interior walls. I think I have the first floor figured out. The boxes and furnishings are stand ins, of course!

Looking from the front of the house

Looking in from the back of the house

The upper level is going to be much more complicated, given the limited floor
space and the sharp angle of the roof.


I'd like to use the furniture that came with the kit and see what I can do with it. I'll get the captain's bed taped together to determine size and placement, then figure out wall and arrangement for the bathroom. It probably won't be ideal, but I'll do my best!


Maybe a completely dormer-ed back roof? Hmmm...

Hope your week is off to an inspired and creative start!

xo xo,
Jodi

Thursday, April 12, 2018

Going Organic...

After spring cleaning for days, followed directly behind making vanities for months, I felt as though my creativity was withering on the vine. So, without premeditation, thought or plan, I broke into the Storybook Cottage kit. And I have to tell you, I've been bombarded with ideas and filled with pure joy all week! This is exactly what I needed!


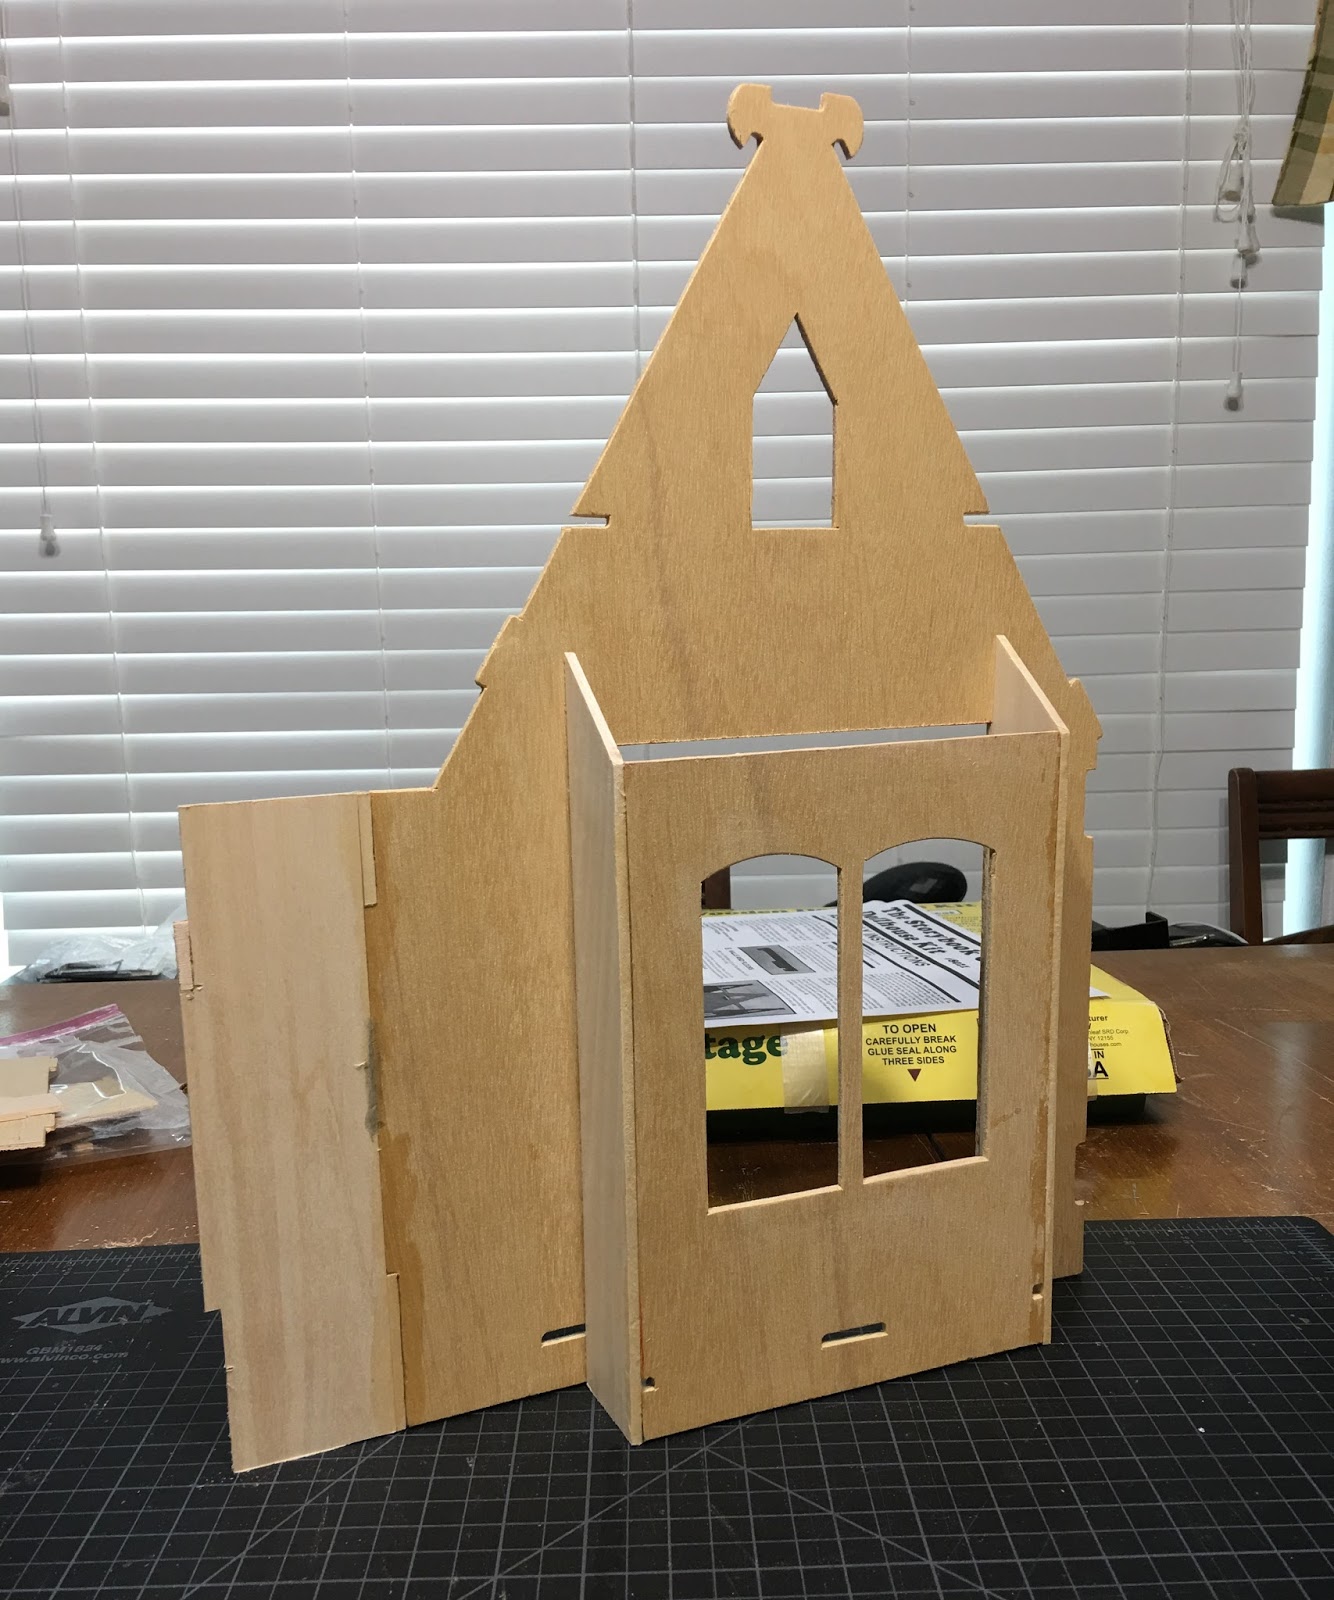
Of course I can never leave well enough alone, and the original floor plan had some issues. First, the house has a cavernous first floor but an "attic" space that no miniature person could stand erect in. I think the kit is intended to be a store, but I bought it thinking of an English Cottage where the elderly female resident loves a good cup of Rosey Lee (tea). That means it needs to be a fully functioning home complete with living area, kitchen, bedroom, indoor bathroom and of course stairs. But where to put the stairway and how to gain more ceiling height upstairs? This lead to many changes - exciting ones, and instead of planning myself to tears, I'm going organic. Meaning: denoting a relation between elements of something such that they fit together harmoniously as necessary parts of a whole. and/orcharacterized by continuous or natural development.

Kit box photo - Extremely Tall Main Floor, Very Short Attic Height


After considering many options for stair placement, I began by adding two inches to the front of the floor plan. This would allow floor space for a staircase without taking away from the living space. More on the stairs later...


Other improvements came to mind once I had the first dry fit going. The right wall has adorable rounded windows, but it could be better, right? I saw an opportunity to bump out the wall, adding visual appeal to the exterior plus a built in window seat/sofa on the interior. Added space and cuteness!


The left wall has a nice bay window, but wouldn't washing dishes be much more enjoyable with more room and a view? So, I added about an inch and a half to the depth which presented a perfect opportunity for built in shelving. I raised the windows so they'd be just above counter height. Actually, I made the whole opening taller by about two inches, adding basswood to the bottom of each bay. This will become the kitchen sink area.

Kit Box Photo With Original Bay Window Configuration


To lower the floor by two inches, I simply added 3/8" basswood strip on each of the three main walls. Notice how much head room is gained - the original floor would have been right at the bottom of the attic window openings.


Then, because the floor sat lower in the apex, I needed to add strips of wood to extend the floor. Making these changes has netted me 2 additional inches of floor space in the front attic dormer and 1-7/8" all across the back opening. I also had to add strips to the sides to widen and meet the roof walls.


The front roof needed an addition to accommodate the new stairwell. That was a real brain teaser because it would have to meet two angled roof lines and be tall enough so a 1/12th person's head could clear the ceiling while climbing the stairs. I pondered this in my head for a couple days, then finally got out some cardboard from a cereal box and played around. Sometimes it helps just to get a good visual. This was the rough configuration I settled on:


Then I used the paper and tape method to create a template. I didn't have any 1/8" pieces of basswood that were wide enough, so I laminated some scraps together slightly larger than the template. It was a little trial and error, but finally I got something that I think will get me 90% of the way there.


Once the roof addition was finished, I needed to make the new front wall to fill in the space. I used the paper template method again, folding it over the angle of the new roof piece. I had a big piece of leftover Greenleaf 1/8" plywood from when I bashed two kits together in 2015, so I was able to recycle that for most of the wall. The MicroLux table saw has paid for itself with all of the cuts I've had to make so far!

I made a dormer window to fill in the area above the new roof line, and I'll add a couple of the windows I bought from Auntie Em's in Glendale AZ last year to brighten the stairwell. Here's the new elevation so far...


The next step will be to finalize the ideas for the stairwell. That means cutting away part of two roof sections then building the interior wall. I don't foresee gluing walls together any time soon - with all of the nooks and crannies inside this little gem the "decorate as you go" method might be the best way forward. But who knows - I am just flying by the seat of my pants with this one and loving every minute of it!


Let's just see where this goes...

xo xo,
Jodi