Search My Blog!

Use the Search box below to find keywords that you're looking for quickly and easily!

Search Feature

Monday, December 18, 2017

Brick Walls & Experimental Wood Staining


In keeping with the rustic feel of the Duplex Room Box, I decided on a brick wall treatment for the second shop space. I like the quick results I get with the Magic Systems sticker and mortar kits, so that's what I used.


I want the look of painted brick, so my "grout" and bricks will be warm white. Normally, the under color will end up being your "grout" color so most people use gray or white on the walls and get the kit with the red mortar powder. I got the kit with the white mortar so it would be easier to paint over.


It's kind of fun putting the sticker stencil on. I pre-peel the brick waste cut outs from the backing paper. I've learned from experience that if you don't, they sometimes stick to the stencil while you're peeling and it causes moments of panic that just aren't necessary. Better to mindlessly remove them while Netflix is on.


I actually forgot to take photos of peeling off the sticker - bummer because it's a fun and gloppy mess to look at! Then, I forgot to take photos before I painted the bricks. :o/

I end up with some rough edges on my bricks from when I peel the sticker stencil away. I solve most of this by letting the bricks get almost dry, then just gently rubbing my thumb and finger over them. It works great! I did manage to touch a couple of spots before they had set and kind of messed up some bricks. Notice the lower back corner area on the photo below. Oops!


I thought it would be fun to experiment with some different products for the wood floor (I am using the same Houseworks wood floors I used in the first shop). I took a scrap piece and tested the following products:

  1. Minwax Stain Marker, Provance
  2. Ranger Alcohol Ink, Pebble
  3. Ranger Oxide Re-Inker, Vintage Photo
  4. Ranger Oxide Re-Inker, Walnut Stain
  5. Ranger Distress Stain, Hickory Smoke
  6. India Ink & Isopropol Alcohol


I have used the Minwax stain pen a few times and always really like it. The color was a little too dark and too brown for the look I wanted for this room. But it is a good product, it is not water based so it smells, but that also means it doesn't cause your wood to curl.


The alcohol ink was really interesting! I love how it colors the wood and am definitely going to do more experimenting with it. I think it might be great on wood furniture. Getting color without adding layers of paint could be so good!


The re-inkers were interesting, and while I like the rich colors, it may be better suited as a wall finish. It stayed a little greasy feeling, too.


The Distress Stain was my favorite of the bunch. What you are seeing is from just one coat. It really brings out nice highlights in the wood, and the color could complement a number of color schemes in a room.


A close second was the India Ink and alcohol mixture. The model railroad website where I read an article on it said to use 1 to 2 teaspoons per pint of alcohol. I didn't want to experiment with that much, so I added about 1/3 a teaspoon to about 1/3 of a 16 oz bottle of 99% alcohol. The first coat barely did anything but wet the wood floor. So, I added the other 2/3 teaspoon and put on one more coat. I think this could be really interesting. The ink tends to pool a bit together on the wood, which really leaves a nice aged patina. I think with a couple more coats this could be a fantastic way to get gorgeous weathered boards!


So I decided to use the Distress Stain. It dispenses itself through a sponge on the top of the bottle. Think Bingo dobber. It kind of snagged here and there on the wood floor, even though I had it sanded smooth to the touch before starting. I don't see why you couldn't apply with a paintbrush, but I didn't try. I really love the way it came out!


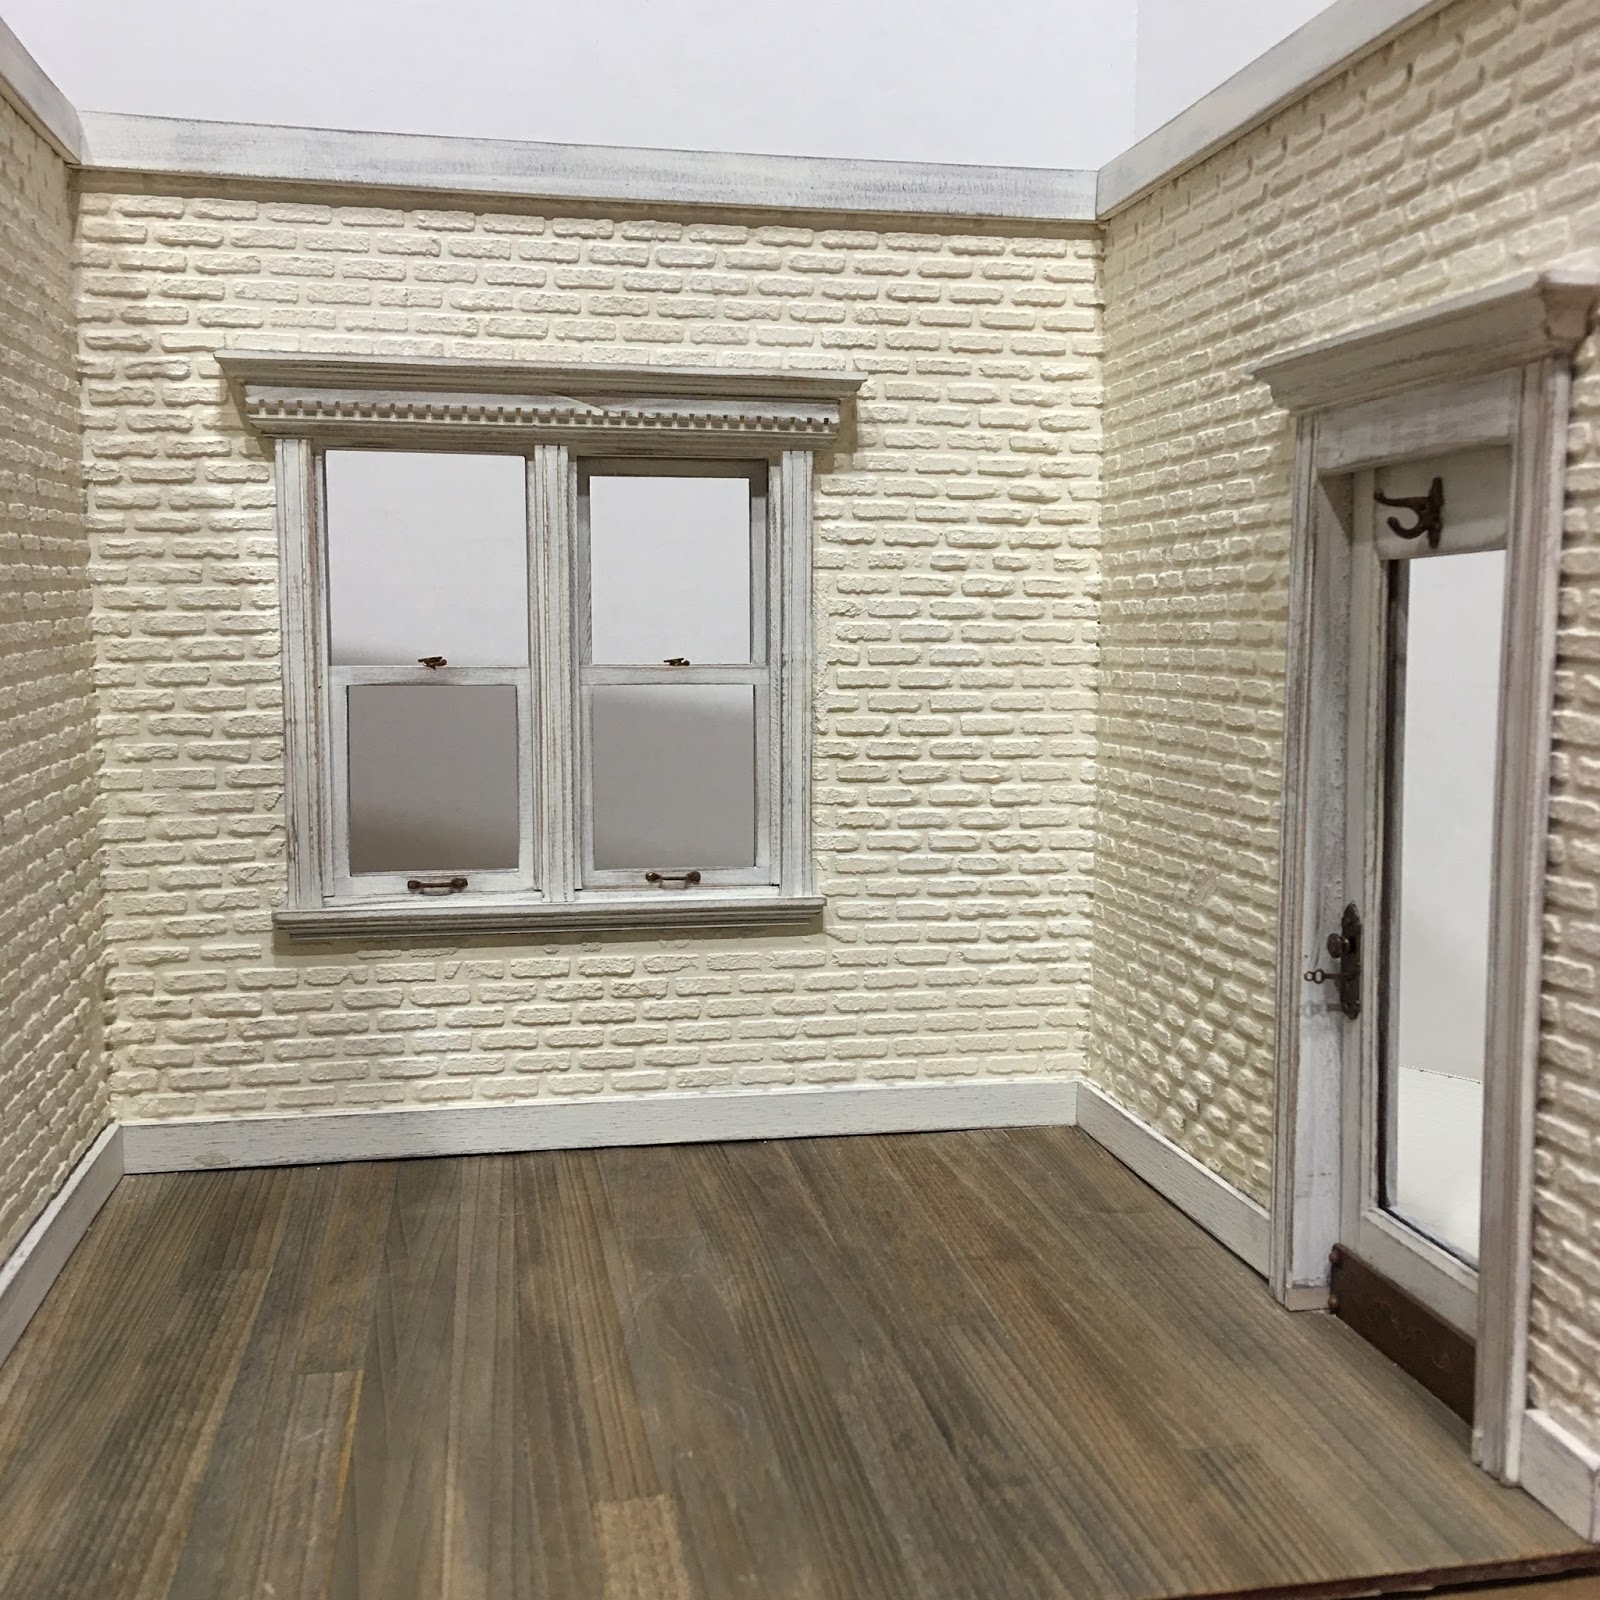
Then I added the baseboards, crown molding, window and door (hinged in the same manner as the first room).


I may add a bit of ageing to the bricks, but for the most part it is done! Now I get to start making stuff to go inside! I have so many kits that I really want to do, so many things that I really want to try! I think that's going to be the focus for the end of 2017 and into 2018.

And maybe still, before Christmas, I can post some photos of Ellie and Jim enjoying the season in the Sweet Christmas Cottage!

Peace and love to each of you!

xo xo,
Jodi

Friday, December 15, 2017

Eliminating A Trip Hazard


Now that's what I call a trip hazard. And, it just doesn't look very realistic. So what to do? Well, there are a couple options I considered. One was to raise the floor up. The ceiling height of the Duplex Room Box is just over 10", so that wasn't an issue. I could have added some 3/16" floor joists, attached the wood floor to poster board and laid that on top of the joists. Or, I could eliminate the threshold and run the wood floors through the jamb. The only issue then is, how to secure the bottom door hinge, if I still wanted the door to open, and I do. So here's what I did...


Pulled the pin and prevented myself from losing track of it by taping it to the floor.


Poked a pin vice through the original hole to mark the spot for the new hinge hole.


Because the pin hole ended up so close to the edge, I added an extension strip to the doorway.


Then drilled out the hole.


To remove the threshold from the door frame, I clamped it to my miter box and sawed through each side.


I like to tape a scrap piece of wood into the bottom of my miter box. I don't like the using the grooves to hold my wood - it's never as steady as holding it up against the fence. Plus, having the scrap wood underneath prevents me from sawing through the metal, ruining my miter box and my saw blade!


Now that the threshold is gone, there's a gap.


Good place for a kick plate!


I cut and sanded a piece of 1/16" basswood to fit, then added pearls for rivets and a sticker as an embellishment. I painted a base coat of brown wash. followed by an aged bronze metallic coat followed by another brown wash. I dabbed with a Bounty paper towel and it left a cool pattern on the paint.


To install the door, I exchanged the original pin with a nail that was about the same gauge but a bit longer. I applied a little glue to the end of the nail before sliding it into the door, then tapped the head flush to the floor with an awl.


The door closes and opens perfectly and feels very sturdy! This method may present some bigger challenges on a real dollhouse with thicker wood and multiple floors. I guess I'll have to deal with that when I start back in on the New Orleans...


Door and windows finished and installed...


Dusky dark...


One side of the duplex is ready for whatever comes next! But first, the second duplex space!

And maybe, some photos of the Sweet Christmas Cottage with Ellie & Jim?

Back soon!
Jodi

Tuesday, December 12, 2017

A Lighting Dilemma...

I have this ongoing problem with the lighting in my workroom (a.k.a. dining room though it hasn't been used for that purpose in nearly three years). I need bright white LED bulbs in my fixture to provide good lighting for minis, but it casts a weird tone in a lot of my photos. Often, my iPhone camera gets confused by it, causing the display to brighten then dim. Sometimes I can diffuse the light a bit with a sheet of polystyrene dollhouse flooring and that helps. But try to hold the camera steady, hold the diffuser steadily to cast just the right shadow over the subject and push the button simultaneously . It must be absolutely ridiculous to watch! I am trying a few apps that supposedly snap the photo for you on voice command, but so far, the results are sketchy.


I am calling the above photo the "in my underwear" shot, because in order to show you the light fixture I have to show you what my work space looks like when I am in the middle of a project. I do clean up and put stuff away in-between tasks because I don't function well in messy spaces. But there it is - it's okay if you judge me! :o)
A couple years back HBS sent an email flash sale. They were offering a Houseworks Side By Side Duplex kit for (if I remember correctly) $9.99. It's been in that stack of "future dreams" ever since. Lately, I've been thinking I could turn it into a photo box of sorts. When constructed I could replace the plywood roof with a plexi one, then set a diffuser on that to take photos.

Look ma! No hands! :o)

If I used neutral finishes for the interior, I could photograph almost everything in it. The size is 24" wide by 10" deep, so I can easily tuck it up on my shelf when not in use!


So last Saturday, I started the kit. It comes with 6 pieces of luan plywood and 5 pieces of trim for the edges. There are no tabs, slots or grooves, so tape, glue and weights saved the day! The plywood is thin and slivery - I still have 3 of them I can't quite dig out, so if you get one of these kits be aware.


My floor piece was pretty warped, but using the weights made it behave while the glue set. I knew going in it would be challenging thanks to following Kat's posts when she put hers together. I went back to her blog for a refresher before I started. Hers came out awesome and really shows how neat this kit can be with a little imagination!


Each of the three shorter walls are interchangeable, which makes it nice because you can set it up for your specific purposes. The back wall has the windows centered vertically, so you can change the orientation of them, as well. I wanted each space to be separate (think two different business sharing a common wall) so I have the doors on each of the end walls. I cheated the center wall to the right so that the left "shop" had just a bit more space.


For the interior of shop 1, I wanted a rustic but neutral feel. I was thinking of a Pottery Barn or Ballard Designs kind of feel. I had an abundance of 1/8" x 3/4" basswood on hand, so decided to clad the walls in "reclaimed barn wood". I made up a few test pieces with a Real Brown wash (3 parts water to 1 part paint) then set to painting a whole lot of sticks and scrap pieces!


After some drying time, I coated over the brown with a 2 to 1 wash of Warm White. 2 coats, then after they had dried, I sanded to achieve a nice worn and pickled whitewash.


During all that drying time, I painted an undercoating in the room, just in case any cracks should show peeks of the wall. The doors and windows were treated to the same process.


I installed vertical "beams" in the corners and around the door, then began to clad the walls. I am still considering my options for crown molding, so I am leaving the top row off for now.


I decided to go with some Houseworks flooring for this project. I like it's ease of use, it looks really nice no matter what kind of finish you're going for, and it's paper backed - a real plus when gluing onto thin plywood. The less chance for warping, the better! After making the paper template of the room, I just tape the pattern to the edge of the flooring sheet and cut with an xacto knife. Easy peasy!


In keeping with the neutral and rustic theme, I gave the floor two coats of the white wash, letting them dry in between, then sanding at the end. The wood sheet tends to curl during this process but not to worry - it lays right back down as it dries! I installed with Gorilla Wood Glue - same glue I've used for everything so far. While all of this was drying, I settled on the material to use for the baseboards and got them painted. Installing them is the next step!


I'll also be creating a solution for those unsightly and trip hazardly door thresholds. Stay tuned for that in my next post!

Until then my friends, I hope the holiday season is filling your heart with joy and excitement!

xo xo,
Jodi

Friday, December 8, 2017

The Elf Has Left The Building...

A very big and very heartfelt thank you to everyone who participated in the giveaway, and also to those of you who take moments out of your busy life to visit and comment. I treasure the learning and supporting that happens in our community almost as much as I do having minis in my life. You are all so awesome in so many wonderful ways!

There were a total of 27 mini enthusiasts who participated in the giveaway drawing from 10 different US cities and 9 countries! Miniatures really do make the world a smaller place! :O)

Enough with the small talk (lol). A very helpful little elf came by this morning. He reached his little hand into the stocking where all the entrants names had been placed. He swished and stirred them until he was satisfied that they were mixed thoroughly. And then, he withdrew a name. And the winner is...


Congratulations Irina!!! I hope you'll share what you make with us on your creative and inspiring blog, and I hope Lily Luna is a happy winner too!

Please send an email with your mailing address to me at:


If I hear back before the weekend ends, I'll mail it out on Monday!

xo xo,
Jodi