Search My Blog!

Use the Search box below to find keywords that you're looking for quickly and easily!

Search Feature

Sunday, July 2, 2017

Tangled And Tired

Fourth of July weekends usually find us out where electronic devices don't work so much, delighting in campfires, forest sounds and tranquility. Not so this year. We are enjoying a relaxing weekend at home. On Tuesday, we'll be barbecuing with the family at my brother's place. One last day to love on my parents before we say our bittersweet goodbyes. They leave for their exciting new home in AZ Wednesday morning...


Being home gave me time to start on the can lights for the ceiling. I painted the once silver grommets to a gold-er tone, then got them and the bulbs installed. See all of those wires? Today I will be labeling, combining and inserting into plugs. I have to make twenty LED bulbs and eleven 12v bulbs connect to only twelve outlets on the power strip. Excuse me for a moment while I go take my ginkgo and eat my Wheaties...

Facing that task has taken me a couple of days to work up to. Probably a lack of sufficient sleep - Woodson has been getting up with the light at about 4:40 every morning. He's not yet two, so the appreciation for sleep hasn't occurred to him yet. Instead, I focused (ha!) on some fun and less mentally challenging things...


These little resin candlesticks are super cute, but I thought I could make them even better. I drilled a 1/16" hole through the center so that candle flame bulbs could be added.


Then I painted the bases, candles and bulbs. I also made up some Mary Kinloch maidenhair fern leaves and added them to a couple pot metal planters.


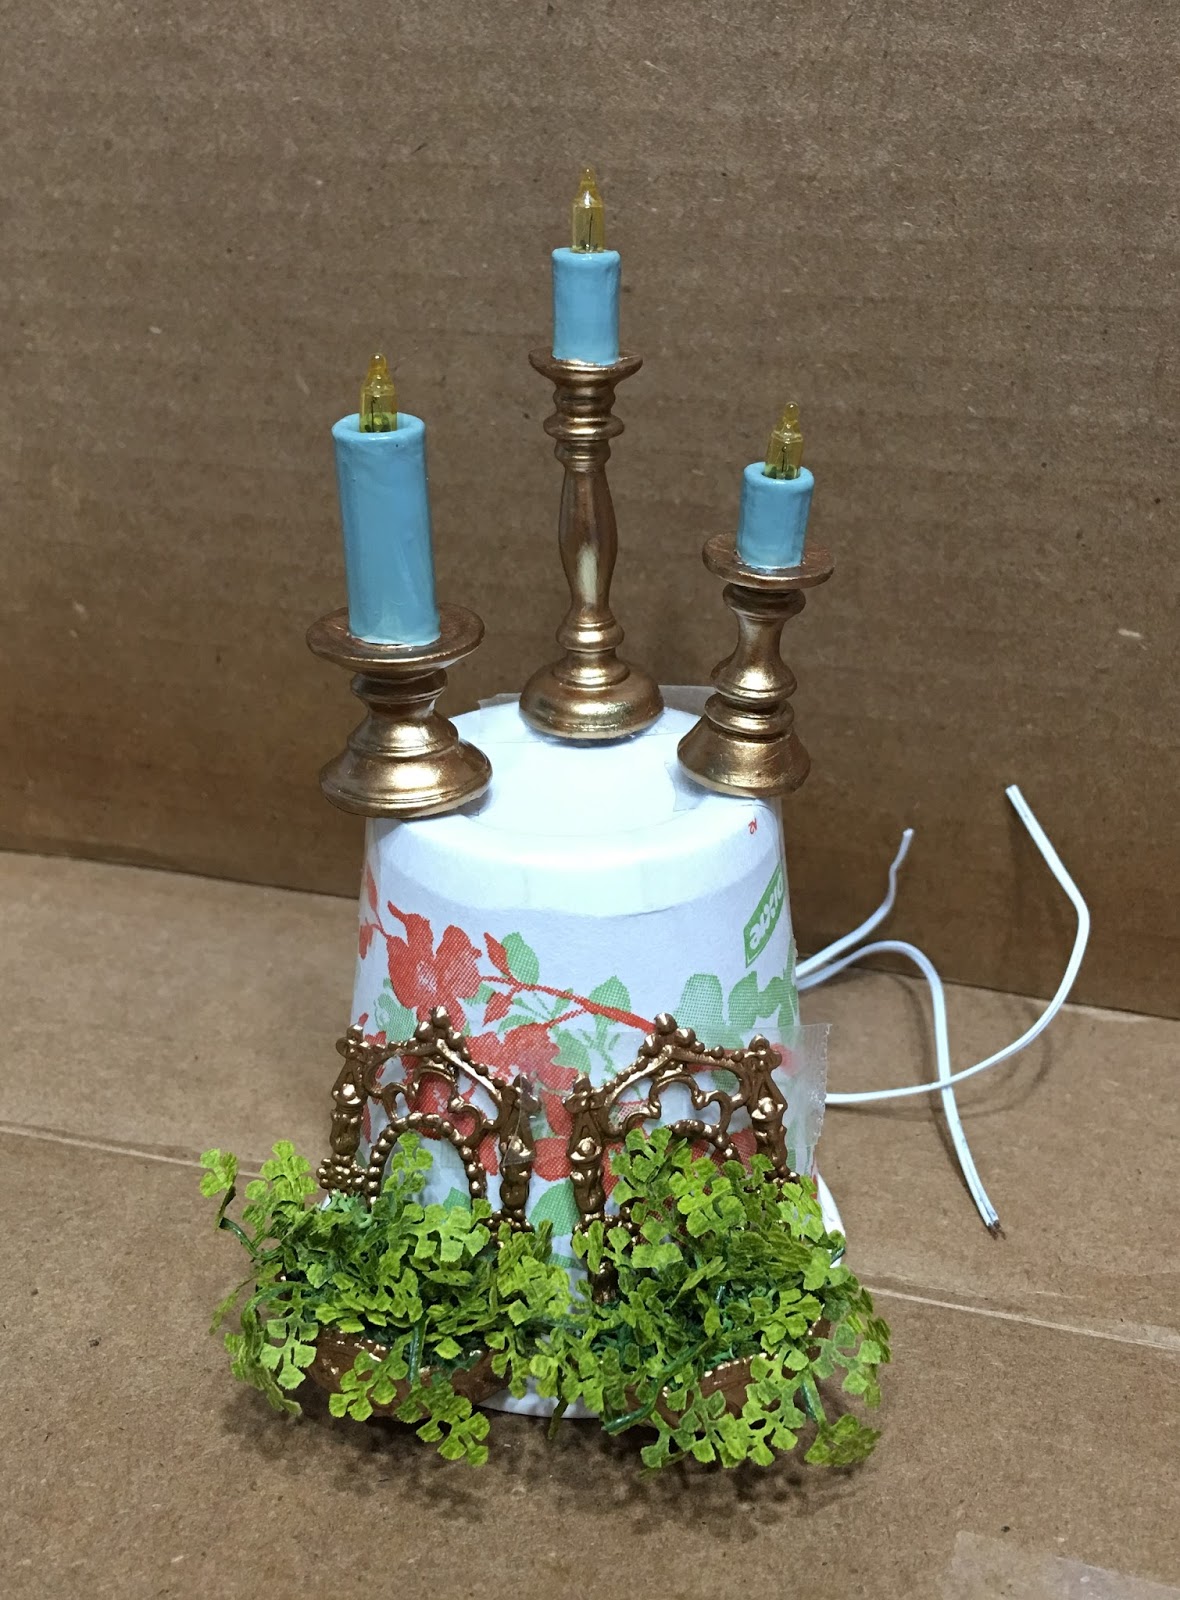
Here they are in the fireplace - hope to have them wired in later today.


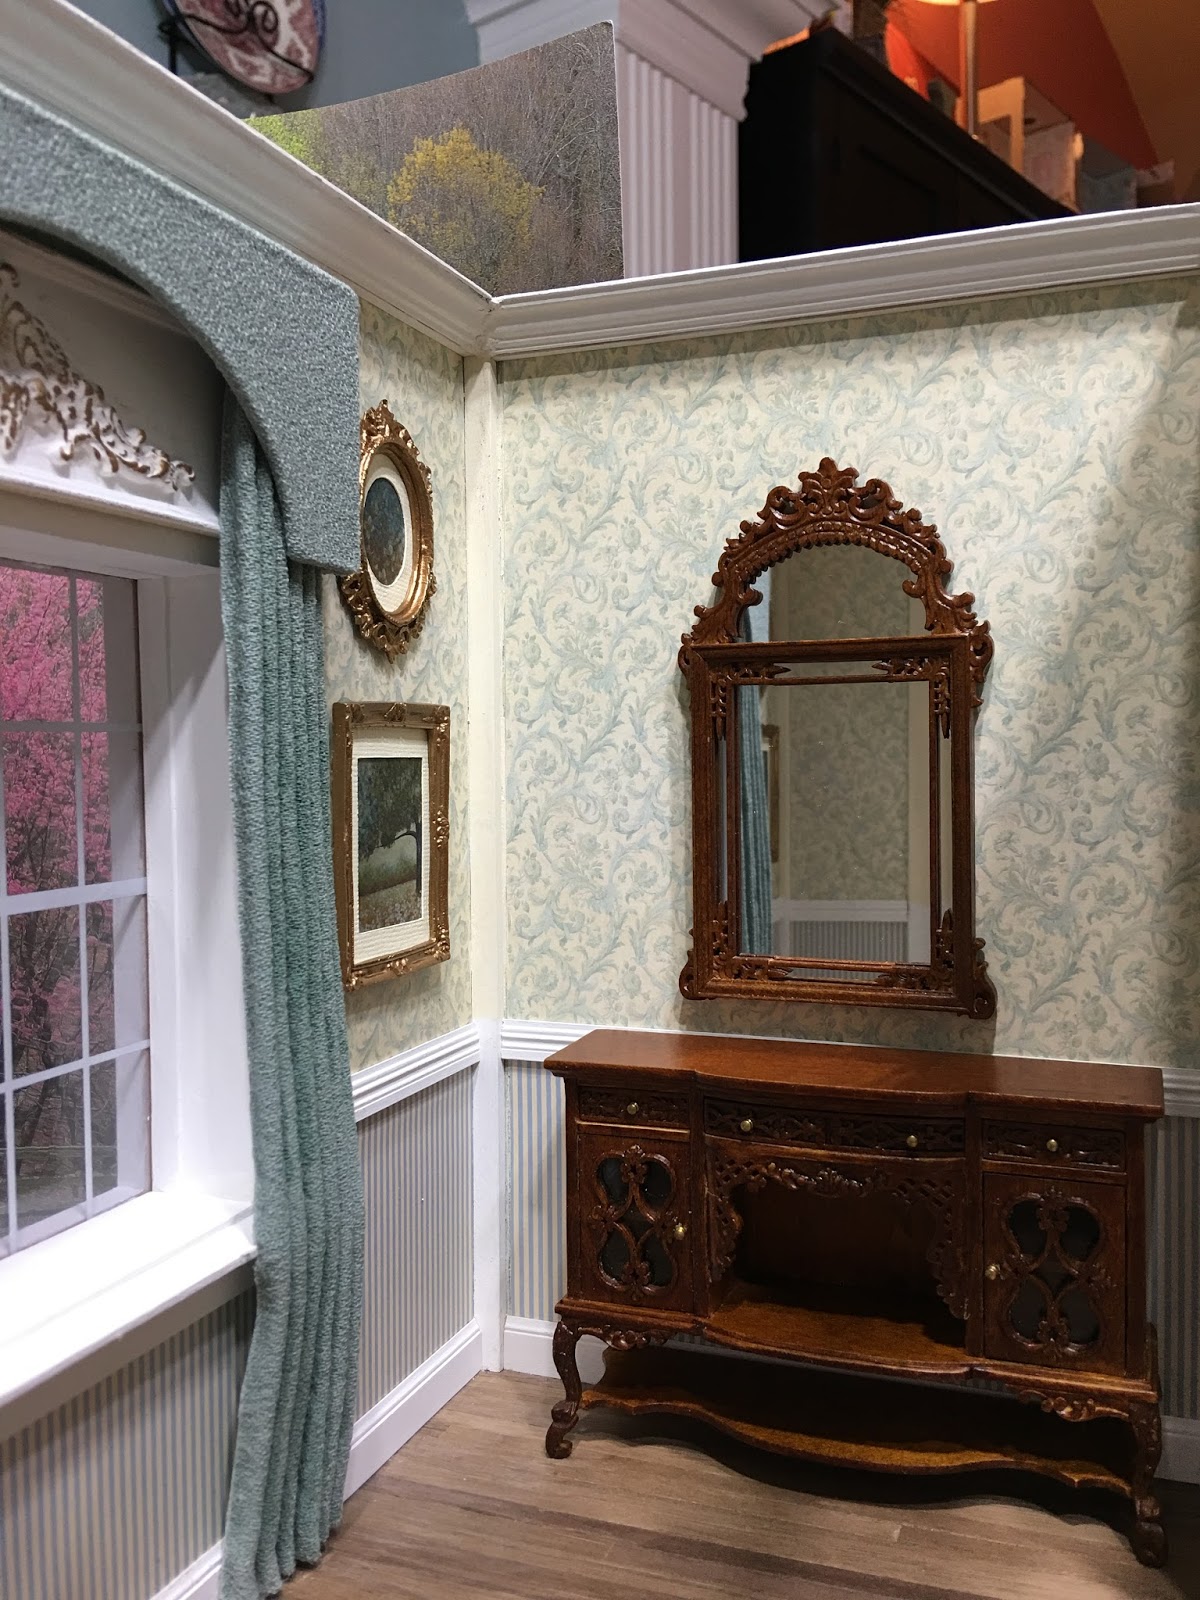
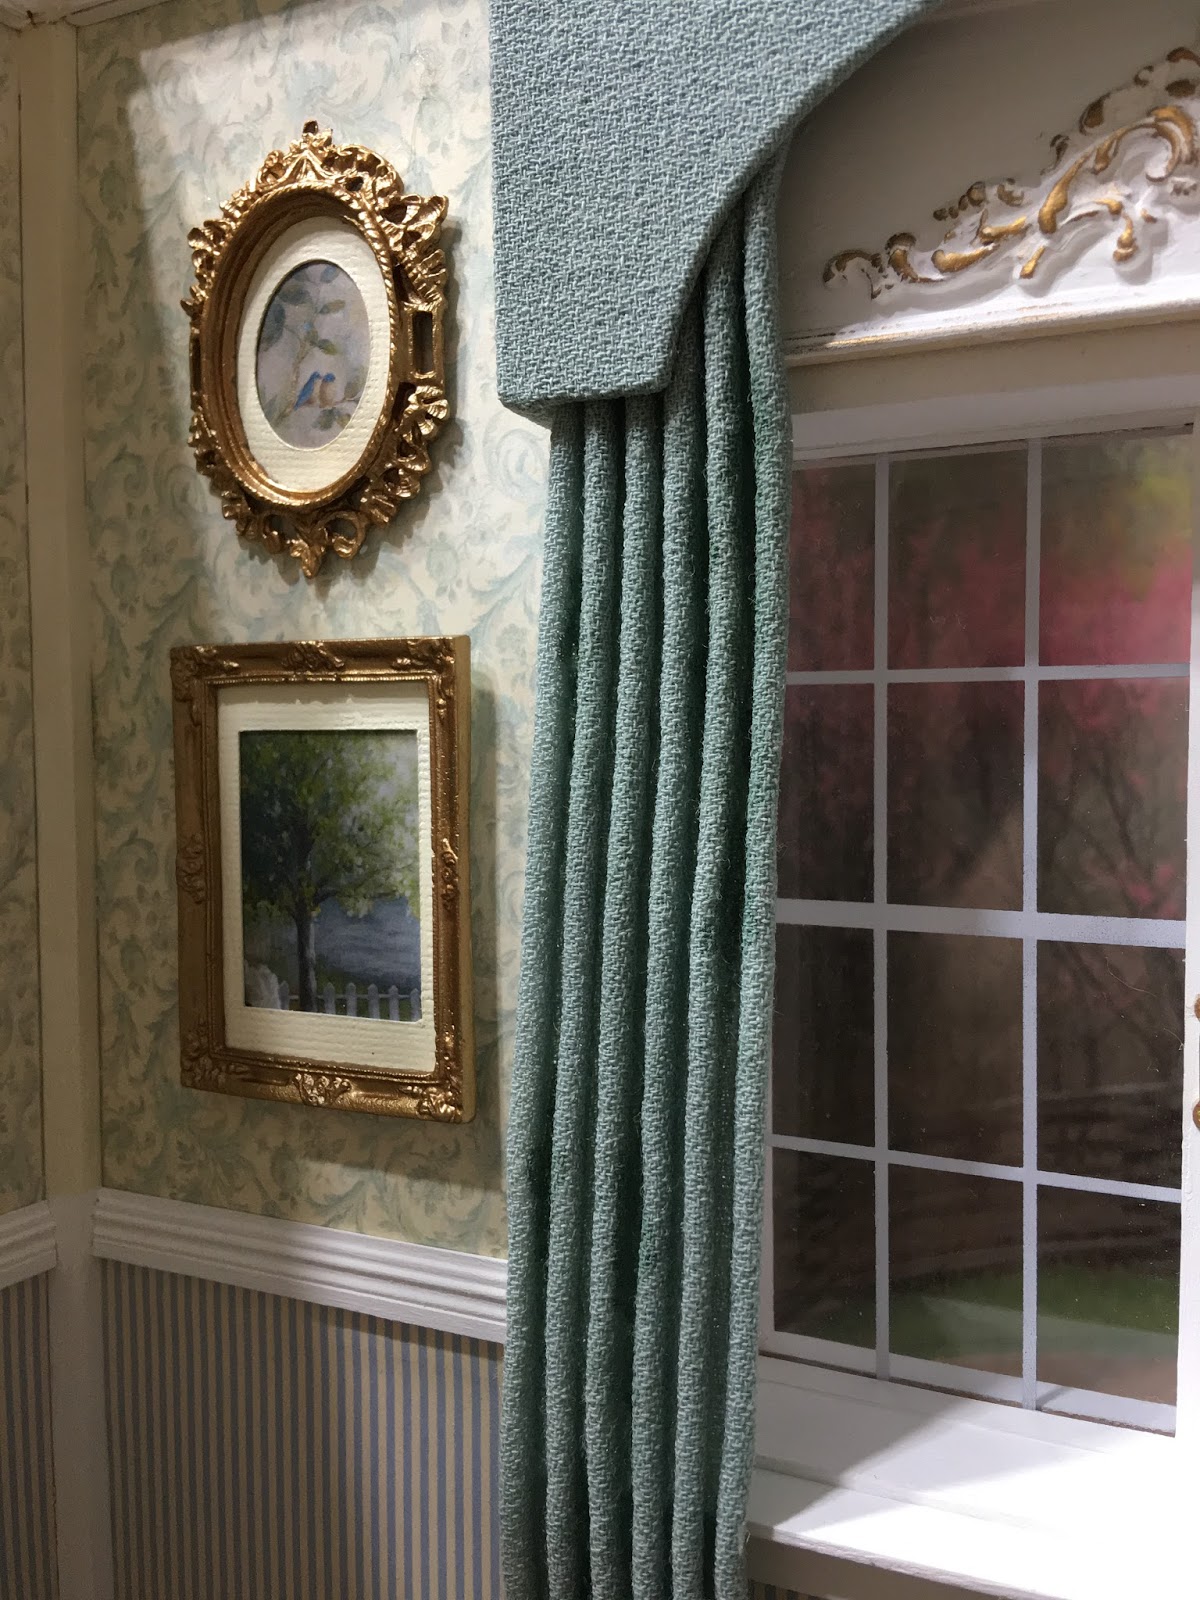
Here are the ferns in their planters on the dining room wall...


And to further avoid monumental brain work, I made a topiary and played with some accessories for the dining room furniture. It's so hard to decide what to put where - especially since it will not be easily seen. The sticks in the little bonsai pot will eventually become, well, bonsai-ed. Thanks Casey for the inspiration! Mine won't be nearly as detailed, but it has to be tiny for that space.


Now the question becomes... Shall I permanently attach the decor to the furniture for easier placement later on? I better give that some serious thought. What do you do?

Hope you are all off enjoying some Independence from responsibility, doing something you love!

Jodi

Tuesday, June 27, 2017

The Frames & Art Are Finished!

Er... Well, some of them anyway! Taking photos is a good way for me to see which areas still need "something". And it looks like I'll be needing to make A LOT more somethings...


I started out with the pot metal frames that you find on eBay. I like them best because they are very detailed, not as thick as most "dollhouse" frames, come in a wide selection of styles and sizes and are highly affordable. That is, if you don't mind a little work.


I always start out with my kit of metal files to sand off the metal sprue from the molds. Then they get a good scrub with soap and water to remove the oily mold release agent. Then I paint. I've used a variety of methods from spray paint to acrylic, but I found a new favorite method this time: Tim Holtz Distress Paint in tarnished brass. It's very thin so it goes into all of the details, but the coverage is excellent. I used three coats, but two would have been plenty.


I had previously made up the art prints (ink jet printer, matte photo paper), card stock mats and back panels (Cricut) so after the paint dried (which was fast) I just had to assemble. I used double sided tape to hold the mats onto my working surface, then applied glue to the frames edge. I carefully lined up the frame to the mat before pressing it into the frame.


Once these were well dried, I used double sided tape to hold the art work to the working surface. Then I applied glue to the matted frame, lined up the part of the art I most wanted featured, and pressed the frame onto the print. Once that was dry I applied glue to the backing card stock and centered it on the back. Ta-Da!.


Although I used many different sizes and designs for the frames, I wanted the frames to be the same metal finish and for the art work to have the same cool blue feel of the build colors. I really like them all, and since my real life house has all warm colors and traditional decor, it's a nice way to explore a different vibe!


Now for the sealer. I used Aleen's matte spray sealer. It's quick drying and seems a lot less stinky than most others I've tried. Gloss ones are the worst! I still spray in the garage, so I like to have a box with a fold down top for my spray booth. Spray then close the top down. This keeps the little nasties from getting stuck to the surface while it's still wet. I applied three coats just for good measure. I don't want that printer ink fading before I am ready to remodel in a few years!

And now, a few shots after they've been "hung" (hot glue so as no glue moisture warps the papers). I also attached the dining room and entry mirrors - trying to do this after the ceiling is attached would be a nightmare!


I like the way they turned out, and the directions that this project is leading me. It's interesting, challenging and mostly fun. Next up: Finishing up the lighting so the ceiling can be attached, stairs, column bookcase and then... Well, a totally different direction. More on that soon...

Happy Humpday!

Jodi

Sunday, June 25, 2017

Oh, Behave!!!

The ease with which the fabric adhered onto the cornices was not repeated when it came to getting them to behave in the Pretty Pleat. The Stiffen Quick had no apparent effect at all on this rayon/spandex stuff (although it worked beautifully on the cotton samples), so I had to pull out the Big Guns! In Elizabeth's tutorial, she first dampened her cotton material, then further infused it with gel glue. I was astonished that in all of my supply drawers, I had no gel glue except for a partial 2oz bottle of actual fabric glue. I didn't want to chance not having enough, so I went with Sheila's method of watered down Tacky Glue. I thought I'd better wet my material first too, to better help the adhesive mixture distribute more evenly.


After the first coat had dried overnight, it still seemed a little unruly, so I added another coating of the water/glue mixture - a little more concentrated with glue this time. Sheila had wished me luck getting it out of the pleater, so after it had again dried overnight, I began the process of slowly peeling it away from the rubber form. She was right - it was a little tricky. This time, it was permanently molded in pleat form, yet still pliable enough to manipulate.

I needed enough material for two large and one small window, and luckily I had just enough to divide it into into six pleats each for the wider window panels, and three each for the smaller window. I stuck a metal ruler vertically into the grove of the pleat and used it's edge to run my Xacto knife along (to varying success) to separate them. I cleaned up the edges as best I could with small fabric scissors.

Once cut apart, the panels wanted to twist a bit. I was able to shape them fairly successfully without the pleats coming out, so that was a positive step forward.


I used hot glue to attach them to the cornices, and that helped to further stabilize the tops.


The bottoms, though - another story! I ended up having to attach them at the window sill and baseboard with another bead of hot glue.


And finally, they behaved! Please also notice the new trim around the door's window insert and the hinges. I am hating that crooked raised door panel so that's getting covered with some sort of panel, soon. It's funny what photos vs the naked eye reveals.


I like 'em, I think they work well for the vibe and color scheme, and from now on I will only ever use cotton or silk! The Pretty Pleat itself was a dream to use and to clean, so this was a smart investment that I am sure will pay off in lots of future projects.

So what's next? I have the frames picked out and an arrangement settled upon, artwork, mats and backs cut, and will begin the painting and gilding process on all the little pot metal frames.


And in other exciting developments, I received a fantastic open sketchbook with original artwork by Nancy Enge, along with some wonderful kits to make journals and office supplies. These will be a fun day project when I need a little break from major mini construction!


Hope you all have some fun things on the horizon, and that you'll share every challenge and triumph!

Now behave! :O)

Jodi

Wednesday, June 21, 2017

Cornice Progress

Now that I have the cornice moldings painted and installed, I really like them. So much better than the original trim I had on the window tops. I learned how to use on hand supplies, just 1/8" basswood and chair rail trim, to really dress up the frames. If I'm smart, I'll make molds of the fancy resin pieces and have them on hand for future projects.


I like the lower profile and finer detail of the decorative resin piece I used on the dining room cornice, but I only had one. I still like the ones in the living room, just not as much.


I assembled the cornices using the arched front pieces I made on the Cricut, then added structure pieces on the top and sides using 1/2" x 1/8" pine scraps that I had on hand. I painted them with the Americana Blue Mist, the darker of the two shades in the color scheme since it was a closer match to the almost see through fabric.


The fabric is nice and lightweight, so it was fairly easy to mold onto the cornice forms using only Quick Grab Tacky glue. I really like the texture and wish I could get my hands on more of this fabric in different colors!


You can see that the color is a nice complement to the wall color, and is an almost perfect match to the darker door color. I like the way you can see the decorative moldings under the arch, so I'll most likely just have straight panels hanging down on either side.


I have the test pieces iron hemmed, pleated and sprayed. I'll pull them out when dry and see if the Stiffen Quick seems like it will do the job (from Brae's tutorial). If not, I'll try additional test pieces with Elizabeth's damp fabric/gel glue tutorial, or Sheila's watered down white glue method. One thing I noticed on my test fabric is that I'll need to have careful measurements overall and carefully calculate the hem into them. I ended up with a longer pleat on the end of the right fabric because it was too short for another pleat. I imagine this would look bad if it happened to my "real" fabric.


Also, I was watching a movie called The Queen. I noticed that all of the white moldings appeared to have some sort of gilding or highlighting and it looked amazing. Not so stark, and the detail showed up better. I found a couple photos online. What do you think? Should I give it a try? Maybe just a bit of chalk pastels brushed on would make a difference.


Anyway, off to bed to dream about the panels. Hopefully, I'll have some show and tell to share in the next few days!

Sleep tight,

Jodi

Monday, June 19, 2017

Redeux or Re-Do?

And I had such plans to make noticeable progress...

But instead I am in a bit of a do over...


It started out promising... Just add a couple thin strips to the window trim to make them appear that they open out. Then add pulls and viola - something done. Got the brass handles and door knobs coated with gilders paste to make them look more gold than brass. Did the same with the dining room chandelier and fireplace sconces. Liked it. The that's when the setback happened...


While I'm here, I thought - better start figuring out the window treatments. Some luck there, as a random piece of clearance fabric that I bought ages ago seems to blend nicely with the color scheme. Had previously made up a cornice with decorative molding for over the door to add some oomph. Thought "why not do something similar for the windows"? You know - turn them into cornices for the drapes to tuck behind. I have some nice resin pieces left over from the ceiling decorations.


Great idea, until I made the mock up. Should they be painted white or fabric covered? The white looked too stark. If I covered them with fabric, the molding pieces would look silly just sitting on top. So, all progress stopped which was just as well since I was out of ideas. Then that night, while laying there with a migraine and unable to sleep, it came to me. White decorative cornices over the windows as part of the trim, then arched, fabric covered cornices as the drapery treatments. You'd be able to see the good stuff under the window treatments, reference the arches everywhere in the build and it would make it more interesting. That idea had to sit there and marinate as my attention was focused on Father's Day activities.

Note how far it protrudes.


As I was testing different mock ups I realized that the trims I'd added to the tops of the windows stuck out too far and would interfere with the way the drapes draped. At least this was an easy re-do - they came right off with only a little encouragement.


I haven't had occasion to play with the Cricut in several months, but I knew this was my opportunity. I made mock ups for all three windows with card stock, printed and gave them a test fit. Once I made a couple adjustments, I printed again on chipboard.


The arches themselves will be covered with a little batting and the same material as the drapes which will hang down between the decorative cornices and the arched cornices. Now I just need to learn how to use the pleater. On some scrap fabric first.


I also cut the new piece of "glass" for the front door and got the interior handle attached. The decorative glass came in the same eBay lot as the door but was a little too tall and narrow. I am hoping that a couple more syringe applications of tacky glue in the cracks will be enough to make it appear like glazing and not look weird. If so, I'll have to cut some trim pieces to cover it up.

Hopefully the window covering part goes well and does not require any more do-overs. Then I can turn my attention to getting the ceiling on. That will surely feel like progress!

Have a great first week of summer, everyone!

Jodi