Search My Blog!

Use the Search box below to find keywords that you're looking for quickly and easily!

Search Feature

Thursday, May 4, 2017

All That Glitters...

The garage sale with the folks last weekend didn't rid my parents of all of their unwanted stuff, but they got rid of some, and in-between customers and in the evenings we had a wonderful time together. Mom took all of the unsold items to Goodwill on Tuesday, and said that they are a lot closer to getting the house listed. We are hoping that mom and I can head down to the new house in a couple weeks and start getting it set up. She loves the heat and is looking forward to 110 degree temperatures. My perfect day is sunny, 75 degrees with a light breeze. I predict that I'll be feeling grateful anyplace there is air conditioning!


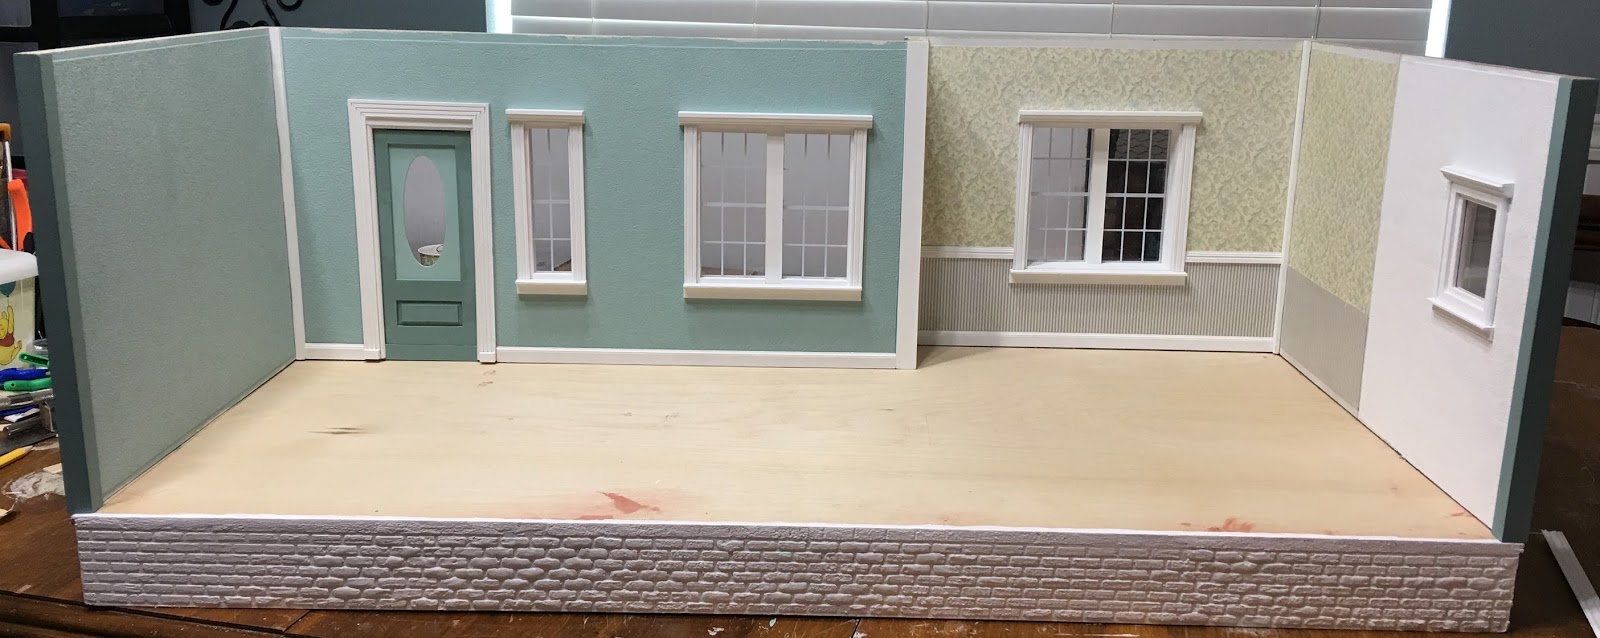
Okay - on to the New Orleans kit update...

I really thought that I'd be farther along than I am by now, but I've run into a few things that were a bit challenging. One of them was my desire to have arched doorways and the resulting structural changes and additions to accommodate them. The other was having to scrap the first chimney breast wall/bookshelf/fireplace and make a whole new everything. As is usually the case, try 2.0 was a big improvement.


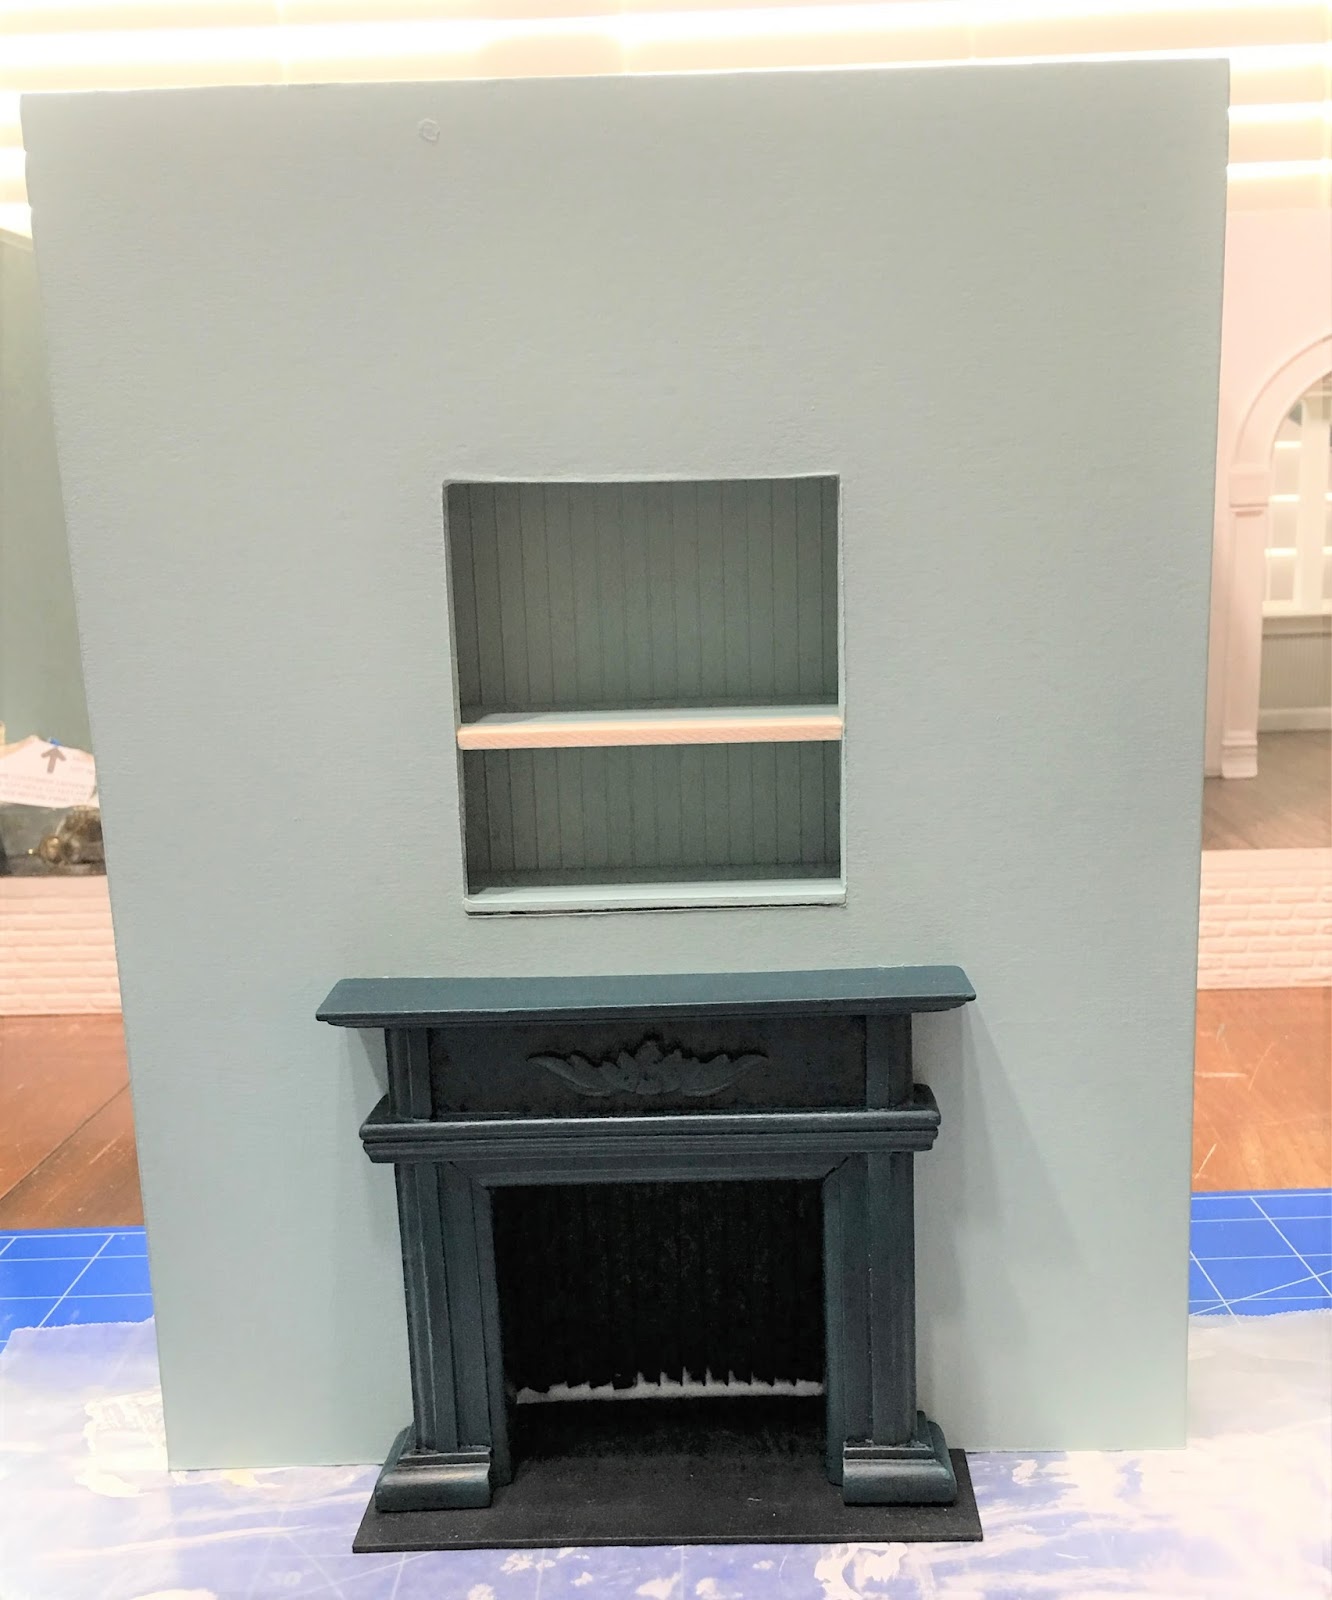
I started the same way as before with some foam core. The measurements I needed for the wall were 10" H x 8" W. It just so happens that I have pieces of foam core in that exact size. I love when that happens! Instead of using another of the thicker arched doorways for the outside frame of the bookshelf, I had a much less hefty door frame. All it needed was to be cut down to the right height. I cut out a section on each side then rejoined the bottom trim to make the bookshelf frame. You see in the photo that rather than try to fit the bookshelf and the fireplace side by side, this time I opted for a stacked arrangement.


I had this fireplace - it was one of those "changed my mind" leftovers from the flower shops. I also had the fru-fru wall moldings in the "maybe, someday" drawer. I figured I'd run the crown along the top of the chimney breast to make it look more permanent, and the corner moldings would tie it into the rest of the walls in the living room.


One of the design elements I have in mind for the room is to sprinkle in some gold accents. I've had the fake gold leaf and sizing in my "just have to try this" drawer for a long time. I was happy to come across it again and the bookshelf frame seemed like a perfect piece to try it on.


There is definitely a learning curve, and to that end I had to go at it three times with the sizing/glue to cover spots I'd missed the first two times. It's the nooks and crannies that are tricky. You have to apply an even coat of the sizing without letting it puddle. I was too stingy or too generous, it seems. In the end I liked the results and can't wait to try it on other things!


I felt that the finish was a little too shiny and new looking, so I rubbed some Inca Gold gilders paste wax on to add deeper toned highlights. I really like the effect, so then I added a bit of the patina wax, too! I like the highlighting effect and that it ties into the color palette for this room.


I built a new shelf box but was able to recycle the fire box from the 1.0 chimney breast wall. I've purposely lined it with bead board painted black - I want the fireplace to be a reno that's been updated to accommodate candles rather than a fire. It's just something different to try out.


I sanded down the shiny black finish on the fireplace but had no earthly idea what to do next. I had just about made my mind up on painting it white when a blue thought came to my head. I reached into the back of the color coded paint bottle drawer to see what blues I hadn't used already.


That's when I found it! A wonderful peacock blue! I knew right then that it was no chance encounter - it was a synchronicity! One thinly brushed on coat over the sanded black was perfect! I added a coat of beeswax and I love the finish! And I love the color against the sea foam wall!


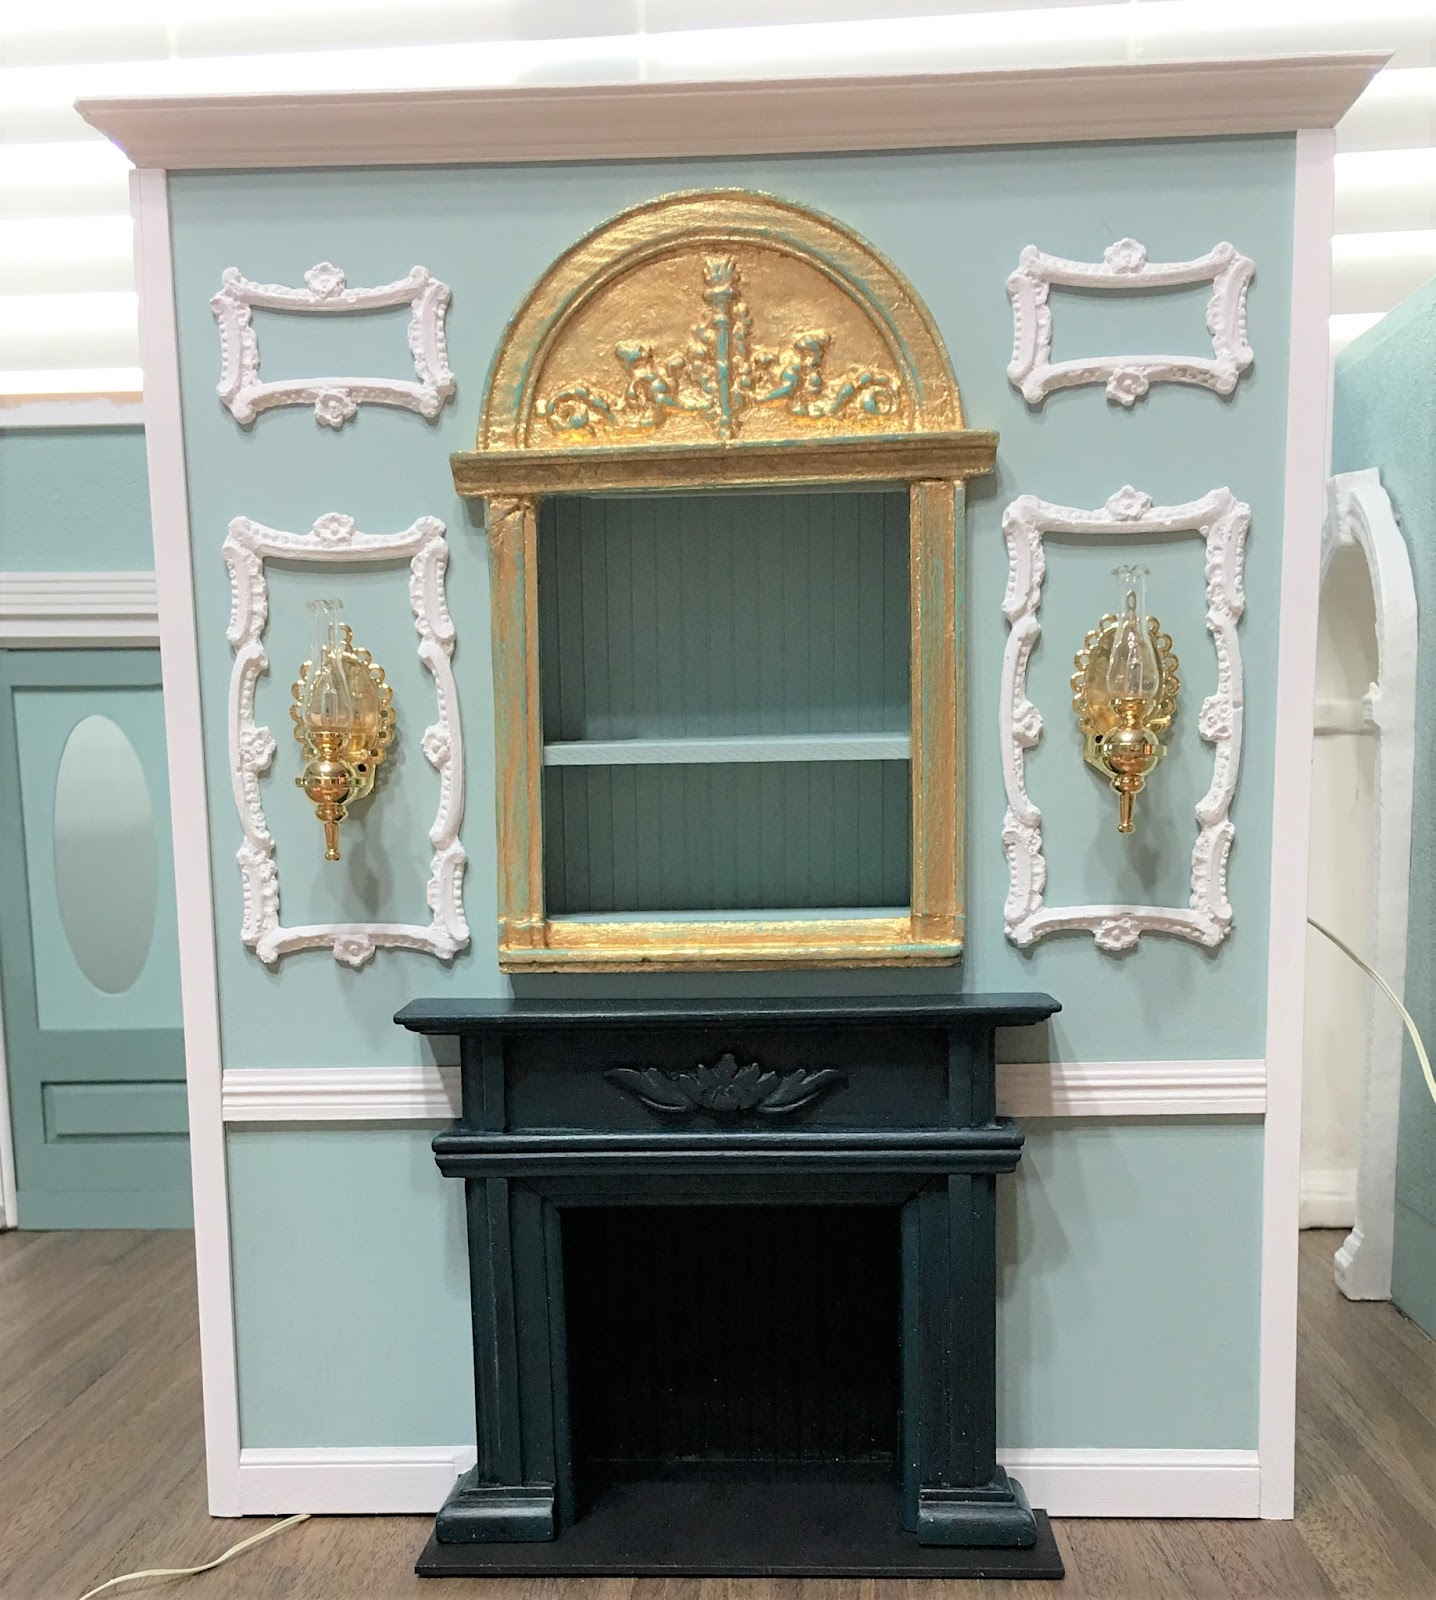
I love the gold, too! Even the gold colored light fixtures (for the first time ever)!


It took me every spare moment to get the chimney breast wall to this point, with trims and lighting installed. I have some ideas for lighted candles, so the next chance I get to play I may start in that direction.

When I think about the To-Do list I have the optimistic impression that I can finish it in a weekend. More likely, I'll be lucky to have the crown molding installed and stairs built by the end of next weekend.

I hope everyone has a festive Cinco De Mayo and a fun filled weekend to follow!

xoxoxo
Jodi

Friday, April 28, 2017

The Word For The Week Is...

The word for the week boys and girls is TRIM. ~T~R~I~M~ TRIMmmmmmmmm...

Got the window trim for the first floor installed. I'm kind of liking this Batrie style construction (a.k.a. layer cake) because you can finish stuff off as you go along, and don't really have to contort yourself to reach into the rooms to add wallpaper, trims etc... I studied some window trim photos online, looked at my stash of trims, then made something up as I went along. The funny thing is, in the end, the window coverings will hide a good bit of the effort!


Do the thresholds on mini doors kind of bug you? They don't really look like our real ones, and if the flooring is consistent throughout the house they just seem kind of unnecessary. Except of course if your doors happen to swing using a top and bottom pin rather than actual hinges. If you want them to be operational, you have to make them hinged or figure out how to install a pin up through the flooring below the door. For my front door, I did a little experimenting to see if I could actually get rid of the bulky threshold. I ended up gluing it shut permanently, which is A-OK by me.


This is an old Hofco door I acquired on eBay eons ago. The front door that came with the kit really looked like an interior door. It certainly was not worthy of a kit named the New Orleans. One of the problems Opportunities with using the new door was that it was significantly taller and wider than a "normal" dollhouse door. No worries - Just widen the doorway a little. But, because of the fancy pediment on top, if I installed it flush to the floor the small sidelight window trim got in the way. Another great reason to get rid of the threshold and raise the door to clear the sidelight trim.


To correct the shortness, I added a piece of wood the thickness of the door and the height I needed to make it meet the floor.


Once I painted it and added additional trim pieces to the door, it looked like it had always been that tall! (note that the baseboard trim could now be installed.


I still have to install the outside door trim, but I'll wait until I do the porch flooring. That way, I can slide the flooring under instead of having to cut the flooring to go around. Smart cookie or just made a lot of mistakes experienced? I'll let you decide...


I got as much of the baseboard and chair rail trim installed as I could before actually gluing the walls together. The kit is unique in that it has routed corner moldings which actually join the walls together. The result is corner molding on the interior wherever the walls meet. This makes installing the trim a little tricky. It's great in some aspects because you don't have to miter the trim for the corners on the chair rail or baseboards. But - when it comes to thicker trims like the crown molding, you have to engineer it a bit. More on that in a minute...


So, I stopped there with the trims and moved my attention to erecting the walls and getting them glued and nailed onto the foundation. After all, you can't really miter crown molding for walls that are not even attached together yet.


I thought maybe it might be better to add the flooring before I glued the walls down. Less tracing and maybe accidentally cutting something too short... I had four sheets of Houseworks Walnut flooring saved for this project, and it's a good thing I did. I have a lot of wood veneer sheets, but not many of the same variety. So, small flooring jobs are great, but with this much floor space, I am glad I had them in the stash. Note to self: This is why it is GOOD to stock up when supplies go on SALE!


I ran all of the flooring the same direction as the foundation joists, which in real life is a big no no. But hey - that's why we love minis, right? My house, my rules! This was a lot easier for installation because I did not have to create staggered boards at the seams - a real pain in the @$$ job that sometimes does not go so well. I also had to strain my varnish using a coffee filter. Does anyone else get dried specs like I do? Even in fresh bottles?


I tried the ultra matte finish the first time and it was really blah, so after a sanding I applied a satin. Yes, after straining that one, too! After it was good and dry, I glued and nailed the walls to the foundation. I put the ceiling/second floor on with weights to help everything seat flat. Kind of neat to see how it will look with the next floor on!


Now it was back to trim work. I had to add strips of trim to fill the space between the corner moldings. That way, I could add the crown molding just like any other job.


Until I install the two interior dividing walls, I still can only get so far with the crown moldings.


They are glued together, finally, but I am still in the spackle/sanding cycle for a few more days. It's the drying time that really slows you down.


Meanwhile, I am working on the plans for the new fireplace wall, and will hopefully start on those this coming week.


This weekend my folks are having a huge garage sale. I'll be trying to convince complete strangers that they really need to buy stuff. The more they buy, the less my parents have to take with them to AZ!

Hope you have a wonderful and productive weekend!

xoxo
Jodi

Thursday, April 20, 2017

New Orleans Kit - First Challenges...

Before I could continue working on the Real Good Toys New Orleans kit, I needed a little organization. My very kind husband hung the new melamine shelf on the wall and added four very strong braces right into the wall studs. I have confidence that I can display a number of heavy projects up there with no worries. So, because I am organized everything in my little dollhousing world should go very smoothly, right? Oh brother...


I'm sure many of you are like me - going around in circles trying to figure out if you need to start with the chicken or the egg. I finally just decided to solve that riddle as I went. I jumped right in with the wallpaper, opting to go the round wire method instead of potentially dealing with another MDF/tapewire nightmare (search for "tapewire" in the blog search for all of the gory details). Opting is the semi unthruthful word, and I really just forgot to do the tapewire. I'm calling it a serendipitous save from the universe.

I had some textured ceiling paper sheets in the old wallpaper drawer so I thought I'd give it a try on the living room walls. I was worried about having too many wallpaper patterns competing, so this was a great solution. Solid matte color with a little texture. It has a vinyl coating which is great for wiping off any seeping wallpaper mucilage without damaging the paper. I applied it to the walls first, then painted with two coats of acrylic paint.

Before and after painting.

This photo shows the texture better.


I used the same textured paper in the kitchen, except painted it in white chalk paint. For the dining room, I used a combination of two complementary wallpaper patterns. Off to a great start, right?


I couldn't wait to do the dry fit with the poly-resin arched door frames. Finally, I'd get to see them against the finished walls and then congratulate myself an a well planned build. That's when the trouble began...


Remember the chimney breast/false wall I built? Well, I made the fireplace and bookshelf openings based on the amount of space I had left over after fitting the one arched door frame that I had on hand at the time. The other two I needed were on the way... But they are from molds and therefore should be exact, right? Um, no. Not even close!


So my homespun fireplace is pushed over too far to the left and sticks out from the wall...


And the door hole does not exactly accommodate the arched door frame. Hrmpf.


And, my measurements of the dividing wall between the kitchen and the dining room were off... because in the drawing program where I carefully laid out all of the walls (so that I would be able to use the already on hand kitchen cabinet kits), I FORGOT TO DEDUCT THE 1/8" WALL MATERIAL and I measured the wallpaper width from the end of the wall and not from the end of the trim. Duh! Rookie blunder 101! Not to worry, after all I am a professional, right? Ha! Keep dreaming. Well, at least I am a problem solver and if things get too funky it really is just a dollhouse, right?

So we trim back the wallpaper.


Modify the arched doorways by cutting off the parts that stick out and remove the part of the door frame that is now too wide for the dining room to living room side.


Mark and sand down the doorway to accommodate the much differently sized, newly arrived poly-resin arched door frame.


Glue and clamp...


Fill, sand, fill...


Fill, sand, fill...


Still more filling and sanding...


And still more filling and sanding left to do...

And just when you are ready for something to go right, you look at said homespun fireplace and can no longer kid yourself because you HATE it! It's too tall, too squished, the Michael's hutch top on the mantle is out of scale and the whole space is too tight with the bookshelves! Your sconces are just going to look stupid! So there is no other choice but to re-build the entire thing from scratch. And in some weird way, you are actually relieved because you did not settle for "meh".


A good thing to do when you are pouting trying to work through a problem is to paint. Sand and paint, sand and paint.


And stain stair treads,


And start on window trim.


And then spend the next three days helping your elderly parents pack up their entire lives because they bought a new house in Arizona and while you are so happy and proud of their bravery you have no idea how you will cope with how much you'll miss them.

xoxo
Jodi