Search My Blog!

Use the Search box below to find keywords that you're looking for quickly and easily!

Search Feature

Showing posts sorted by relevance for query resin. Sort by date Show all posts

Tuesday, July 4, 2017

Starbucks at Pike Place


December of 2013 I used my Happy Birthday 25% off coupon from HBS to purchase the Street Of Shops. I had done all three shops in 2002-2003, but had a completely different vision for this set. I wanted to replicate what you might find in a block of shops in Pioneer Square or at the Pike Place Market in downtown Seattle. Plus, I wanted to make almost everything myself!

I'll apologize now for some of the terrible picture quality. I left my "good" camera in the hotel room at McMennamin's when my daughter and I stayed there for her 25th birthday. All I had left was my iPhone 3g camera at the time. I now have an iPhone 5 and a GoPro, so all future photos should be much improved!

In this photo I'm employing my gluing jig as I build the display shelf.


Here it is as I dry fit into place. The front and back counter, as well as the restroom door were all made using 1/16th to 1/8th basswood.


A lot of my family and friends on Facebook have no idea about 1:12th scale. I took this photo to show a real life sized object so they'd have a comparison. I made the food display unit based on measurements I found from their distributor online (converted to scale, of course). It is also electrified using LED lighting strips. The wires are hidden under the wood flooring, which has a plug, which the unit plugs into.
All of the baked goods, food, beverages, salads etc. I made from Fimo, resin, wood, mold putty, printies etc. The baked good trays are old eye shadow trays painted with spray paint.


Below are photos of the fixin' station. I made the napkin holder and cup sleeve holder out of balsa wood. The sugar substitute packets are printies and the holder was made from taking apart old electronics items (such as a cordless phone). The closest thing I could think of to make the Starbucks green straws was to take the copper wire out of old phone wire. The stir sticks are just carved and sanded wood scraps. I traced the rounded shapes for the counter and the platform onto balsa, then sanded and fit until they looked right in the bay window.


The espresso machine frame is made from basswood, then I cannibalized the previously mentioned cordless phone, plus an old electric razor for parts. The coffee bean dispenser on top was a plastic jar from the dollar store cut down to size and then filled with Fimo beans.

The cash register screen glass was the display window of the cordless phone. The Starbucks payment screen is then sandwiched between the glass and a wood backing. The cash drawer base is made of wood. The item scanner is made of more metal parts and Fimo, and is connected to the cash register with black electrical wire. The receipt dispenser is also Fimo and a scanned receipt.

The Tazo tea display and signboard were made from wood and printies. The cups are made from various glue lids with printed labels. The syrup dispensers and milk are replicas I made after casting original containers into silicone mold, and then using them to make resin bottles. Color changes to the resin were achieved by adding shavings of artists chalk.


The sink is a candy tin I've been holding onto for a while. I just added the faucet and cleaning products purchased from HBS. The microwave is wood/metal pieces salvaged. The blender was made from silicone mold/resin/fimo.


Below is the second cash register for the front counter.


This is Starbucks drip coffee machine - The Clover.


I guess about now you're probably thinking I must go to Starbucks a lot. Well, I used to, sometimes twice a day. Now that I am not working/commuting 13 hours a day I don't need nearly as much coffee. I do still go by for a hug in a mug periodically! ;0)

Verona Basket

Displayed By The Counter

Point of Purchase candy, cd's, Via packets,

Just wood, printies, and a lot of patience!

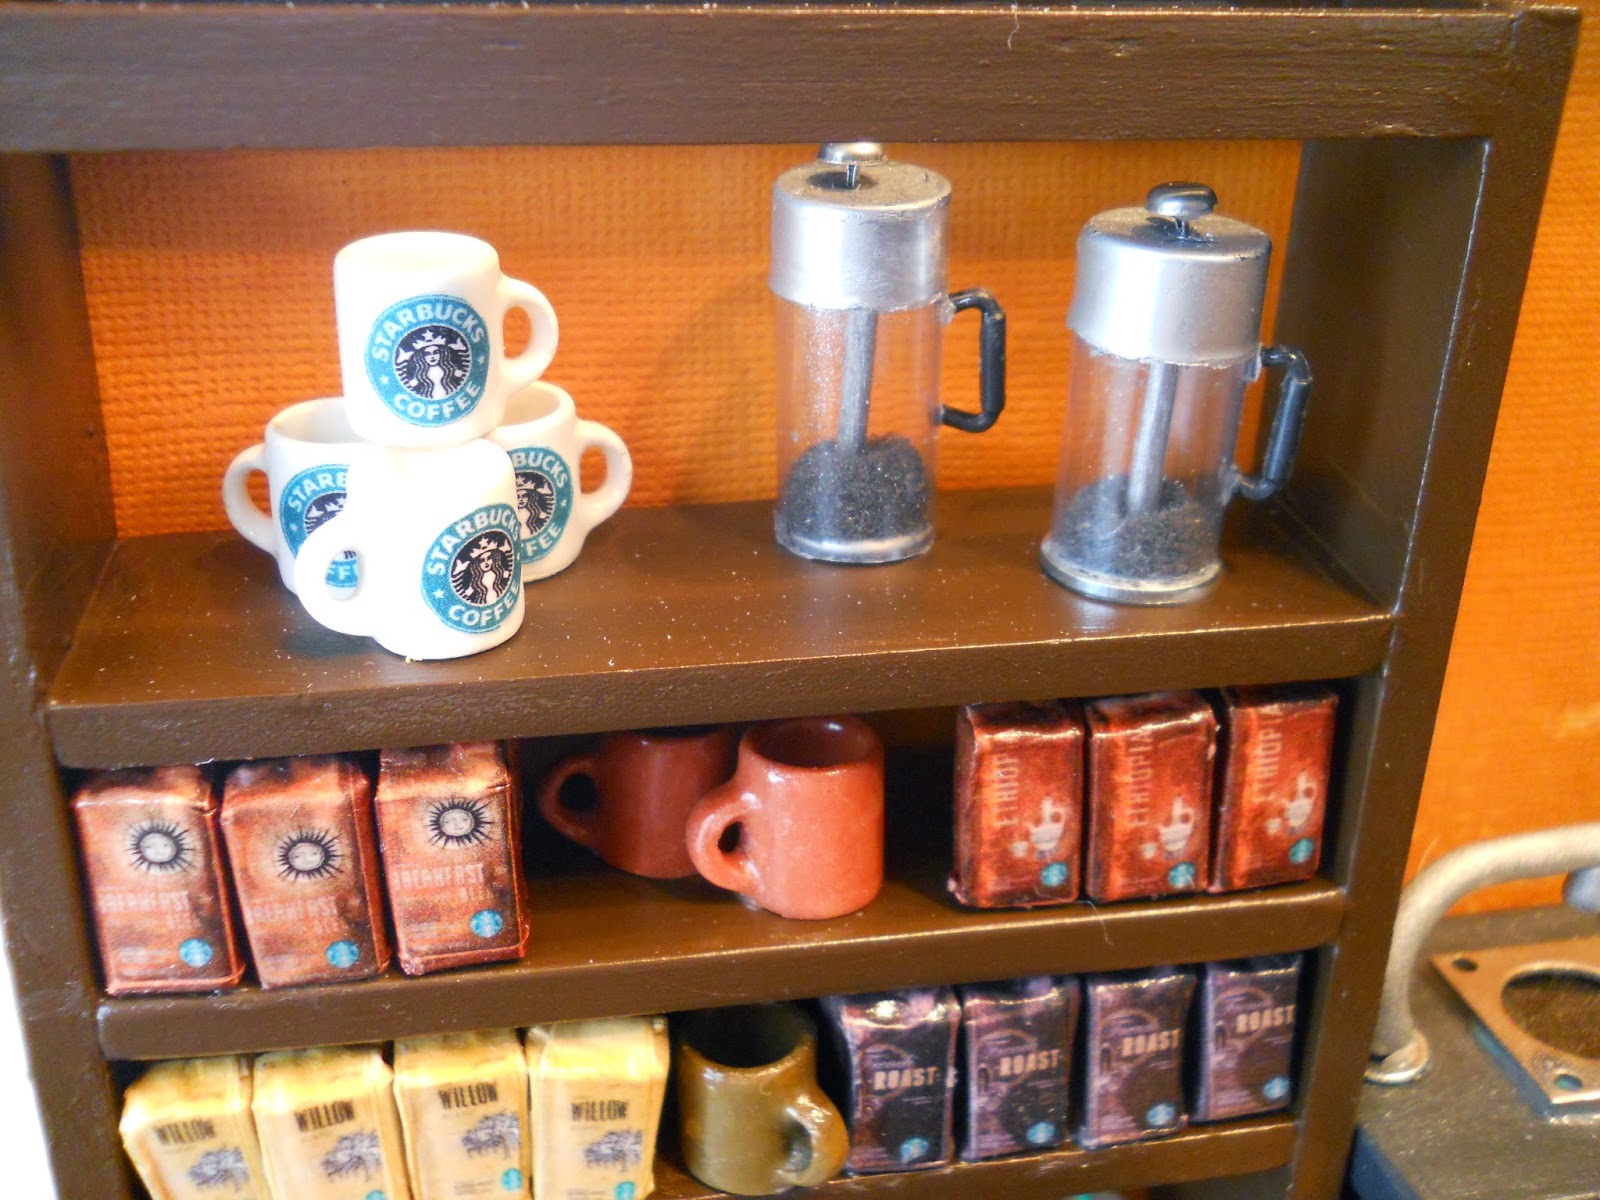
All these to go and ceramic mugs are resin molds of the originals.


The French Presses were made from Xacto blade packaging, leftover parts from a Chrysnbon kit, and brads.


The pictures below show just where my progress has stopped. I can't go any further until I complete the other two shops in the set, as well as the restroom addition to be placed between Starbucks and The Tasting Room. Once I have all the shops complete, I'll secure them all to the 60" base and begin brick streets, lamp posts, landscaping, and the drive thru. Stay tuned, as I'll post news on the blog as I update!


Thursday, April 20, 2017

New Orleans Kit - First Challenges...

Before I could continue working on the Real Good Toys New Orleans kit, I needed a little organization. My very kind husband hung the new melamine shelf on the wall and added four very strong braces right into the wall studs. I have confidence that I can display a number of heavy projects up there with no worries. So, because I am organized everything in my little dollhousing world should go very smoothly, right? Oh brother...


I'm sure many of you are like me - going around in circles trying to figure out if you need to start with the chicken or the egg. I finally just decided to solve that riddle as I went. I jumped right in with the wallpaper, opting to go the round wire method instead of potentially dealing with another MDF/tapewire nightmare (search for "tapewire" in the blog search for all of the gory details). Opting is the semi unthruthful word, and I really just forgot to do the tapewire. I'm calling it a serendipitous save from the universe.

I had some textured ceiling paper sheets in the old wallpaper drawer so I thought I'd give it a try on the living room walls. I was worried about having too many wallpaper patterns competing, so this was a great solution. Solid matte color with a little texture. It has a vinyl coating which is great for wiping off any seeping wallpaper mucilage without damaging the paper. I applied it to the walls first, then painted with two coats of acrylic paint.

Before and after painting.

This photo shows the texture better.


I used the same textured paper in the kitchen, except painted it in white chalk paint. For the dining room, I used a combination of two complementary wallpaper patterns. Off to a great start, right?


I couldn't wait to do the dry fit with the poly-resin arched door frames. Finally, I'd get to see them against the finished walls and then congratulate myself an a well planned build. That's when the trouble began...


Remember the chimney breast/false wall I built? Well, I made the fireplace and bookshelf openings based on the amount of space I had left over after fitting the one arched door frame that I had on hand at the time. The other two I needed were on the way... But they are from molds and therefore should be exact, right? Um, no. Not even close!


So my homespun fireplace is pushed over too far to the left and sticks out from the wall...


And the door hole does not exactly accommodate the arched door frame. Hrmpf.


And, my measurements of the dividing wall between the kitchen and the dining room were off... because in the drawing program where I carefully laid out all of the walls (so that I would be able to use the already on hand kitchen cabinet kits), I FORGOT TO DEDUCT THE 1/8" WALL MATERIAL and I measured the wallpaper width from the end of the wall and not from the end of the trim. Duh! Rookie blunder 101! Not to worry, after all I am a professional, right? Ha! Keep dreaming. Well, at least I am a problem solver and if things get too funky it really is just a dollhouse, right?

So we trim back the wallpaper.


Modify the arched doorways by cutting off the parts that stick out and remove the part of the door frame that is now too wide for the dining room to living room side.


Mark and sand down the doorway to accommodate the much differently sized, newly arrived poly-resin arched door frame.


Glue and clamp...


Fill, sand, fill...


Fill, sand, fill...


Still more filling and sanding...


And still more filling and sanding left to do...

And just when you are ready for something to go right, you look at said homespun fireplace and can no longer kid yourself because you HATE it! It's too tall, too squished, the Michael's hutch top on the mantle is out of scale and the whole space is too tight with the bookshelves! Your sconces are just going to look stupid! So there is no other choice but to re-build the entire thing from scratch. And in some weird way, you are actually relieved because you did not settle for "meh".


A good thing to do when you are pouting trying to work through a problem is to paint. Sand and paint, sand and paint.


And stain stair treads,


And start on window trim.


And then spend the next three days helping your elderly parents pack up their entire lives because they bought a new house in Arizona and while you are so happy and proud of their bravery you have no idea how you will cope with how much you'll miss them.

xoxo
Jodi