Search My Blog!

Use the Search box below to find keywords that you're looking for quickly and easily!

Search Feature

Showing posts sorted by relevance for query flowers. Sort by date Show all posts

Thursday, October 11, 2018

Growing A Cottage Garden Part 5

With family coming in for a visit on the 19th, I knew this week would be my last chance to work on minis for a while. So, I pushed hard, worked late, and really every spare moment (and moments I should have been doing other things) were focused to get as much of the garden finished as possible. I'll apologize now for not taking any "in process" photos. I'll just explain some of the processes with the photos.

*One quick note for Chrome users: If you want to view the images as large as possible, even larger than the Blogger photo viewer, right click on the photo and select Open In New Window.

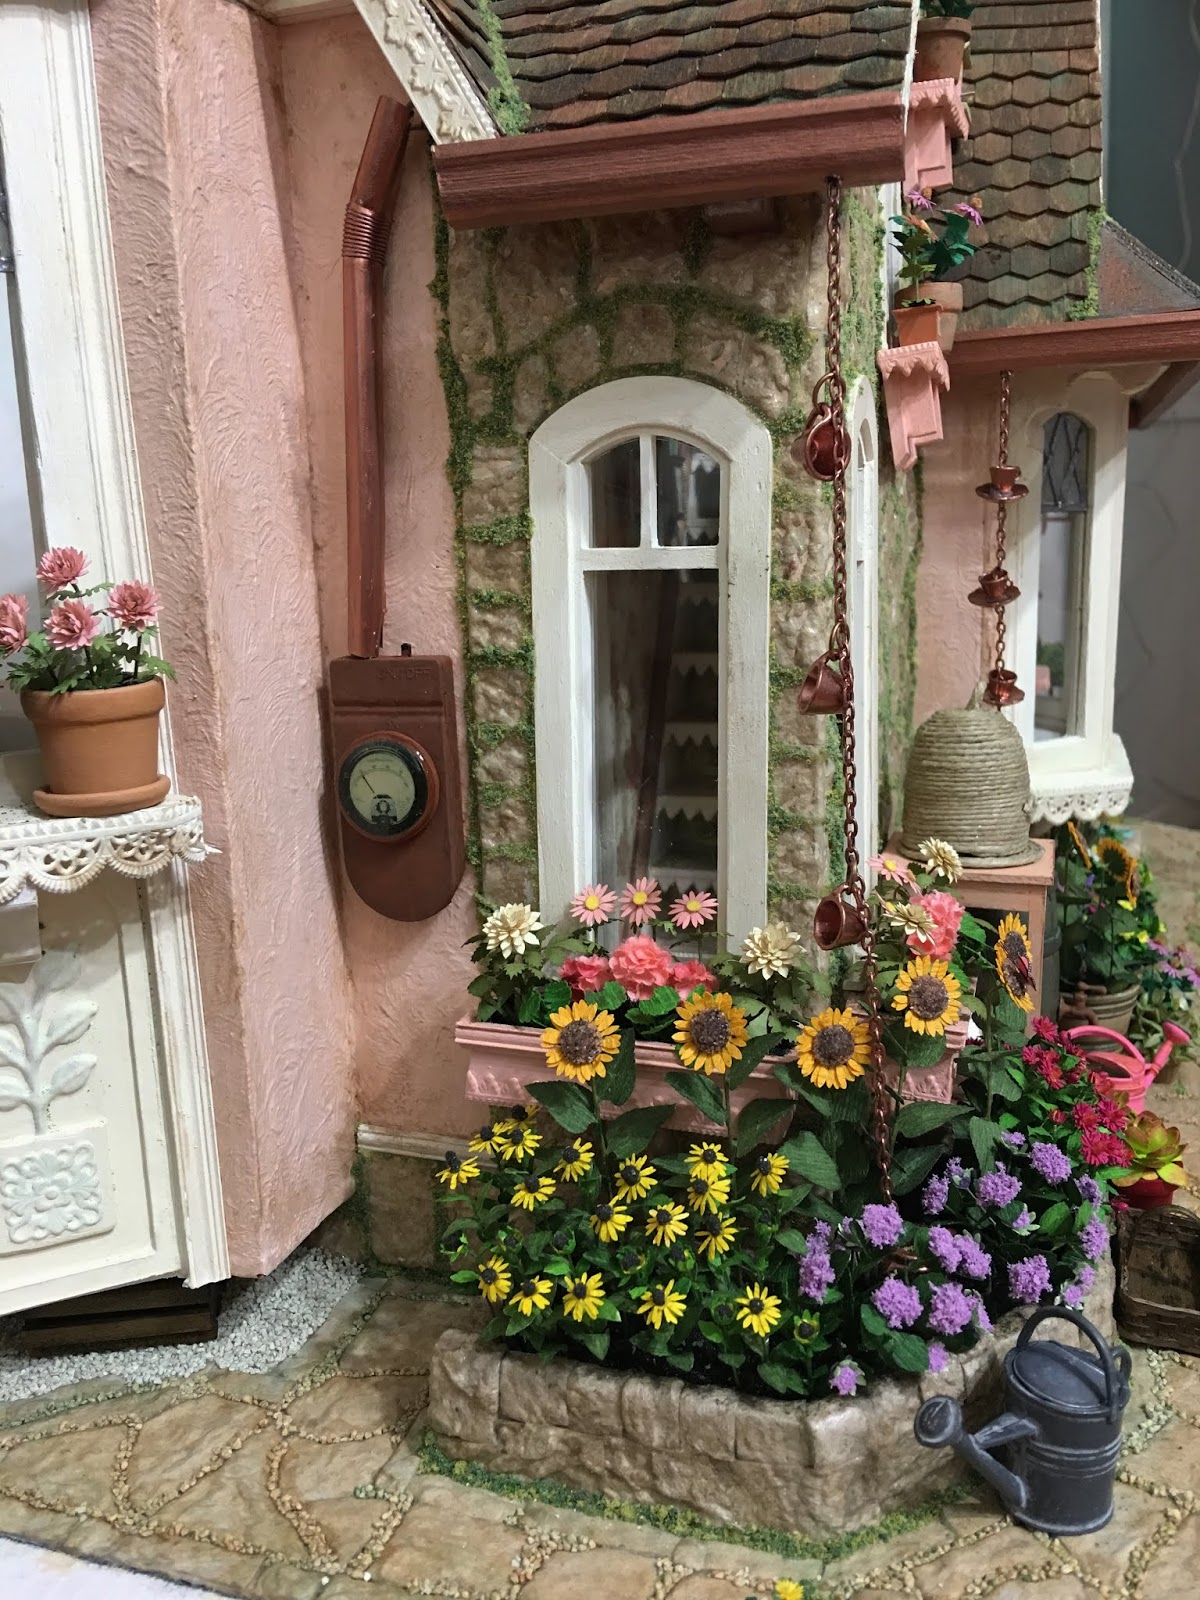
I finally committed to attaching the flower boxes


I installed gutters and teacup rain chains which empty into rain barrels. I installed the battery powered porch light (after the brass was made copper), the teacup address plate, topiary and strawberry pot to the porch area. I have yet to make the strawberry plant. I also need to make a door mat.


Here's the bee skep and the bee smoker. I have the bee skep tutorial somewhere on the blog. Search skep and it should come up. I still need to make lots of tiny bees. The ones I made for the Three Pigs were a little large and cartoonish, which was fine for that build, but I'd like to try for smaller ones at some point.


Here's the corner planter filled with flowers that bees love. And another teacup rain chain to utilize nature's water. You may also notice the stone path has been weathered and aged.


The light switch and battery pack for the stairwell lights have been turned into the electric meter. The space below it is reserved for the big clay pot which will be the home of the Camellia tree, once I get around to making it.


The kitchen's bay window ledge was always slated for pots of herbs and flowers, and I finally got to make that dream come true! The area below the bay window got a layer of gravel - it still needs to be aged. A water heater and gas meter are planned for the small space to the left of the window.


Here's a photo of this side of the cottage. It looks a little bare now without the rose arbor and fences.


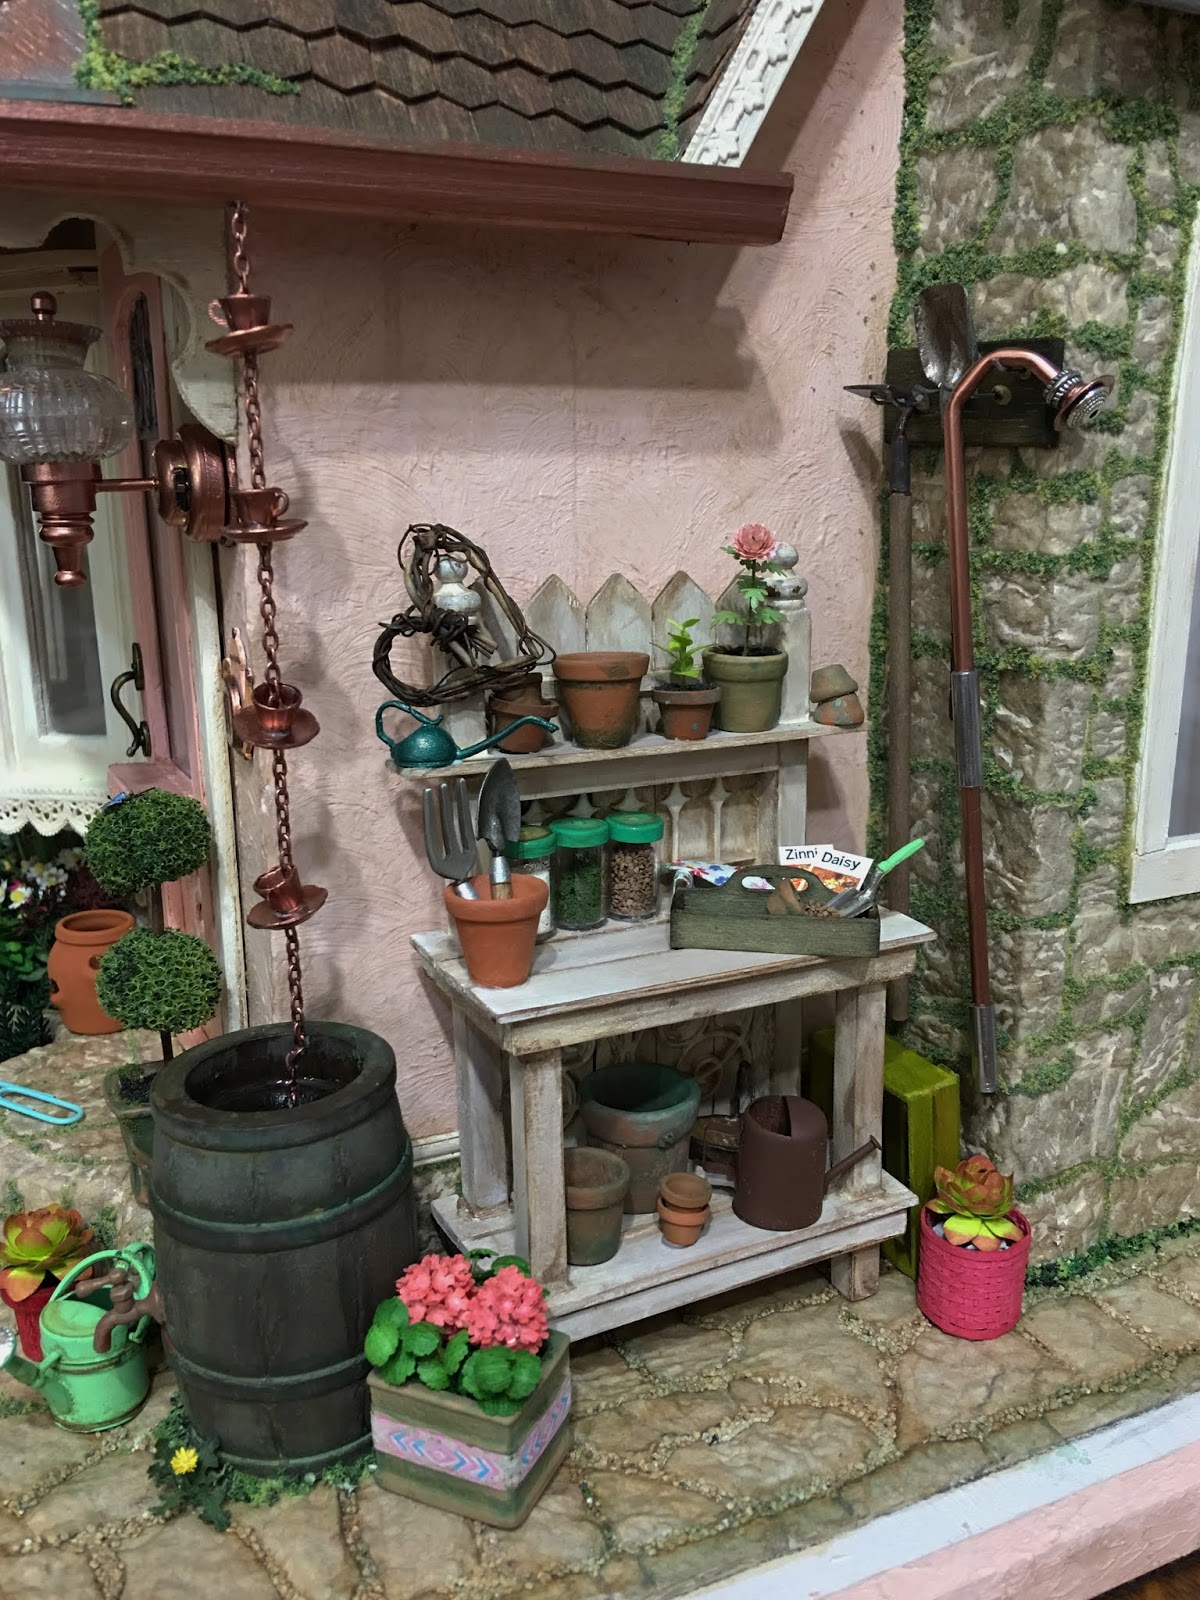
The right side of the cottage was the home of the potting bench, which finally got outfitted for planting.


In order for our homeowner to reach the high window boxes for watering, I made a watering wand from roughly bent brass rod. I added beads and metal pieces to replicate the fittings, and to make it look adjustable.


To make the cheap, clear green hose look more authentic, I painted it with green paint marker, then aged with brown washes. I attached it to a fairy garden wall sink (painted copper) and added the hose holder to the front. This area still needs some accessorizing in good time.


Here's the whole side together.


The next step in the process will be to add flowers to the fence planters, then install the fences to the landscape board. Then the arbor, then the gate etc.


For the next week, I'll be turning my attention to getting life ready for company. I hope to share the guest room photos during that time.

One last note before I leave you... Our talented, creative and funny friend Keli, in the midst of her own life challenges, has taken the time and care to send some of Charlene's treasures to me for display in the cottage. I'll share photos in my next post. They are perfect, and I love that through Keli's heart, Charlene's passion for minis will continue to delight others. Thank you, Keli! 💗

xo xo,
Jodi

Thursday, October 1, 2015

I Found Them!


Last night when I was thanking my grandma for her help with the pillows (some very weird synchronicities happened throughout the day), I also asked if she could help lead me to my missing window trim pieces for the living room window. This morning, I suddenly knew exactly where they were. I went right there, and voila! Understand, I looked everywhere for them. Thanks grandma!

With pep in my step, I set about happily making little details for the living room. Did I mention how much I love and am addicted to the feeling that comes over me when creating? Minis or anything else my mad mind comes up with? Madness in the name of my blog is completely apropos.


I save the leaves and flowers and branches from silk and plastic flowers I use in other projects. Lots of times they can be used to make 1/12th scale plants. In my pretend mini world, they are legitimate species. :o) One time, when I was working on CannaBliss, I ordered way too many little bags of the rubberized brown mulch from HBS. This works perfectly to camouflage the stems and glue in the container. I just squeeze some Tacky Glue into the pot, trim leave stems, arrange  the stems to look "natural", then sprinkle the mulch on top. After it dries, I shake the excess off back into the bag. I still have one full and one partial bag left. It goes a long way!


This is the lamp shade from the little bead lamp I made in July. I decided to cover the shade in the same toile fabric I used on the sofa pillows.I didn't have a pattern, so I had to make one by tracing the lamp shade onto card stock. I made a couple of these before, but with full sized lamp shades. The mini lamp was definitely harder to roll while holding onto the pencil, but I made the pattern close enough to work. It's times like these that I really wish I had taken drafting classes and had fancy drafting tools. In my house, we really try to make due with what we have.


I needed a little lamp table for the lamp to sit on. I wasn't sure what I'd make it out of, so I did what I always do when I need inspiration: I went through drawers and boxes until something sparked an idea. I had a couple of these unfinished trays and some legs. I knew I'd use them "someday". Today was the day!


Here is the finished table with the lamp. I added a book, a jar of fresh picked flowers (not), and a plant basket. Looks like I need to tie up that lamp wire a little better! Also, maybe it is time to mop the floor...


Here is the other little table, all dressed up with tchotchkes. I have two shelves full of real sized tchotchkes. None of them are really useful, but I do like to look at them a lot!


Here is the table in its new home. The room is still far from complete. I have pictures in frames to make, the coat rack, a shelf filled with junk curtains, and I think it still might need a rug and an ottoman. 


Those projects will have to wait a few days. It looks like I'll be car shopping with Ande! The Jeep he's been driving since he was 17 is no longer fit for daily driving. This time, he's looking for fuel economy rather than lift height and tire size. He's really all grown up now! :0)


Wednesday, August 31, 2016

How To Grow A Miniature Garden In Two Days...


I am happy to say that my 19 day work marathon finally wrapped up last Friday night! It's amazing how quickly things fall apart when you don't clean for three weeks! I spent the weekend getting the house back in order and was ready for minis on Monday!

At this point in the HBS Creatin' Contest build I could have gone in several directions. The open side roof piece and the roofing needs to be done, then there's the fascia, and I have a long list of little projects that all need doing. It was a toss up, but I decided that some mini vegetable gardening sounded the most rewarding.

Have you ever watched the Food Network show called Semi Homemade? I haven't seen it in years, but I love Sandra Lee's philosophy: Why do it all from scratch when you can save time with a few ready made ingredients? For this post I am going to share how I used ready made minis, kits and good old mini ingenuity to create the vegetable garden for the little piggies...

I started with some carrots, beets and tomatoes from NattyCollection and some vegetable kits from TheMiniatureGarden on Etsy.


 I highly recommend all of the products from both artisans, but I wanted to expand and combine things to make them more realistic and more my own.

Tomato Vines
The tomatoes on the left are from the kit. they are plasticy one hole beads. The ones on the right are like FIMO, but softer and a little pliable, which was really handy for making alterations. I thought it would ne mice to combine the kit and the clay tomatoes.


I needed to make the vine wires attach to the "clay" tomatoes, so I drilled little insertion holes in the top and glued in the wires. For the kit tomatoes, I did the same but they already had the hole.


Then I bent the little wires to form a loop and cut away the excess wire.


Once everyone had their loop, I strung several of the tomatoes onto long wires.


I made the structure of the tomato vine using wire for the main stem and then smaller vines branching off of it.


I added the strings of tomatoes at random spots, wrapping the extra wire around the main stem.


Next it was time to add the leaves and flowers. I added veins to the leaves then glued them on as a tomato vines leaves naturally grow. Looking at photos really helped! I also attached a wooden stake to each plant.


They were starting to actually look good, but I thought adding some green and unripe tomatoes would really add some nice detail. I looked around for what I could use, and painted styrofoam balls worked out perfectly!


Here they are before potting so that I could determine how tall to leave them.


And here they are sculpted and planted in their barrels. A fun and rewarding little project!


Zucchini Plants
The zucchini plants started out as a kit. The kit does not include actual zucchini - only the leaves and flowers. I decided to make my own to add a bit more visual interest. I just cut off the ends of some take-out chopsticks, sanded them to shape, then painted them. I used my little star-flower paper punch for the little flowery thing on the ends, I am not even going to pretend to know vegetable plant anatomy, and tonight I am just too lazy to Google it!


I was pleasantly surprised to find that I had all of the paper punches I need for future zucchini plants! In fact, I cut out more pieces to beef up the kits!


Here's a photo of a zucchini plant's leaf. See the spotting? It was easy to replicate using a little dry brushing with a pale gray paint.


Now it was time to vein the leaves, crinkle the flowers, add the wire stems and assemble everything. Once again, Google photos really helped, as the kit instructions have only outlined renderings.


I just love the vibrant colors! These will add so much visual interest to the little garden, and they were so simple to make!


Lettuce
The lettuce kit came with some strips of thick green crepe paper and some wire. Next time I'm at Joanne's or Michaels, I'm going to buy some! I see lots of lettuce in my future projects! It was probably the most fun of all the vegetables!

After cutting and shaping the paper, I ended up with enough leaves to make 8 heads. Three of them had one extra leaf. The first leaf gets glued about 1/8" onto the wire, then gets rolled up tightly. Each consecutive leaf gets glued a little offset from the previous leaf. Once all of the leaves are glued, you use tweezers to fan out the leaves. For the red leaf, I just watered down some purplish/red paint and dabbed it on. LOVE, love love the lettuce!


Green Onions, Swiss Chard & Leeks (oh my!)
Who knew that so many awesome mini veggies could be made from these simple and everyday supplies:


For these little veggies, a pictorial will do nicely!


Reworked Clay Carrots & Beets
NattyCollection makes fabulous mini food and other items, but there is a certain style I was after with the garden for this project. I guess more organic looking is what I was after. Like I mentioned earlier in the post, these veggies are soft and pretty pliable which allowed me to make alterations.

For the carrots, I was able to twist out and drill the carrots to add my own tops made from painted Lycopodium. I dabbed some glue on the end of the stock and pushed it into the drilled hole with the aid of a piece of wire. It's not a perfect carrot top, but it has a much more natural look.


For the beets, I cut about 2/3 off the bottom and affixed them to a "dirt mound" to give the illusion of a planted vegetable.


I attached all of the veggies to dirt mounds, coated the mounds in a light layer of glue, then added Woodlamd Scenics dirt on top. I also dirtied up the carrots and bottoms of other veggies.


I will wait until the last steps to attach the vegetables to the base and create the actual garden. When the roofers come they always make such a mess and kill all of the plants anyway. Better to wait...


I'm not sure what to tackle next, but I hope it will be as fun as the vegetable garden was! It's so nice to be back into the mini swing of things!

Have a safe & happy Labor Day weekend!

Jodi