Search My Blog!

Use the Search box below to find keywords that you're looking for quickly and easily!

Search Feature

Saturday, October 15, 2016

All Work And No Play...


Makes me a very cranky miniaturist! Therefore, this time in my bi-monthly work overload, I instituted staggered deadlines! It's been brilliant! Every 9 days or so I get 1 or 2 days off! I am at the end of the second day of play time, and while I will be back at the grindstone tomorrow, I managed to finish up quite a few items on the Creatin' Contest To-Do List!

First up, it felt like the kitchen area needed some more detail. I decided to reconfigure another Michael's hutch to make a small shelf for under the window. This involved popping the piece in the microwave for about 30 seconds. After each time in the micro, I would pull the parts off that I didn't want or that I wanted to reconfigure. For anyone who's new to softening glue with this technique, please make sure to remove any and all hinge pins before placing in the microwave. Also, only handle the hot piece using potholders or in my case an Ove-Glove. They work great!

Original hutch - removing the doors and metal hinge pins.

After the first 30 seconds in the micro, I separated the top and bottom.

I had to use a variety tools to saw off some curvy bits to make the bottom flush.

I popped it in the micro again to remove the shelves - there was not enough space between them to display what I had in mind.

I wanted to use the scrolly piece, but needed to cut it down a bit.

Scrolly bit and first shelf were ready for painting, gluing, filling and sanding.

I decided to stain the shelves and top, and use Georgia Clay on the rest to tie the piece to the other furniture in the build.
Once everything for the shelf was finished, I glued it together. Now I could work on the shelf fillers. I believe the last time I worked with polymer clay was when I was working on Starbucks back in 2013. The last time I made canning jars was way back in 2003! I made some basic fruit and vegetable shapes, and a couple loaves of bread. I had a couple adorable, wonderful loaves that I purchased for this project, but they completely disappeared someplace and I was forced to just make my own. I do hope I find them one day - they were so stinkin' cute!!!

Rolling balls for peach slices. I like to bake the balls, then cut the slices while the clay is still warm.

I made apples, peaches, choke cherries, green beans and potatoes.

Here the canning jars are getting ready for filling. I like to use food coloring, alcohol ink or chalk pastels for coloring the resin.

Chalk gives the loaves the perfect just baked look!

I also needed to fill the kettle with wolf meat and vegetables in wine sauce.
Now I needed to make some groceries for the shelf. I cut 1/4" dowels into 1/2" lengths. These were going to become canned goods. Instead of painting the tops, I decided to try out the aluminum tape that I have. I used a paper punch to punch the tape then affixed one to the top and bottom of the cans.


I thought that food labels from the 40's seemed kind of appropriate for the piggies. I found some really great labels googling, then adapted them in my graphice program to fit some wooden shapes I cut.


Here is the filled up little shelf in it's new home. I was careful not to block the view out the window of poor Sam's straw house still being blown about in the wind. I added a few other details I had in my stash, unused from past projects.

These little piggies won't be going hungry!
I made some napkins, added some silverware and painted plates and bowls for the table. Since they're celebrating their freedom from that terrorizing wolf, they'll even partake in some wine with dinner.

Musical instruments are always close at hand for these merry fellows!
Joe likes to display his daily epicurean genius on the menu board. Today's menu is truly an inspired culinary experience!

Kettle braised wolf tenderloin, harvest root vegetables in red wine bordelaise.
Mmmm... Looks delicious!

Ooohhh and crusty french loaves, too!
Nothing beats a home cooked meal shared with the piggies you love!


This was just the relaxing break I needed to fill up my happy tank again! I'm ready for more hard work, and soon after I'll be back to my beloved mini world! This time, to begin adding final details to this fun little build!  See you in about 10 days or so!

Jodi

Monday, October 3, 2016

Speaking of Lists...


It seems that a lot of us participating in this year's HBS Creatin' Contest are beginning to realize that the December 16th entry deadline is coming up rather quickly! Several of us have been posting and chatting about our To Do lists. In my case, it seems that as soon as I check something off, I realize I need to add several more things. Talk about lighting a fire under your butt!

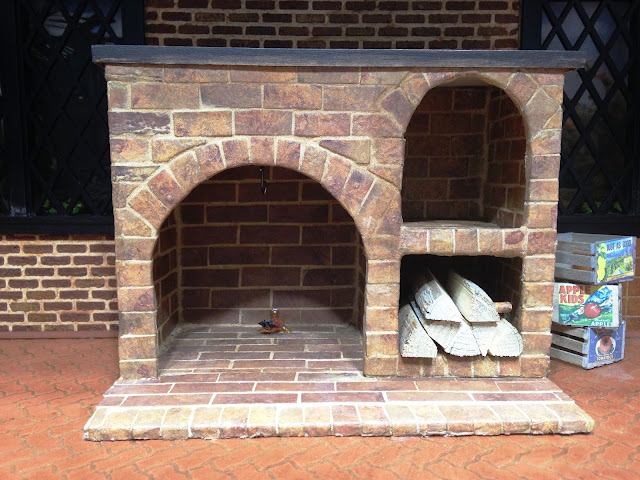
The highest priority item on my list was addressing the fireplace's flame lighting. It was the age old story of how everything was working just perfectly until I lost access to the connections, and then it just stopped working. It took me a good while to sit and think about a Plan B. But I finally just got out all the parts and made myself sit there until I came up with a solution.


The first thing was to remove the grate with logs from the fireplace. I had to cut the original wires in order to free it. Then I removed the non working bulbs and saved them for another project some day. Rather than trying to connect the new lights to the 12 volt system, my only option seemed to be running them using a 9 volt battery system.


I debated for a long time about having access to the switch while still camouflaging the battery and wires. In the end, I remembered Brae's hidden battery in her firewood box and that gave me an idea. If I loosened the firewood from the fireplace cubby and made it so that it could slide in and out that would solve all my issues.


I inserted the new lights into the fire grate, drilled a hole into the side wall of the fireplace, strung the light wires through, met them up with the switch wires in the firewood cubby, attached all wires together then and heat shrink tubed them securely. Now I only needed to come up with the camouflaged log system.


I grabbed some quick wood scrap and Woodsies and came up with a sort of log/battery box toboggan. When it's inserted into the cubby, you (almost) can't see a thing!


To celebrate after the resolved lighting issue, I decided it was time to mount the head of that Big Old Bad Woolf! It will serve as a reminder that no matter how big the bullies are in your life, just look them right in the eye and you'll persevere in the end!


Now that one important item was finally crossed off the list, it was time to move onto some of the fun details for the project! The oldest piggy, Bob, knew that it would be important and inspirational to chronicle the events that took place with The Big Bad Wolf. He's been typing up a novel about it since very near the beginning. He used to have his typewriter sitting on the kitchen table, but now that his brothers were sharing the space he needed a dedicated writing desk. I took one of the HOM kits in my stash and gave it some new legs that would fit better into our cartoony scene, For the seating, I added a bigger seat, padding and fabric to a little milking stool.


It was also important for Bob to have everyday supplies like pencils, paper pad, stamps, envelopes, tape, twine and a ruler. I'll have to hunt for some scissors to add in the drawer soon.


Here's the extra large but somehow perfect typewriter with the last page of the story being written. I think Bob's publisher is going to be pleased!


I'll leave you with a few up to date progress shots. There are still many items on my list that I'd like to include on the project. We'll see how many I end up with time for.


I am always looking to the next mini projects in the queue. It's embarrassing to admit, but in my daily gratitude conversations with the universe, I often express just how lovely my life is, and that when it's my time to leave this Earth I will do so with no regrets. I always include an asterisk at the end of the conversation, though, asking if I can please stay until such and such mini projects are finished. I bet I get some head shaking with that request. What can I say - I really love miniatures.

I'd love some wisdom and feedback on a particular decision that I am struggling to make. After the contest build is completed, do I start on the Beachside Bungalow, or finish the Shabby Chic Soap Shop first? I am leaning toward finishing the soap shop. What do you all think???

Thanks for your two cents...

Jodi


Friday, September 30, 2016

Missing Blog Roll!!!


Has anyone else who uses Blogger for their blogs noticed that your blogroll is missing? Me, too - starting yesterday. When I went into Design then Layout, the entire gadget was just GONE!

I searched for a solution and found only that blogger recommended clearing out your browsing history and your cache. I did this several times, and still no blogroll.

I tried many other things including adding/deleting and then re-adding the blogroll gadget.


None of the blogs that I am subscribed to would show up, and each time I tried to add them via the 'blogs I'm following' check box. I'd get an error page recommending I clear my history and cache, which I had already done.


Eventually, all that worked was to manually add each of the blog url's to the list, saving in the gadget window and then Saving Arrangement after each addition.


I know that I did not get all of them, so I went to a couple of the blogs I know of that list all of the mini blogs in their blogroll. Guess what? Their blogrolls were gone, too!

I am going to scour and search and try to find the ones that I missed. I have had issues in the past with newly added blogs not showing up or just disappearing. It is frustrating, and I can't seem to find a logical reason for it.

If you do not see your blog in my blogroll, please leave a comment so that I can get it manually added. I don't want to miss anything!

Good luck everyone! I hope the fix will last!