Search My Blog!

Use the Search box below to find keywords that you're looking for quickly and easily!

Search Feature

Monday, October 3, 2016

Speaking of Lists...


It seems that a lot of us participating in this year's HBS Creatin' Contest are beginning to realize that the December 16th entry deadline is coming up rather quickly! Several of us have been posting and chatting about our To Do lists. In my case, it seems that as soon as I check something off, I realize I need to add several more things. Talk about lighting a fire under your butt!

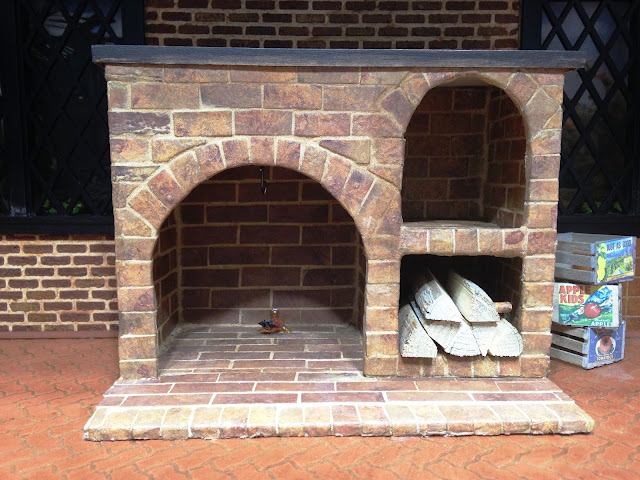
The highest priority item on my list was addressing the fireplace's flame lighting. It was the age old story of how everything was working just perfectly until I lost access to the connections, and then it just stopped working. It took me a good while to sit and think about a Plan B. But I finally just got out all the parts and made myself sit there until I came up with a solution.


The first thing was to remove the grate with logs from the fireplace. I had to cut the original wires in order to free it. Then I removed the non working bulbs and saved them for another project some day. Rather than trying to connect the new lights to the 12 volt system, my only option seemed to be running them using a 9 volt battery system.


I debated for a long time about having access to the switch while still camouflaging the battery and wires. In the end, I remembered Brae's hidden battery in her firewood box and that gave me an idea. If I loosened the firewood from the fireplace cubby and made it so that it could slide in and out that would solve all my issues.


I inserted the new lights into the fire grate, drilled a hole into the side wall of the fireplace, strung the light wires through, met them up with the switch wires in the firewood cubby, attached all wires together then and heat shrink tubed them securely. Now I only needed to come up with the camouflaged log system.


I grabbed some quick wood scrap and Woodsies and came up with a sort of log/battery box toboggan. When it's inserted into the cubby, you (almost) can't see a thing!


To celebrate after the resolved lighting issue, I decided it was time to mount the head of that Big Old Bad Woolf! It will serve as a reminder that no matter how big the bullies are in your life, just look them right in the eye and you'll persevere in the end!


Now that one important item was finally crossed off the list, it was time to move onto some of the fun details for the project! The oldest piggy, Bob, knew that it would be important and inspirational to chronicle the events that took place with The Big Bad Wolf. He's been typing up a novel about it since very near the beginning. He used to have his typewriter sitting on the kitchen table, but now that his brothers were sharing the space he needed a dedicated writing desk. I took one of the HOM kits in my stash and gave it some new legs that would fit better into our cartoony scene, For the seating, I added a bigger seat, padding and fabric to a little milking stool.


It was also important for Bob to have everyday supplies like pencils, paper pad, stamps, envelopes, tape, twine and a ruler. I'll have to hunt for some scissors to add in the drawer soon.


Here's the extra large but somehow perfect typewriter with the last page of the story being written. I think Bob's publisher is going to be pleased!


I'll leave you with a few up to date progress shots. There are still many items on my list that I'd like to include on the project. We'll see how many I end up with time for.


I am always looking to the next mini projects in the queue. It's embarrassing to admit, but in my daily gratitude conversations with the universe, I often express just how lovely my life is, and that when it's my time to leave this Earth I will do so with no regrets. I always include an asterisk at the end of the conversation, though, asking if I can please stay until such and such mini projects are finished. I bet I get some head shaking with that request. What can I say - I really love miniatures.

I'd love some wisdom and feedback on a particular decision that I am struggling to make. After the contest build is completed, do I start on the Beachside Bungalow, or finish the Shabby Chic Soap Shop first? I am leaning toward finishing the soap shop. What do you all think???

Thanks for your two cents...

Jodi


Friday, September 30, 2016

Missing Blog Roll!!!


Has anyone else who uses Blogger for their blogs noticed that your blogroll is missing? Me, too - starting yesterday. When I went into Design then Layout, the entire gadget was just GONE!

I searched for a solution and found only that blogger recommended clearing out your browsing history and your cache. I did this several times, and still no blogroll.

I tried many other things including adding/deleting and then re-adding the blogroll gadget.


None of the blogs that I am subscribed to would show up, and each time I tried to add them via the 'blogs I'm following' check box. I'd get an error page recommending I clear my history and cache, which I had already done.


Eventually, all that worked was to manually add each of the blog url's to the list, saving in the gadget window and then Saving Arrangement after each addition.


I know that I did not get all of them, so I went to a couple of the blogs I know of that list all of the mini blogs in their blogroll. Guess what? Their blogrolls were gone, too!

I am going to scour and search and try to find the ones that I missed. I have had issues in the past with newly added blogs not showing up or just disappearing. It is frustrating, and I can't seem to find a logical reason for it.

If you do not see your blog in my blogroll, please leave a comment so that I can get it manually added. I don't want to miss anything!

Good luck everyone! I hope the fix will last!

Tuesday, September 27, 2016

Side Tracked...


Well I'm sorry to report that I haven't worked on The Three Little Pigs: Revenge at all since my last post. I am so close to loading everything in, but I got totally side tracked!

Usually when I post photos they consist of progress on the current project I'm working on or things I learn to make along the way. Sometimes I post product reviews, and sometimes I post about a new project that's entered the queue. Rarely do I post about new minis on their own, but that is only because up until now I usually make my own or purchase mass produced minis. I often bash them a bit to make them unique, but usually since they are part of the current build there's no need for a post all their own.

Until Now...

Before I get to the good stuff, I'll share a little background...

Brae posts beautiful photos of her new minis and her projects. She has often shared tips on how she sets up her mini photo shoots, using props and lighting and scenery - they are really extraordinary. I enjoy those posts so much! So I thought, now that I am beginning to purchase artisan made minis (and not only for current projects but just because they are wonderful), I should have some quick set up items on hand to use as backdrops for the photos! Then I can share, too!

I picked out a couple scrapbook papers and pasted them to some 8.5 x 11 mat board. I sandwiched them between waxed paper, stacking heavy books on top of them overnight to keep them from curling. Once they were ready I added a piece of baseboard to each panel.

 For the first flooring sheet I pasted a leftover strip of Houseworks wood flooring to mat board and weighted that overnight as well. Then I sanded, varnished, sanded and varnished for a natural walnut look. I like the dark wood and tropical blue together!


For the second floor, I wanted something a little deeper for bigger items. I have some wood veneer sheets leftover in the pack that I purchased last fall for Alki Point. I selected a light one with a good wood pattern. I cut it into strips about 1" wide, then glued them on to a piece of scrap wood. I clamped and let dry overnight, then used wood filler to help disguise any of the larger spaces between the boards. I sanded, added pilot holes for straight pin nails, nailed them in, then set to work with color washes to make the floor look like reclaimed barn wood. Once I was happy with the finishing, I sealed it with a good coat of matte Mod Podge. I love the effect!


Now that I had the backdrops, I needed a prop to set things on. I just love to make mini kits, and I just happened to have the sideboard kit from The Daisy House stashed away for an occasion just as this!


I also happened to need to try out the new FolkArt chalk paints and waxes I picked up! I love it when opportunity knocks! Especially when it's a mini one!

FolkArt Chalk Paint Colors
It took a couple days of sanding, gluing, drying etc. to get the kit done before I could start painting. I started off with a coat of the FolkArt chalk paint called Sheepskin. It goes on pretty thick and you need to leave it to dry for at least two hours before you can sand it, so this also took some time. After the second coat was dried and sanded, I painted over the top in black - also two coats drying and sanding. Then using a light touch, you just sand away the black to create "wear" spots, exposing the sheepskin color underneath.
FolkArt Wax comes in clear, white and antiquing (brown)

I then used the FolkArt White Wax. For this process, you brush it on, wipe away a bit, then leave to dry overnight. Then you come back and buff it with a lint free cloth. The more you buff, the shinier the piece will become. After my white wax dried, I went over it with the FolkArt Antiquing Wax. It is brown in color, and leaves a nice dark finish with wonderful contrast in the cracks and crevices. I love how the finished sideboard looks against each of the backgrounds!


I am planning to use this process, but with different colors, on all of the furniture I make for The Beachside Bungalow. Very exciting!!! You can find some helpful How To videos for these products on YouTube!

Now that I have a background and a finished prop, I can share my new found treasures and links to where I purchased them! Many of them I only found out about because other wonderful mini bloggers shared, too! Thank you all so much!

First, I have never really been a doll person. I liked them, but never coveted a special one for my own. Gertrude, whom I purchased nearly a year ago, was a different story. I just had to rescue that poor lady! You can read about her here.
But when I came across the ball jointed dolls from OOAKhandmade on Etsy, I just had to have one - well not JUST. I waited 2-1/2 years for one! That is because to me they are expensive! Unless you happen to win one of the bidding wars on eBay. Then you can get them for about $100 less. But with the eBay auctions, you take what you get. When you order one, you get to pick all sorts of features, and the doll is made especially for you. One of the things I liked most about her dolls is that they are fully posable, and completely anatomically correct! Yes, she makes male dolls, too! Maybe someday...

Meet Kairi (feminine name for The Sea). She stands 5-1/2", has medium brown hair and blue eyes.


She is fully anatomically correct, although I have taken the liberty to respectfully protect her privacy here. But trust me - she definitely has a ba~dunk~a~dunk!


She'll eventually reside in 549 Tide Pool Cove, though it is now only the Beachside Bungalow kit.

She arrived from Poland naked, in her own special cotton sack, inside a personalized wooden box. She has an extra set of hands, and feet with built in high heel shoes. The certificate of authenticity is signed, and her serial number displayed.


She was weary after such a long journey, so the first thing I showed her was her new wardrobe. It is filled with clothing, shoes, purses and unmentionables from Paolae Sara Miniature, OOAKhandmade, and Jings Creations, all on Etsy.


She was over the moon! I had so much more for her, but I'll need to move the pole up higher in her wardrobe in order for them to hang properly. I plan to finish her bedroom set using the chalk and wax paints. Luckily, she loves the beach, and contemporary/casual with a touch of shabby is her thing!


She also received some very special gifts from MiniFromItaly, also on Etsy. The work on these items is absolutely amazing!

Bra and Panties in a gift box

Sunflower Purse and Wallet, Belt and stellar Sandals

Gertrude was so excited to meet her! Another girl to talk to! They hit it off right away! I'm so glad because they're going to have to be roomies at Alki Point until Kairi's house is finished! Lucky for them Starbucks is right next door! They are still open in spite of ongoing construction...


Enoch, as curious as ever, had to get a look at the new girl. He is extremely shy, and will most likely watch for several weeks before he lets Kairi see him. Probably a good idea - not everyone believes they exist, so it's quite a shock when they see him.


The next work surge is due to hit any day now, so mini-ing time will be precious few until I'm all through it again. Then it's back to work on the Creatin' Contest build. All the while the deadline looms closer still...

Enjoy the distant but familiar smell of wood stove smoke, the refreshing chill of cold bed sheets, and the leaves crunching under your feet!

Jodi

P.S! I cannot believe that I forgot to mention The Pillows from Brae's Etsy shop, and The Hamper from Anita's Etsy shop. I highly recommend both!!!