Search My Blog!

Use the Search box below to find keywords that you're looking for quickly and easily!

Search Feature

Thursday, June 30, 2016

Seeing Mini Dreams Become Real...

Some people who are entering the 2016 HBS Creatin' Contest keep us all in such suspense! I see little peeks and get so excited that I am like a kid on Christmas Eve! I used to beg my parents to let me open my presents early. I'd say "Just one? Please can I open just one? Please, please, pretty please mommy?" I'd jump up and down with my hands folded in prayer gesture on my chest and display all of the childlike exuberance I could muster. Some years I must have been more skilled or adorable than others, because sometimes, rarely, she would say YES!!!

I suck at keeping secrets and surprises. I always want to give my gifts or good news to everyone AS SOON AS POSSIBLE! I am so much happier giving gifts than receiving them. Probably because I am a pleaser, and partly because I rock at giving gifts! If you squeal or even cry, I've done my job well!

All of that said, I am sharing every gory detail, success and failure with you during my contest build. If you like one of my ideas, I wholeheartedly want you to take it and run with it! Sharing leads to inspiration, and inspired miniaturists keep our childlike dreams alive. And best of all, we pass on the love for our obsession to a whole new generation of dreamers!

Okay, so where did I last leave off... Oh yeah! I got all of the bricking finished, except for the outside, so it was time to wrap up some structural issues. I left this little bit of space on the back foundation so that I could create a fake wall.


I cut a piece of plywood down to size with the rip saw, made the side strips then used the scroll saw to make the outer window openings. The outer windows are the exact same as the ones you'll see from the inside. Here's the glued and primed fake wall:


The fake wall will serve as the housing for the scenery that you'll see looking through the windows from inside. It will also store the artificial sunshine coming through the windows. Here are the window scenes: A blown down wooden house, and the remnants of the straw house being blown in the wind. That Big Bad Wolf can really blow!


Now for some structure... I combined two kits, butt to butt and reassigned the opening to the side. Lots of cutting and filling in. That meant that I needed to modify some of the structural peices - like the ridge beam for the roof. I had to join both into one, so I drilled a hole in the center ends of each and glued in a dowel for strength. Then, I needed to decide on my roof length and cut it to size. Later, I stained it and glued it in.


Speaking of the roof, I had a total of four pieces from both kits. All too short for the new configuration. This meant that I had to join two for each roof side, cutting one of them to the proper new length. I kept a small overhang on one end, and shortened the porch to keep the project under 30" (my shelf limit).


Notice here that I have had to add an additional piece of trim to the edge of the roof to account for the fake wall. Once the roofing is on, no one will ever know! Shhhh...


Here's a peek at the inside with the back roof in place. It's going to need some light in there!


Look what adding the front roof does to it! Downright spooky in there! I better make some adjustments, both for light and accessibility!


That's better!


Oh yeah! The beams on the floor have also been modified from both kits, beaten up a bit and will be added to the ceiling later...


Now for the sunshine... I ran a long strip of warm white LED's across the top of the window openings on the interior of the fake room. I also tied in the ceiling lanterns and the fire from the hearth into the tape runs. I lined the interior wall with aluminum tape for optimum reflection, and added just a peek of a hedge to both windows so they'll be seen from the inside.


Here it is all closed up with the back roof getting glued into place. I'm going to need some fascia on the roof edges to help hide the light leaks.


And here it is from the inside. I will wait to add the front roof piece until I am done with most of the fiddling inside. I have been planning this fake window scene in my mind since I dreamed up this project many years ago, and I am really please with how it is turning out!


Next time I'll work on ceiling beams and a lot of pig friendly furniture! But first, I need a nice long weekend away with the hubs enjoying the beautiful forest, warm sun on my arms, and reconnecting with the knowledge that we are all a part of something bigger and more beautiful than our daily lives allow us to perceive!

Wishing all of you a wonderful and happy Fourth-Of-July weekend!

Jodi


Wednesday, June 29, 2016

Hard Work Pays In MINI Ways!

Every couple of months my job completely takes over my life for several weeks. Looooong hours, little sleep and no time for minis. I like my work very much, and working from home in my PJ's is the best part of my benefits package. The torturous days of 80 mile and three hour commuting has been behind me for four years now, and I feel absolutely blessed! I speak words of gratitude to the universe every day!

Working a weird schedule has it perks, too. The "off time" I get can mean many days laced together with guilt free mini play time. And, if I do a really great job, it also means bonuses! You know what that means? A nice little vacation for the hubs and me to escape into the great wilderness exploring in utter peace and solitude. And... New Minis and Toys!!!

Because I was a very good little worker bee this last round, here are my rewards:

New Brother Sewing Machine - Yes, I will re-teach myself so that I can make perfect little pillows! And other important stuff, too...
A Little Clover Iron So That I Don't Have To Drag Out The Big Clunky One Anymore!
It really surprised me that I bought the RGT Beachside Bungalow. It was not on my wish list and I had no intention to. But, it was $40 off at Hobby Lobby, plus another 40% off with the coupon, so $90 including shipping + tax later, I am suddenly planning a new project. The original price tag on these is around $160.00. Apparently, Real Good Toys is out of stock on them until September. The moral to this tale is that when I've had a couple delicious Lemon Drop cocktails, a good deal is just too good to pass up.
I have had my eye on Brimble's Mercantile as a someday project FOR YEARS! Then of course when I went to finally buy one, they are not available through Greenleaf. Apparently, their laser cutting machine is broken, and they pretty much stopped production on the old die cut machine so that means unavailable until further notice. Somehow, the universe smiled upon me and I found one from a great mom and pop mini shop in Pennsylvania!  
They were SO NICE, too! Here's the email from the owner:

~~~~~~~~~~~~~~~~~~~~~~~~~~~~~~~~~~~~~~~~~~~~~~~~~~~~~~~~~~
Hi Jodi,
Thank you for your order of the Brimble Mercantile Kit. The order has been
processed and the Kit will go out to you tomorrow UPS. I will email you a
tracking # as soon as I get it. I hope you enjoy putting you kit together.
It was so much fun to do.

If there is anything else you need in the future, just email me as not
everything we CAN get is on the website.

Best Mini Wishes,
Shirlee
A Touch of the Past
www.atopdoll.com
atopdoll@npacc.net
~~~~~~~~~~~~~~~~~~~~~~~~~~~~~~~~~~~~~~~~~~~~~~~~~~~~~~~~~~

I'll remember the kindness and great service and continue to shop there in the future!

I ordered some items from my own Shapeways store. I just love my big double sink (used in Alki Point) and I love that I can order the faucet in Polished Nickel for about $12.00. So much better than trying to paint it! I also have not had the chance to use a couple of the lamp designs yet, so the Beach Bungalow will make the perfect opportunity!


Once I knew the Beachside Bungalow was mine, I started to plan the design in my head, along with a few modifications (because I can never leave well enough alone). The kitchen came first, because I love me some kitchen design!!! That lead me, of course, to Elf Miniatures. I ordered the Easy Oven Front kit because I had success using it on Alki Point:


Then I chose the Dummy American Fridge/freezer kit (I hope our British friends  just mean "dummy american" as in 'for looks only', LOL!)


I'll be making a Chrysnbon bathroom kit but I thought a purdier faucet would make a nice touch, so I ordered the traditional mixer tap in silver. It's soooo purdy!


Of course I got a few extra accessories but the Deal Of The Day was this:


I know - it's hideous, right! But I see ripping off the ugly fabric and ruffles and having the foundation for some really contemporary tush tuffits! And, do you know what I paid for them? Ten Bucks!!! I love a good (cheap) rehab (just ask the previous six fixer upper homes we had before we bought the "finished" one. Finished... Yeah right...

So I totally got to spoil myself, including ordering some basic restock and fun items from HBS! The Fourth-Of-July Sale started today and you save 20%! I't free minis and a no brainer, so go get you some goodies today!


And, in case you were at all curious, I have been diligently working on the Creatin' Contest build. I am at a stage where many things are in phases of completion, so until it all gels and I actually have some good eye candy, I'll save the progress post for later!
Hugs to all and I hope you get to celebrate more than just independance! Do something nice for yourself and then let your gratitude infect everyone!


Wednesday, June 22, 2016

A Little About Brick Options...

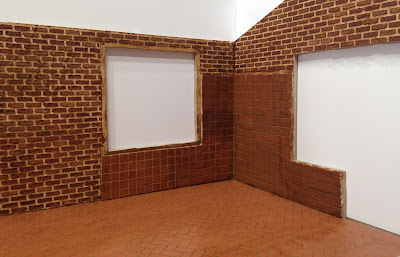
When it comes to brick options, there is a whole world out there beyond the egg carton kind. The ones I am using on the 2016 Creatin' Contest build seem a little less labor intensive than the egg carton version (used for the fireplace), and I am really having fun with the variety! There are great options out there for every budget!


The type of "brick" I saw and wanted to use as flooring is a product by MBS, or Model Builders Supply. I linked to their web site so that you can take a look at all of the wonderful products they have, but many miniature stores and suppliers carry a variety of their products, as well. Mine is called Interlocking Stone, and comes in a brick red color. I purchased mine through an eBay seller. The great thing about this type of brick is that it comes in a 14" x 24" plastic sheet and can be grouted and painted. I will also likely use it on the patio (unless something more fun makes itself known). 


It was so easy to cut it to size - I just scored the line and it snapped off perfectly! Grouting it was also a dream. I just used spackle and my finger to squish it in, let it set up overnight, then wiped away the excess.


It comes with a sheet of detailed instructions and gives great tips on painting and washes. I chose a brown wash and am still working on the layers to get the desired effect.


The next type of brick I wanted to throw into the mix is a Patio Brick Sheet by Houseworks. They are available from Miniatures.com and measure 6-1/8" x 12-1/8". Each little brick is 3/8" square and 3/32" thick. They come attached to a plastic mesh backing to make for faster and more accurate installation. Instead of using them as flooring, I thought they would make a great kitchen tile! I attached them using Tacky Glue and then used the spackle again as the grout. They were pretty easy to cut - just score several times and then use pliers next to the score and snap off. I applied the same wash on them as the floor.


That brings me to the next type of brick. I wanted something quicker for the inside walls. As long as it took to do the fireplace, I was afraid egg carton bricking the walls would take forever! There is a deadline, people! I tried Magic Systems Magic Masonry Brik on a project waaaayyyy back in 2002. I really enjoyed the stuff - and have since used the Slat and Ston versions (I have not misspelled them, they really are spelled that way on the packaging).


It comes with a roll (or two if you buy the larger kit) of stickers and dry grout/mortar mix in brick red or a gray-ish white. You can use the package as a mixing bowl for the dry mortar - just add water until it is akin to frosting. I like to mix mine in a Rubbermaid container because it stays moist for a long time. If it becomes too dry while you store it, no problem! Just add water and it reconstitutes! 


The first step to the process is to paint your background color. This becomes the grout. I chose white because I knew I was adding washes later and this was a perfect starting color. I let my "grout" dry for a couple of days. The next step is to apply the sticker to the wall. I started at the base of the wall and worked my way up overlapping consecutive rows by one brick to maintain the pattern.


One note on the sticker roll. Because of my past experience with the stickers, I have found it less frustrating to remove the "waste" part of the sticker prior to attempting to peel it from the slippery backing and apply it to the walls. Why? Because not every "waste" brick wants to kindly peel away from the "good" sticker. It is difficult to stop in mid-stick to remove the pesky "waste" and it's even more difficult trying to remove them once you have the sticker applied nicely to the wall. Trust me - take a few minutes and remove them first!


For the mortar mix, I grabbed a few tools I thought I might need to do the job. I ended up really only using the large putty knife. You can give texture to the mortar if you wish, but on the small Brik it didn't seem necessary. If I was doing a Slat kit I would have definitely done some texturing. It does spread very much like frosting and is ready to have the sticker pulled away after about 5 minutes. I did mine all at once and it worked out very well. It is messy, though (or is it just me?), so have your trash receptacle handy.


The mortar does lighten up a bit when it is dry. The color might be perfect for those of you who are going for Brick Red, but you can see that it does not match the warm color pallet I'm going for here. No worries! I learned while using the Slat on the Tuscan Villa and the Ston on Encounters that it takes very well to paint and color washes. Tip: If your grout is dark, you don't even really need to be all that careful! My white grout called for a little patience. I put a little squirt of paint into the bottom of several dixie cups and added water. I dipped the tip of the paint brush into the paint/water mixture and by just touching the tip of the brush to the brick it gave me the color variation I was after.


After that it was just a matter of applying the color wash. To keep the same tone, I used the Burnt Umber wash that I had used on the fireplace and the floor. I used it on the kitchen tile brick, too! Overall, I really like the way it turned out - subtle, textural and most important for Little Pigs trying to be protected from the Deadly Hot Air spewed by the lungs of Big Bad Wolves: Brick!


A couple more washes and I can move on to the next phase which involves a rip saw, a scroll saw, faux walls and lighting. Wish me luck!

For today, though, I will just bask in all of the juicy posts I missed the over the last few weeks of work! Yippee!