Search My Blog!

Use the Search box below to find keywords that you're looking for quickly and easily!

Search Feature

Wednesday, April 13, 2016

A fresh start in the work room!

The Sugarplum was started in earnest a few weeks ago, and then LIFE happened. After the four day trip with my mom I came home with bronchitis. I'd let you know in my last post that while I was gone my wonderful husband cleared out my office/work shop (living and dining rooms) and tore out the carpeting in preparation for laminate floors. It was great news for a messy miniaturist with two little puppies and a rapidly shedding beagle. Not so great news because I was really sick for another four days before I could help get the rooms back together again...

New color over old color

When finally I could muster any strength, I decided since the rooms were empty it was a great time to re-paint the dining room. I have never liked the color I ended up with a few years back (never trust a new paint mixer at Home Depot), a pale and cold blue which was supposed to be a warm blue/green, so it was the opportunity I needed for a do over. I got the perfect shade of Valspar called Steely Blue, and the paint itself was thick and really easy to work with. I love it! It will be my go to brand from now on! I primed first because I was going from satin to flat, and one coat covered the primer amazingly. I did three coats though, because I love the durability and depth of color that way.

Yellow ceiling and coral trim.
While I was at it, I got rid of the pale yellow ceiling and the coral moldings (what was I thinking), opting instead for white. Once the ceiling was painted and the coral edited out, I decided that the crown molding, chair rail, baseboards and bead board really needed a freshening up as well. Russ painted the second ceiling coat and the crown molding because heights give me the willies. Thanks honey!

Finished!

Raised the light.
Now the room is bright and clean! The hutch and buffet, which were given to me by my grandma, have found a home in other areas in the house. This means that I can line up all of the drawer units and other storage items along one wall, giving me much more room to move around in the space. No more bruised hips and stubbed toes? I doubt it - when I am focused on minis I hardly remember that my body is there! But having more room to slide from work station to work station on my table in my wheeled office chair will be liberating!

Why does it still look messy? Need to work on that.

Need to add a shelf for finished projects, maybe?

Here's the space before the work table comes in.

Hopefully, by the time I call it a night I'll have the work table back in here and ready for me to play. Right now though, I need something to eat and to let my aching muscles relax a bit.

The rest of the house is in shambles, so I have to spend the next two days hitting the reset on everything. Then work Fri-Sat and hike with the hubs and puppies Sunday. I have high hopes that next week I will be able to carve out some time again on the Sugarplum. Strike that - NEXT WEEK I WILL MAKE TIME FOR MINIS A PRIORITY AND MAKE SOME PROGRESS ON THE SUGARPLUM!!!

Here's a shot of Gertie enjoying a cup of coffee in the newly cleaned and dusted Starbucks. She likes to watch the progress on everything, and when she's finished she just strolls on over to Alki Point for the night.


TTYS :O) Hopefully with some exciting progress!

Thursday, April 7, 2016

Here we go again...

Hello mini friends! I just got back from a lovely little get away with my 66 year old but young at heart mom. Let me just tell you that on her 60th birthday we took her to a fun piano bar. She sang along with the pianist when he did a Snoop Dogg hip hop song. Yeah... You get the picture...

Anyway, nothing too crazy happened. We mostly drove through beautiful Oregon - down the middle, over to the breathtaking coast, then to the eastern side chasing the sunshine. It was fun, we saw some incredible landscapes, and didn't do too bad at Indian Head casino! ;0)

I started getting a sore throat on the last day, and really wanted to get home to resume working on the little soap shop.. We got home late evening, and I walked into a disaster...


Here we go again...


I know I really need to be grateful to my wonderful husband for putting in new floors for me. And I really, really am. I've just got the full on chest cold with body aches, so I'm extra whiny. 


Here sits my crafting table, taunting me as I camp out under the blanket, unable to do anything but cough and complain. Boo hoo, poor me.. I just really want to work on my minis!

Maybe by Sunday I'll have new floors, an organized space to work in, and most importantly a new attitude.  đŸ˜œ

Wednesday, March 30, 2016

Modifications...

I was so excited when I went to bed last night, knowing I'd have time to work on the soap shop today, that I lay there for hours going through the steps in my mind. I finally did fall asleep, and woke up ready to jump right in this morning.

After the first dry fit I was able to determine the modifications I'd need to make to accommodate the new doors and windows. Before marking where I'd need to trim away some of the window openings, I had to modify the windows...

These are cast resin frames by Jim Coates that I purchased on eBay several months back when I began to plan this project. They are very detailed and very nicely finished. I needed to turn them into a single double window, so I needed to trim them down so that they'd be flush where they met in the middle. Using my Xacto knife worked perfectly. I then sanded down the gold paint so I'd get better glue adhesion.  

Here they are before the trimming...


And here they are trimmed and glued.


There will be matching frames on the inside, so I modified and glued a total of eight window frames.

The double windows are just a bit larger than the openings in the kit, so I trimmed away the plywood using my scroll saw. I had to make access cuts in a few cases, but these are easily repaired later with interior and exterior wall finishes.

Before making the cuts in the bay window wall...


After cutting away the plywood.


Here is the left wall with the bay window and attic window in dry fit...


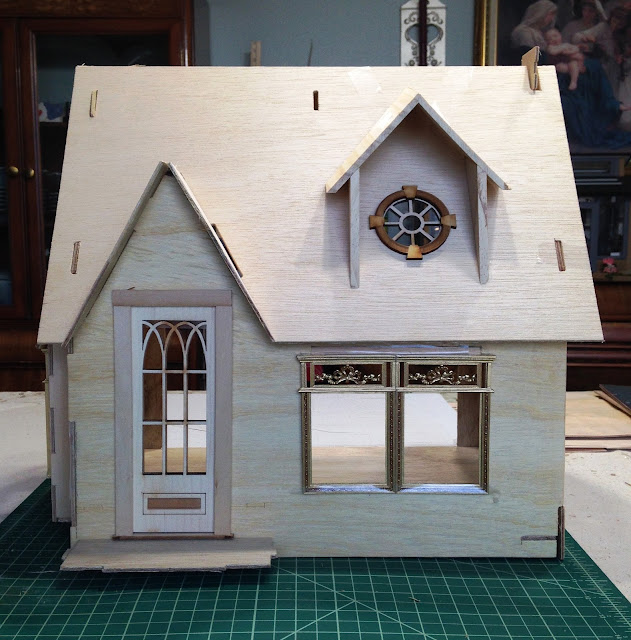
Here is the front wall with the new door and window frames in dry fit. I had to fill in a little space on the top and take a little off the sides...


Some of you may remember that I had dormers for the barn project. Because of the slope of the roof, Russ helped me to recreate the angle in the dormers by cutting them with his compound miter saw. There was essentially half a dormer left over for each of the three we cut. This gave me an idea... The front roof seemed awefully big and boring on this kit. It was crying out for a dormer, and I just happened t have an extra round attic window...


I'll have to come up with some adorable cornice or something to dress it up, but it will sure add some character to that roof!

Here it is in dry fit again after the modifications...


I cut away the settle bench wall from the porch too. I want a more substantial porch for displaying stuff to lure you into the shop.


I should be able to camouflage the bad filling job around the attic window.

I cut most of the second floor away and just left a shelf for displaying stuff. Because the new door was so much taller than the kit door, I cut out that floor section completely. We'll see what ideas strike me in that area as we go along.


Next comes sanding and priming. I'll probably paper and trim out the interior walls for the most part before I glue the structure together. That's going to be the hard part, because I have so many ideas swirling in my brain, but no idea yet if any of them are good ones...

More fun to come soon!