Search My Blog!

Use the Search box below to find keywords that you're looking for quickly and easily!

Search Feature

Friday, February 12, 2016

Containers, Fountains and Resins - Oh My!

I made a lot of containers when I went through my whole 3D design spree last November. I had so much fun, and one idea would just sprout another idea and so on until I ended up with a whole lot of them. When I gathered them all up this morning, I sat and stared trying to figure out if I'd use them on Alki Point, and if so, how?


I had originally designed the Enliven square nesting bowl set to be used as a decor item. I quickly used up all of the space inside, so I decided that they could become planters for the outside. Except, then I looked at them, and thought "fountains"! I mixed and matched the bowls with some of the other containers to piece together a couple fountain designs. Since the effect from the 3D printing process leaves a kind of stepped texture, I thought painting them to look like concrete would be fun.


I decided I'd make two different fountains. For the first, I would use the middle and smallest sized square bowls, with the middle sized on top of another square planter, tilted forward so that it's water would run into the smaller bowl. I had to do some caulking and glue to make them appear as though they were one solid piece. After it dries I may have to add more due to shrinkage, and then touch it up with some additional paint. Don't you just love the texture!


I needed something to support the "water" as it cascaded into the smaller bowl, so I just cut a ramp (I guess you'd call it) from a piece of saved plastic packaging (see Russ, I told you I'd use it someday!) and glued that in. I sort of tapered it and I am hoping in the end it will look more realistic.


For the second fountain, I used the large bowl from the set and added the Resplendent Vase to the center as the water spout. I glued in a small piece of clear plastic straw to also give the "water" something to cling to. I am always looking for twigs and rocks and things when we explore our beautiful surroundings, and these tiny rocks are just the right size and variation in color!


To make the "water" I am trying a new product for the first time. It is called Magic Water, and I ordered it from miniatures.com when I had a 20% off coupon. I have to honestly say that for a full price cost of $29.39, I was expecting A LOT more.


It is pretty typical of epoxy/resin as there is a "part A" to be mixed with a "Part B". In the case of this product, it is two parts resin to one part hardener. It was disappointing that for the price, there was no measuring device, cups or stir stick included. I used the big bottle cap to measure both and just cleaned it with a paper towel after each part. I didn't want to put any of it on my measuring spoons. I poured it into one of the disposable Dixie cups I keep around just for this type of occasion. It cautions you to stir it for 5 minutes, then again for another 5 minutes, so I stirred it for a long time. The drying time is 24 hours for about 1/2" in thickness - kind of a long time to me.


I used the stir stick to drizzle the resin into the water spout on the one fountain, then over the ramp on the other, then pinched the Dixie cup into a spout to carefully pour over the rocks, letting it settle in before pouring more. The directions say that you can add Mod Podge over the top to simulate ripples, so I may give that a try tomorrow. If not that, I'll use some 5 minute epoxy and wait till it starts getting thick before I apply it to the waterfall ramp.


I'll get better photos of everything once they are all finished up, and let you know how the Magic Water did.

A note about my experience with other epoxy/resins:

I have used many other epoxy/resin brands and types in the past, so it will be interesting to compare how Magic Water stacks up. On hand, I have Amazing Casting Resin and Amazing Clear Cast. Right off the bat I can tell you they are both over $10 less per kit than the Magic Water, and there is a lot more resin and hardener - at least twice as much. Plus you get several measuring cups and a couple of stirrers.


I made items from these resins for my Starbucks project in 2013, and they are still holding up perfectly. The clear also takes 24 hours to dry, but the regular dries pretty clear and much faster. I have added artist chalk shavings into both to color my castings. It comes out still clear but colored like like soda pop. I have also added acrylic paint, and it comes out about the color quality of a creamsicle - a little milky, which was perfect when I cast gallon whole milk jugs! The white artists chalk worked awesome for 2% milk jugs. Unless the Magic Water unleashes the magic little people to come finish my landscaping for me tonight, I probably will stick to the Amazing brand in the future. To be continued...


Tuesday, February 9, 2016

All decked out...

Today was one of those days where I was able to focus a good deal of time on doing what I love to do: Make Progress On A Mini Project! And, it was one of those days where the concepts came easily, and the implementations manifested just like I had them worked out in my head. For me, those days are farther and fewer between than I'd like. So while all of this good juju was happening today, I was thoroughly enjoying myself!

I started out trying to remedy the fact that I did not install or run the wires to the exterior porch light behind the siding like I should have. Luckily, I had recently read Brae's post about concealing her wiring for Milo Valley Farm behind channel molding. Hey! That's a great idea! I installed the porch light on top of the channel molding (kind of gives it an 80's vibe), then ran the molding with the wires tucked inside all of the way around the back to the power strip. I'll get better photos once I have all of the wiring tidied up.


While running the channel molding, I thought I'd better just get Alki Point attached to it's base. Then there'd be more glue contact surface for the molding and therefore a better hold. Russ was kind enough to pick me up a 4'x8' piece of 1/4" plywood on his last trip to Home Depot, and he even cut the base piece out for me! A perfect 25"x18". Just what I needed! Have I mentioned that he's not only kind and handy - he's still pretty hot for a 51 year old! :O)

I marked out where I wanted the house to sit, traced it out in pencil, took the house back off the base, then ran a fat bead of tacky glue on the pencil line. I sat the house back on the base over the glue, then cleaned up the excess glue with the best tool my dad taught me about for glue and caulking - my finger!


Once the house was attached to the base, it was time to start framing out the decking. I used 1/4"x1/4" basswood as the outer frame and interior brace pieces. I glued them and clamped them, then when they were dry I applied a coat of the vinegar and steel wool stain.


While everything was drying, I stained about 24 pieces of 1/2"x1/16" deck board with the same stain. Then it was just a matter of letting them dry, then cutting them to length.


I used the same deck board to cover the ugly edge of the plywood on this side. I'll do the same to the other three sides as I begin the landscaping.


I had to weigh the boards down because they wanted to curl up. Also, the spacing between the deck boards was a challenge because not all of the deck boards were straight. I essentially had to eyeball it... Not too bad though. I really like the color variation in the boards, and any imperfections can be hidden with the planters and landscaping.


Not bad for a day's work, and good days like this only make me long for more of them. I hope the landscaping and the rest of the wiring go just as cooperatively!


Saturday, February 6, 2016

Just Feeding The Addiction...

Have I mentioned how much I love the creative expression that happens for me when I get to see how ideas translate into reality working on mini projects? I mean, it is better than sex+drugs+rock&roll combined! Right? It is truly an addictive behavior that I have no desire to 12 step out of, ever!

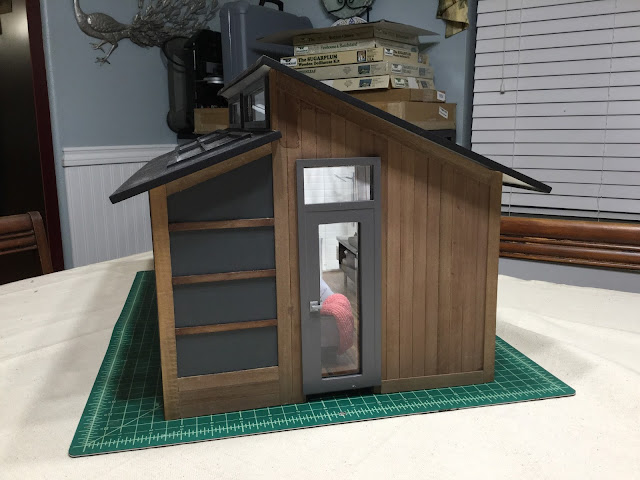
Progress is happening on Alki Point, and while it is not exactly what I had in mind, it's kind of like my kids. Mind blowingly better than I could have imagined!

Enough blah, blah, blah! Hope the photos make you as happy as they make me!


Touch ups, steps, base, landscaping next... Vinegar + Steel Wool stain turned more brown that I expected, but I am kind of digging it. We'll see... So excited!!!