Search My Blog!

Use the Search box below to find keywords that you're looking for quickly and easily!

Search Feature

Tuesday, October 13, 2015

Printing Labels For Products

Lots of miniaturists know all about printing labels for their mini products, but some have no idea, and some have better ideas on which media to use for what effect. This post will give you what I know, and what I learn as we journey into the future!


Program I Use
I began using Publisher back in the late 90's and have stuck with using it for the majority of my printing projects. It is easy to use, and has all of the basic functions you need to get great labels. Most Microsoft Office Professional Suites now come standard with Publisher.
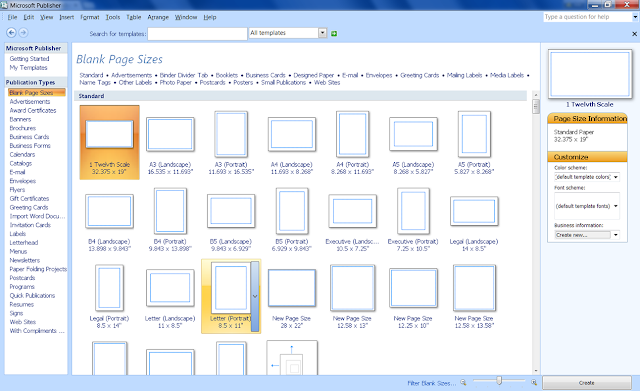
I start with a blank page that is the size and orientation of the paper I am printing to. Once you have the page in layout view in front of you, change the page margins to .25 on all four sides. >File/Page Setup/Margin Guides. You'll notice that the blue margin guides allow for more print space.

Be Prepaired
I am frugal, so I like to use up as much of the paper as I can in one print. For this reason, I decide what I need several steps ahead and make up a print list.

Have the measurements you need all figured out and written next to the item on your list.

If you have bottle/jar blanks, measure height. Write that down.

Then measure depth and width (remember all four sides). Add that number together. Add 1/16 to 1/8" extra to your depth+width number. Write that down.

How many do you need? Write it next to the measurements and circle it. This also helps to avoid forgetting something.

Just under each of the measurements, you are going to write the decimal conversion. You'll need this number soon.

Here are the decimal conversion charts I have used for years:

http://www.hamuniverse.com/antfrac.html

Or for figuring larger fractions over 1"

http://www.printmini.com/calc.html

(thank you to HamUniverse and Printmini!)

Make A Template
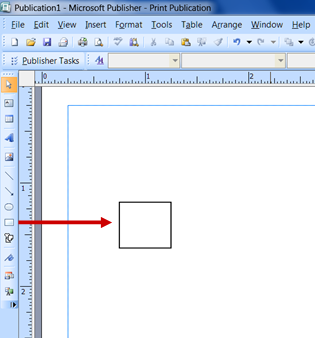
In Publisher, use the Auto Shape tool to draw a rectangle.
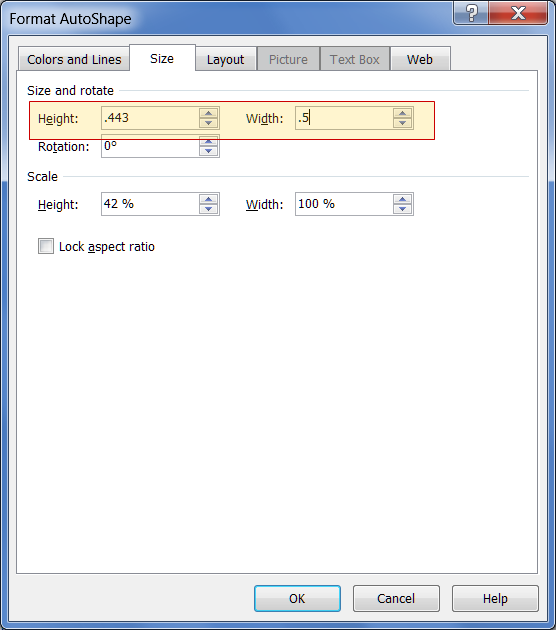


Once the rectangle has been drawn, right click and select Format Auto Shape, then click the Size tab.

Enter the decimals from your list for height and width. Click OK.

Now you know that the image file for that item must fit within that box. If so, and if you are a careful trimmer, your label will fit perfectly!

Here is a .pdf file to some boxes I have created. Feel free to use and share.


What To Print On
Glossy photo paper is the best product to use (imo) for a realistic looking label. There are a couple precautions, though. This paper is very thick and that can help or hurt your end product.

Use If - you are using a box pattern and are making the paper into the actual product packaging, this thickness will help you. The end box will be strong.

Use If - You can peel off the paper backing and have a thinner veneer to work with. This method is best for adhering to blanks and/or wood blanks you have made.


Don't use If - Your item needs a matte finish. In that case, use plain paper or cardstock.

What Adhesive To Use

Glossy Photo Paper
Yes - Tacky Glue (I use Fast Grab)
No - Modpodge. This will result in curling and no adhesion.

Cardstock or Plain Photo Paper
Yes - Mod Podge (matte or gloss) will give weight and add vibrancy.

As as this writing, I have not used a glue stick on either. I go for what I know, but am always interested in knowing more! Feel free to leave comments and I will update the post!

Sunday, October 11, 2015

Welcome Home My Friend

A week or so ago, in my New Friends post, I mentioned that I had rescued a poor little woman I'd seen on eBay. Well, here is why I just had to save her...

For one thing, she was only listed as "Elderly Woman" in the auction. The poor thing wasn't even given a name! Second, the auction also mentioned that she was from the Chicken Ranch in Texas. I am sure most of you know that the Chicken Ranch was a real brothel from very early in the 20th century until the 70's. A few years after it was finally shut down, the movie Best Little Whorehouse In Texas came out. It was based on the activities of the brothel. The history is very interesting, so click the link above to learn more.


I could only imagine the horrors that go along with growing old in a brothel. I just had to help her. Imagine wearing this outfit every day!

When this poor lady arrived in a coffin, giving her a new life was even more poetic! The nerve! Even on the coffin she was referred to as "Elderly Woman"! She even had a price tag!


As soon as I freed her from that Styrofoam death, the little lady and I had a long, heartfelt, warm and beautiful conversation. I PROMISED her that she would never again be treated with such indignity! I said that she was officially retired from that former life, and in this new life, she would be well taken care of. I would build her beautiful homes to live in. I would bring her new friends. Her and I would be friends.


The first order of business was to liberate her from that sequined and inappropriate get up. We made her a nice dress in a soft cotton knit. She loved the tie dye pattern, and said teal was one of her favorite colors.

We smoothed the stick mess out of her hair, cut off the bad ends, and added a nice braid. She said her eye sight was fading a bit, so we dabbed on a nice deep ebony to improve her vision. She now sees life in a whole new light, and is looking forward to many happy days ahead.


Everyone, meet Gertrude. Or as she likes to be called, Gerdy. Welcome home my new friend!


Thursday, October 8, 2015

Making A Work Bench

Last night after supper I asked the hubbs if he'd like to come and help me make a workbench for the garage. He enthusiastically agreed!

We scoured Google photos until we found one we could simulate and make our own. Just a pretty basic workbench, just made of stripwood and held together with tacky glue.

We used the photo to help us determine a cut list (you list all of the pieces you need for the project and have them cut and ready before assembly). If I have enough lumber, I like to tape the pieces together and make one cut on my rip saw. For example, I needed 8 - 3" 4x4's (what I call my 3/8x3/8" wood because it looks like real life sized 4x4" post) for the frame. I taped 8 of them together with painters tape and cut them all at one time. Doing this ensures that all of the pieces are EXACTLY the same length. I cut all of the pieces this way.

I used my gluing jig to make all of the support pieces first, then let them dry. Meanwhile, I scored a trim piece with my xacto knife to look like separate drawers. A little sanding to round off the drawers, and it was ready to affix.


Once that layer was dry I glued the bench top and shelf boards, clamped everything, and let dry overnight.


Here is the work bench after drying overnight. I added a "backsplash" then did a light sanding - not to make it smooth (more on that later), just to round off the edges a bit and remove any glue that made it's way out.


I wanted the work bench to have a well used look, just like my husband's real sized one. I have had great results in the past watering down acrylic paint and treating it as a stain for the wood. I chose a color called... wait for it... Barn Wood! Here you see that I used just a couple small squirts of paint, then added little bits of water until I got it to the right consistency.


TIP: If you don't have stain on hand, or if you don't have a good acrylic color for staining, you can use artists chalk. You'll need a little white paint or gesso as a medium, then you just shave the chalk into the medium until you achieve the color you want. Mix well. You can then turn it into 'stain' by adding water, or use full strength for vivid color. Watered down, it will have the look of milk paint. Use a sealer when dry to preserve the vibrancy.

I started applying the stain on the bottom so that I could be sure I was getting the results I wanted. The stain will soak in, so if you keep adding layers, you'll increase the depth of the stain. It also dries a lot lighter, so experiment until you feel comfortable staining your actual piece.


This is after the first coat. I like to let my stain dry for a bit. The water in the stain will have really raised the grain in the wood, so I like to sand, stain, dry, sand, stain, dry several times to achieve the look. On subsequent stain layers, you can apply just to certain areas to vary the "wear". Since this is a work bench, I am not looking for smooth in the end. It's more realistic if it looks like there is potential for slivers!

After I get the base coat about where I want it, I go back in and add shadowing. Notice here that I have a squirt of Barn Wood and a squirt of black. I mix the two colors in various shades to use for the shadowing and highlighting. I use a small brush and add darker color where I want, then go back over it with my moist stain brush to soften the edges.


This is about where I'll stop the bench for now. Once I install drawer pulls and begin to dress it with little accessories, I'll add dried spilled paint and oil stains wherever it needs it.


One quick note: Don't ever worry about showing your work. Be proud of it! Don't compare yours to other's work. There are always going to be miniaturists out there with more experience, higher skill level, different ideas, more time and most importantly, better tools. The fun in miniatures is getting to see your ideas come to life, and the journey and the things you learn along the way! Share with everyone, be kind, and remember to help those with less experience. This is how we all pay it forward and welcome new enthusiast to our crazy crew!