Search My Blog!

Use the Search box below to find keywords that you're looking for quickly and easily!

Search Feature

Showing posts with label Sweet Christmas Cottage. Show all posts

Wednesday, November 22, 2017

Sweet Christmas Cottage - Gingerbread Exterior


It has been such fun to watch the exterior evolve. Each layer getting closer to the sweet vision I imagined.


When It was time to click the lights on, I held my breath. Then, seeing each one glowing, I squealed with delight!


I made the post and porch lights by drilling out clear resin gumdrops for globes and candy cane pieces for poles. The little peppermints made perfect spacers!


For the porch posts, I drilled holes into candy canes and gum drops bases, then used resin to anchor the pins to make them sturdy.


I couldn't resist making a cookie cutter wind chime for the front porch!


The chimney is removable for access in case of wiring issues. Let's hope I never have to remove it though.


The other side was calling for some Tudor style frosting covered timbers.


I just love how the interior lights shine through the candy windows!


As usual, when viewing the photos I see opportunities to add more things. I recon I will, but the main focus will be to get the bedroom finished up in time for Christmas.

Wishing each and every one of you a wonderful Thanksgiving, full of everything to be thankful for!

xo xo,
Jodi

Sunday, November 19, 2017

Sweet Christmas Cottage - And The Next Layer...

Getting on the next set of layers has been fun and fiddly...


I love the collage clay, though my piping skills are still a bit shakey...


The flower boxes filled with candy flowers and fudgy chocolate soil...


Gumdrop goodness in a rainbow of colors...


Candy Cane support columns for the porch...


What will the next layers bring? I'll have to figure that out in my Sugarplum Visions and Dreams...

Tuesday, November 14, 2017

Sweet Christmas Cottage - The Next Layer


Although I am happy with the look of the paperclay cookie roof tiles, it was a real slog getting them done. At times the endlessness of rolling, cutting, smoothing edges and gluing them on had me fantasizing about other new projects. Thanks to the encouragement of the fine group of fellow miniaturists over on the Greenleaf Forum, I hunkered down and finally finished. I ended up using a total of five 16 oz packages of Creative Paperclay. Thank goodness it doesn't weigh 5 lbs when dry, or I'd have needed extra structural support!


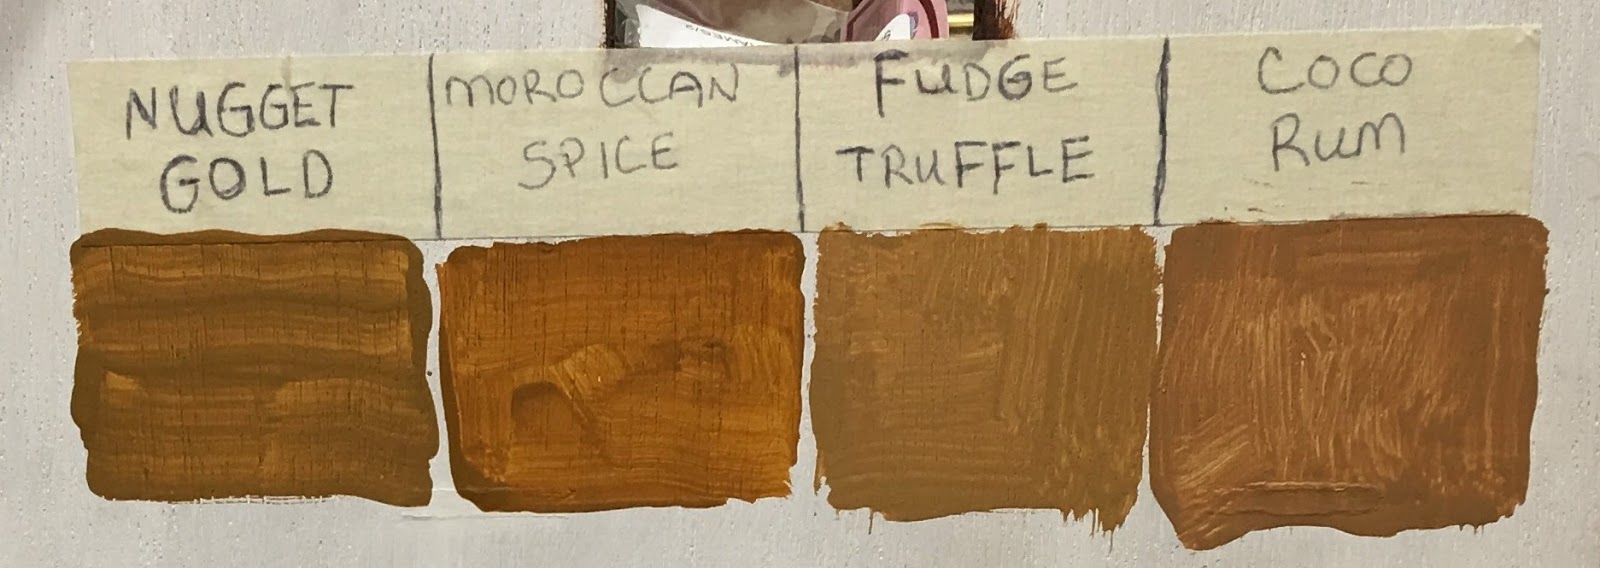
The next step then was to get them painted. I had made my mind up on Moroccan Spice from the color samples, but once the roof was painted, I had a nagging doubt each time I looked at it.


True to form, I ignored my doubts and kept moving ahead, painting the rest of the structure. I guess I was succumbing to the pressure of the fast approaching self imposed holiday deadline.


But finally, I had to face the fact that I was looking at a Big, Spicy Turd. :o(


I must have mixed and painted on at least three colors until I found my ideal "gingerbread". First, I added the whole sample jar of Nugget Gold to the Moroccan Spice. After 2 coats it was still too dark. Then, I added in a good amount of Warm White acrylic.


Once I liked the body color, I toiled still about the cookie roof. Finally, laying awake and running options through my mind, I remembered that I'd originally wanted a lighter color for the roof. That made the decision easier. I just added in the Fudge Truffle, more Warm White, and had a base for the roof I could live with. I actually love it now. I should know by now that nagging voices nag you for a reason.


I quickly threw together the small base - just a piece of 1/2" plywood with simple 3/4" basswood trim on the edges. It is only 15" x 20" to save time on landscaping, or in this case candy-scaping, and make holiday display less intrusive. Having not accounted for the full depth of the porch, it will stick out a bit from the front. I'll try to turn this from and oops to a "I totally meant to do that". Hopefully, I've managed to convey the graham cracker planking.


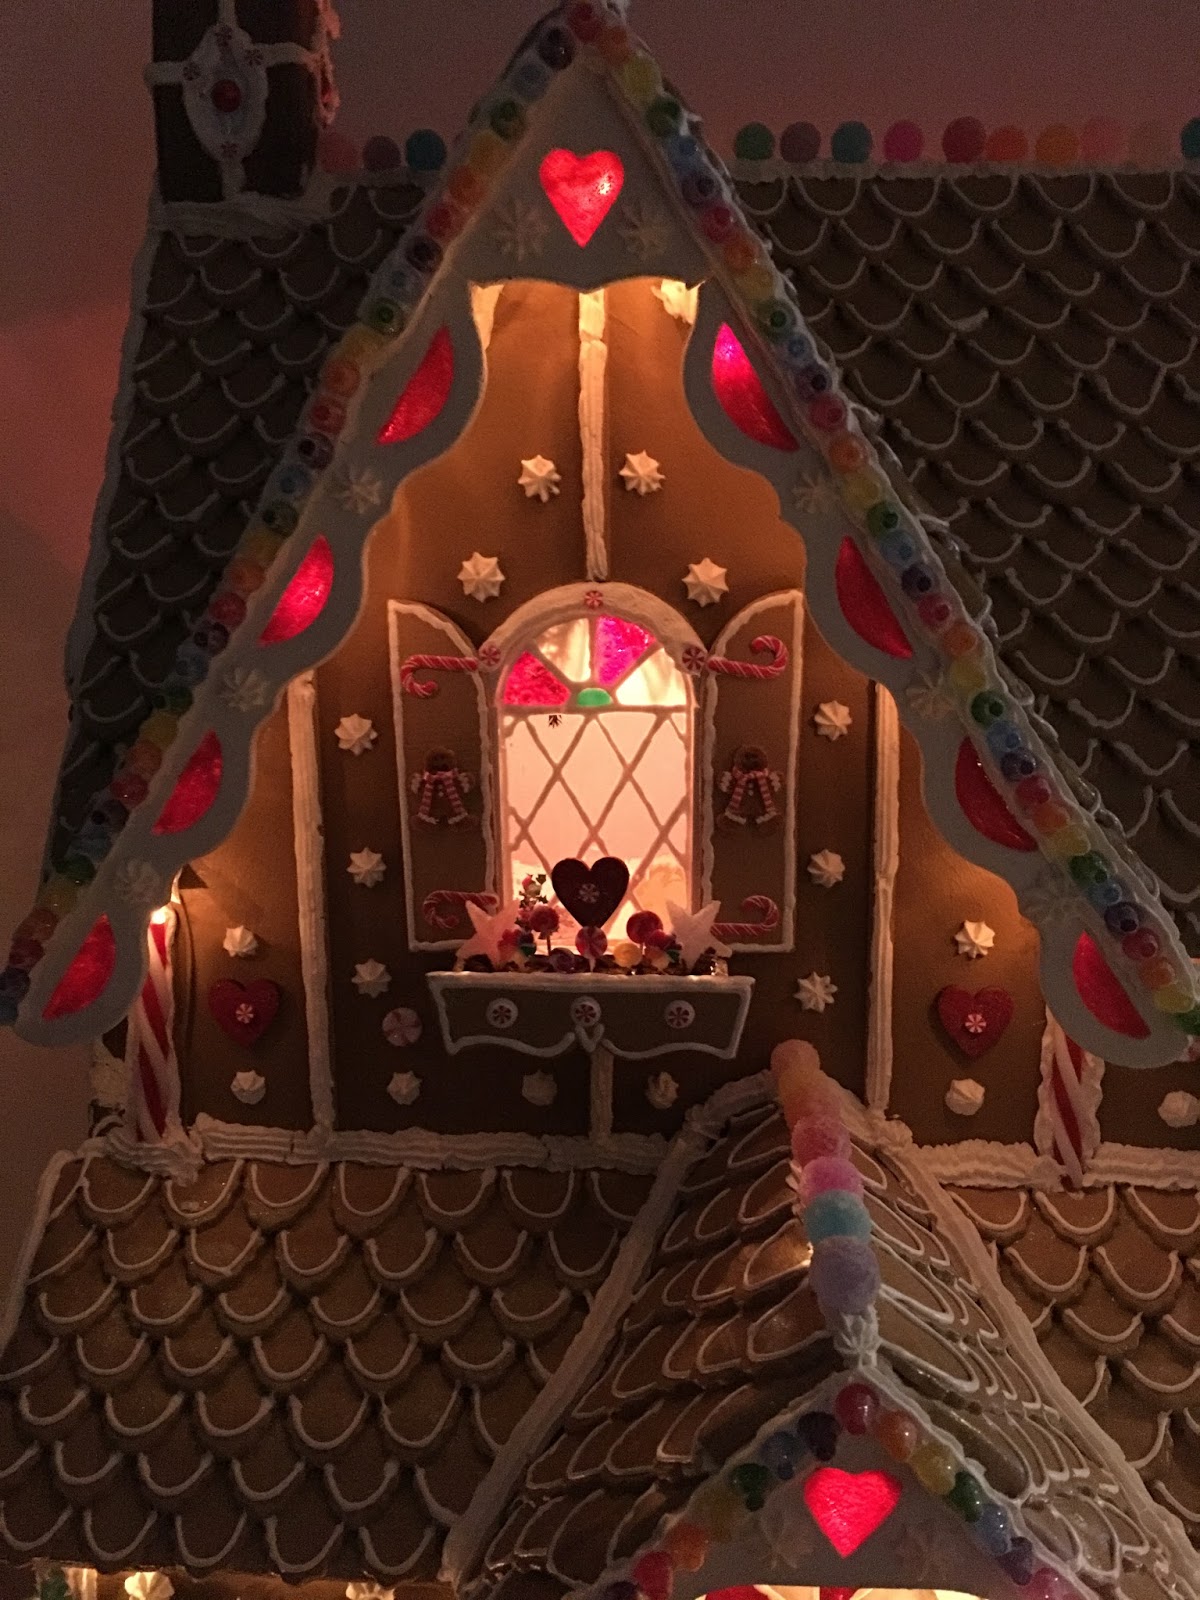
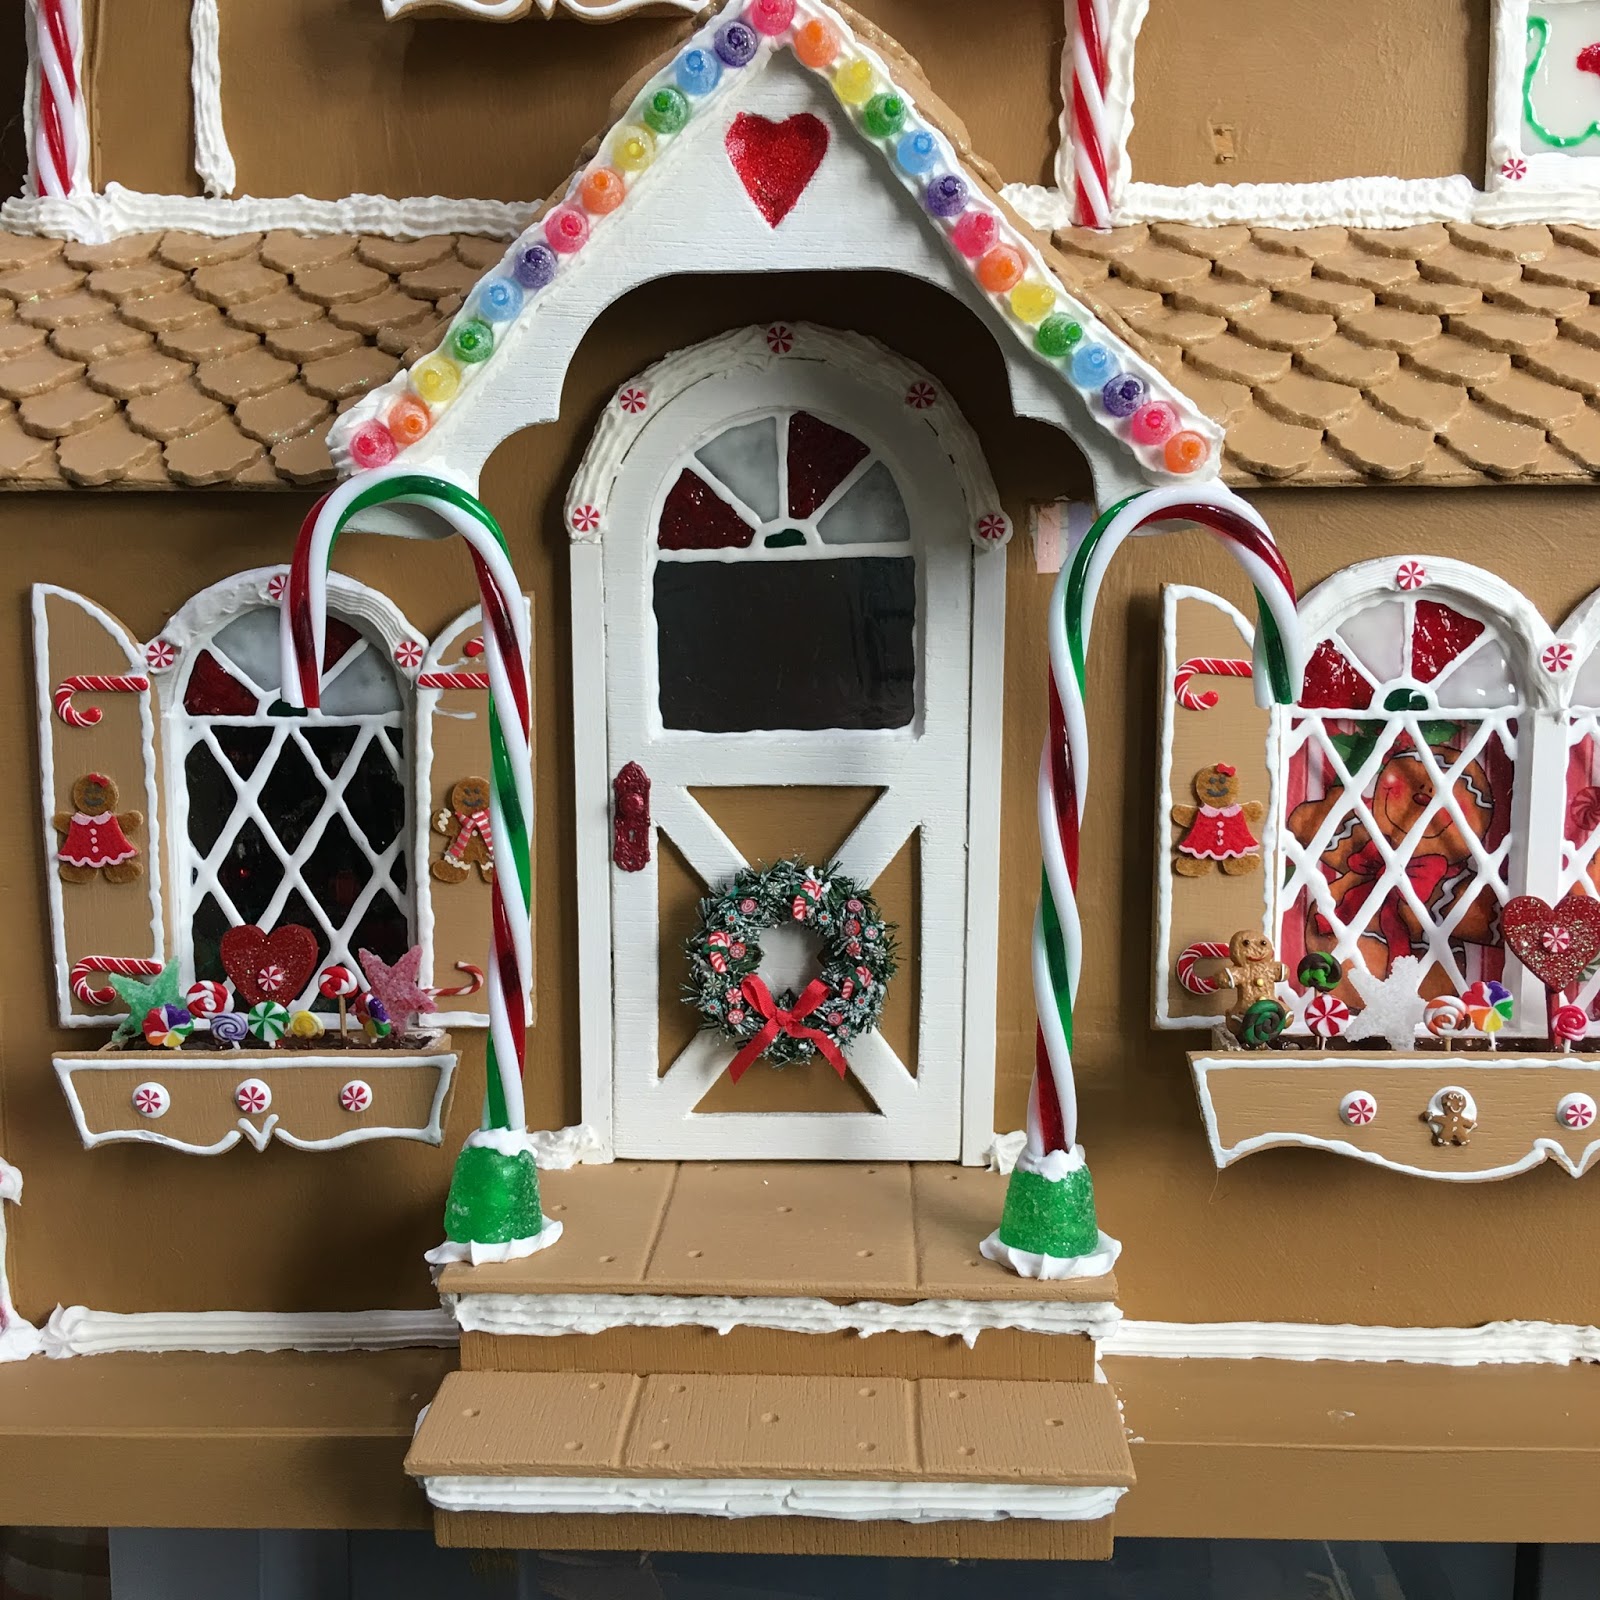
Next, I built windows, making candy and frosting "stained glass",  added shutters with candy cane hinges, and began turning plywood gingerbread trim into gingerbread house gingerbread trim.


The chimney's gotten it's first outline in "mortar"...


And next I'll be working on adding layer upon layer of collage clay frosting, peppermints, candy canes, gum drops, frosted fences, cookie shrubbery and any other idea that fills the Sugarplum Visions in my dreams each night.


With just over a week until Thanksgiving, I am hoping the great winds generated by the speed with which I'm working continue to fan the flames of inspiration! And that in spite of no experience, I take quickly to piping "frosting"!

xo xo,
Jodi

Thursday, November 2, 2017

Sweet Christmas Cottage Progress Report

While I can't say this post will contain any good eye candy, there will be some cookies! Paperclay cookies, that is! And while it's been a very busy couple weeks, I have made slow progress on the Sweet Christmas Cottage nonetheless.


I wanted to make an easy access panel for the wiring, so decided a removable chimney seemed like a good solution. It was challenging to make something to not only hide the exposed wires, but also accommodate the shape of the structure. I had wires coming out from a lot of places.


I began by making a frame to enclose most of the wires, leaving out the junction splice and the wires from the radio. If I add a speaker to the radio, I'll need this area open to attach the iPod to later on.


I wanted a fantasy sort of feel, so I cut strips of cardboard to create a curved edge.


Then I traced the structure onto some cardboard from a cereal box.


Then covered it in gesso. The gesso caused a bit of warping, but I think the finish mortar/frosting will make it work in my favor.


This is my first time working with Creative Paperclay, so I had fun experimenting with different cutters and push molds.


It was just like making real gingerbread cookies, really. Just roll, cut out, and glue.


I used wood shaped hearts to fill in gaps, and in general just had fun. The base will be painted gingerbread, have "frosting" piped in as mortar, then I'll add candies and such where needed.


I added some porch roof extensions, then gave the roof an undercoating before starting on the cookie roof.


I am using these fondant cutters to cut the paperclay into roof tiles. It's a slow go, but I think I am really going to like the effect when it's all finished with frosting, glitter, candies and tons of gingerbread house goodness! :O)


The lower roof and porch roof are finished up, the back roofs started, and the large front roof in progress. The plywood base will arrive tomorrow, so I can get that attached and begin the cookie texture on the walls.


 Much left to do, and with all of the holiday tasks like cleaning and Christmas shopping competing for time, it is sure to be a race to the finish. It is so much fun, though, and I am so grateful when I can find the time to play!

Hope you're all finding play time, to!

xo xo,

Jodi