Search My Blog!

Use the Search box below to find keywords that you're looking for quickly and easily!

Search Feature

Showing posts with label Inspiration Projects. Show all posts

Tuesday, October 12, 2021

3D Printing The BAT Designs

The work continues in all my spare time on the Breakfast At Tiffany's facade project. In fact, so much work has been required, that I haven't had a moment to think about the Beachside Bungalow. I hope it's not worried that I have forgotten it!

The next step in the BAT project was to start the 3D printing. Most of the files took an entire day or longer to print, so it was a long process. I also had a four day conference to attend, so time has flown since my last post! I don't have a true step by step to share, so I'll just share some info about the process that I hope you'll find interesting.

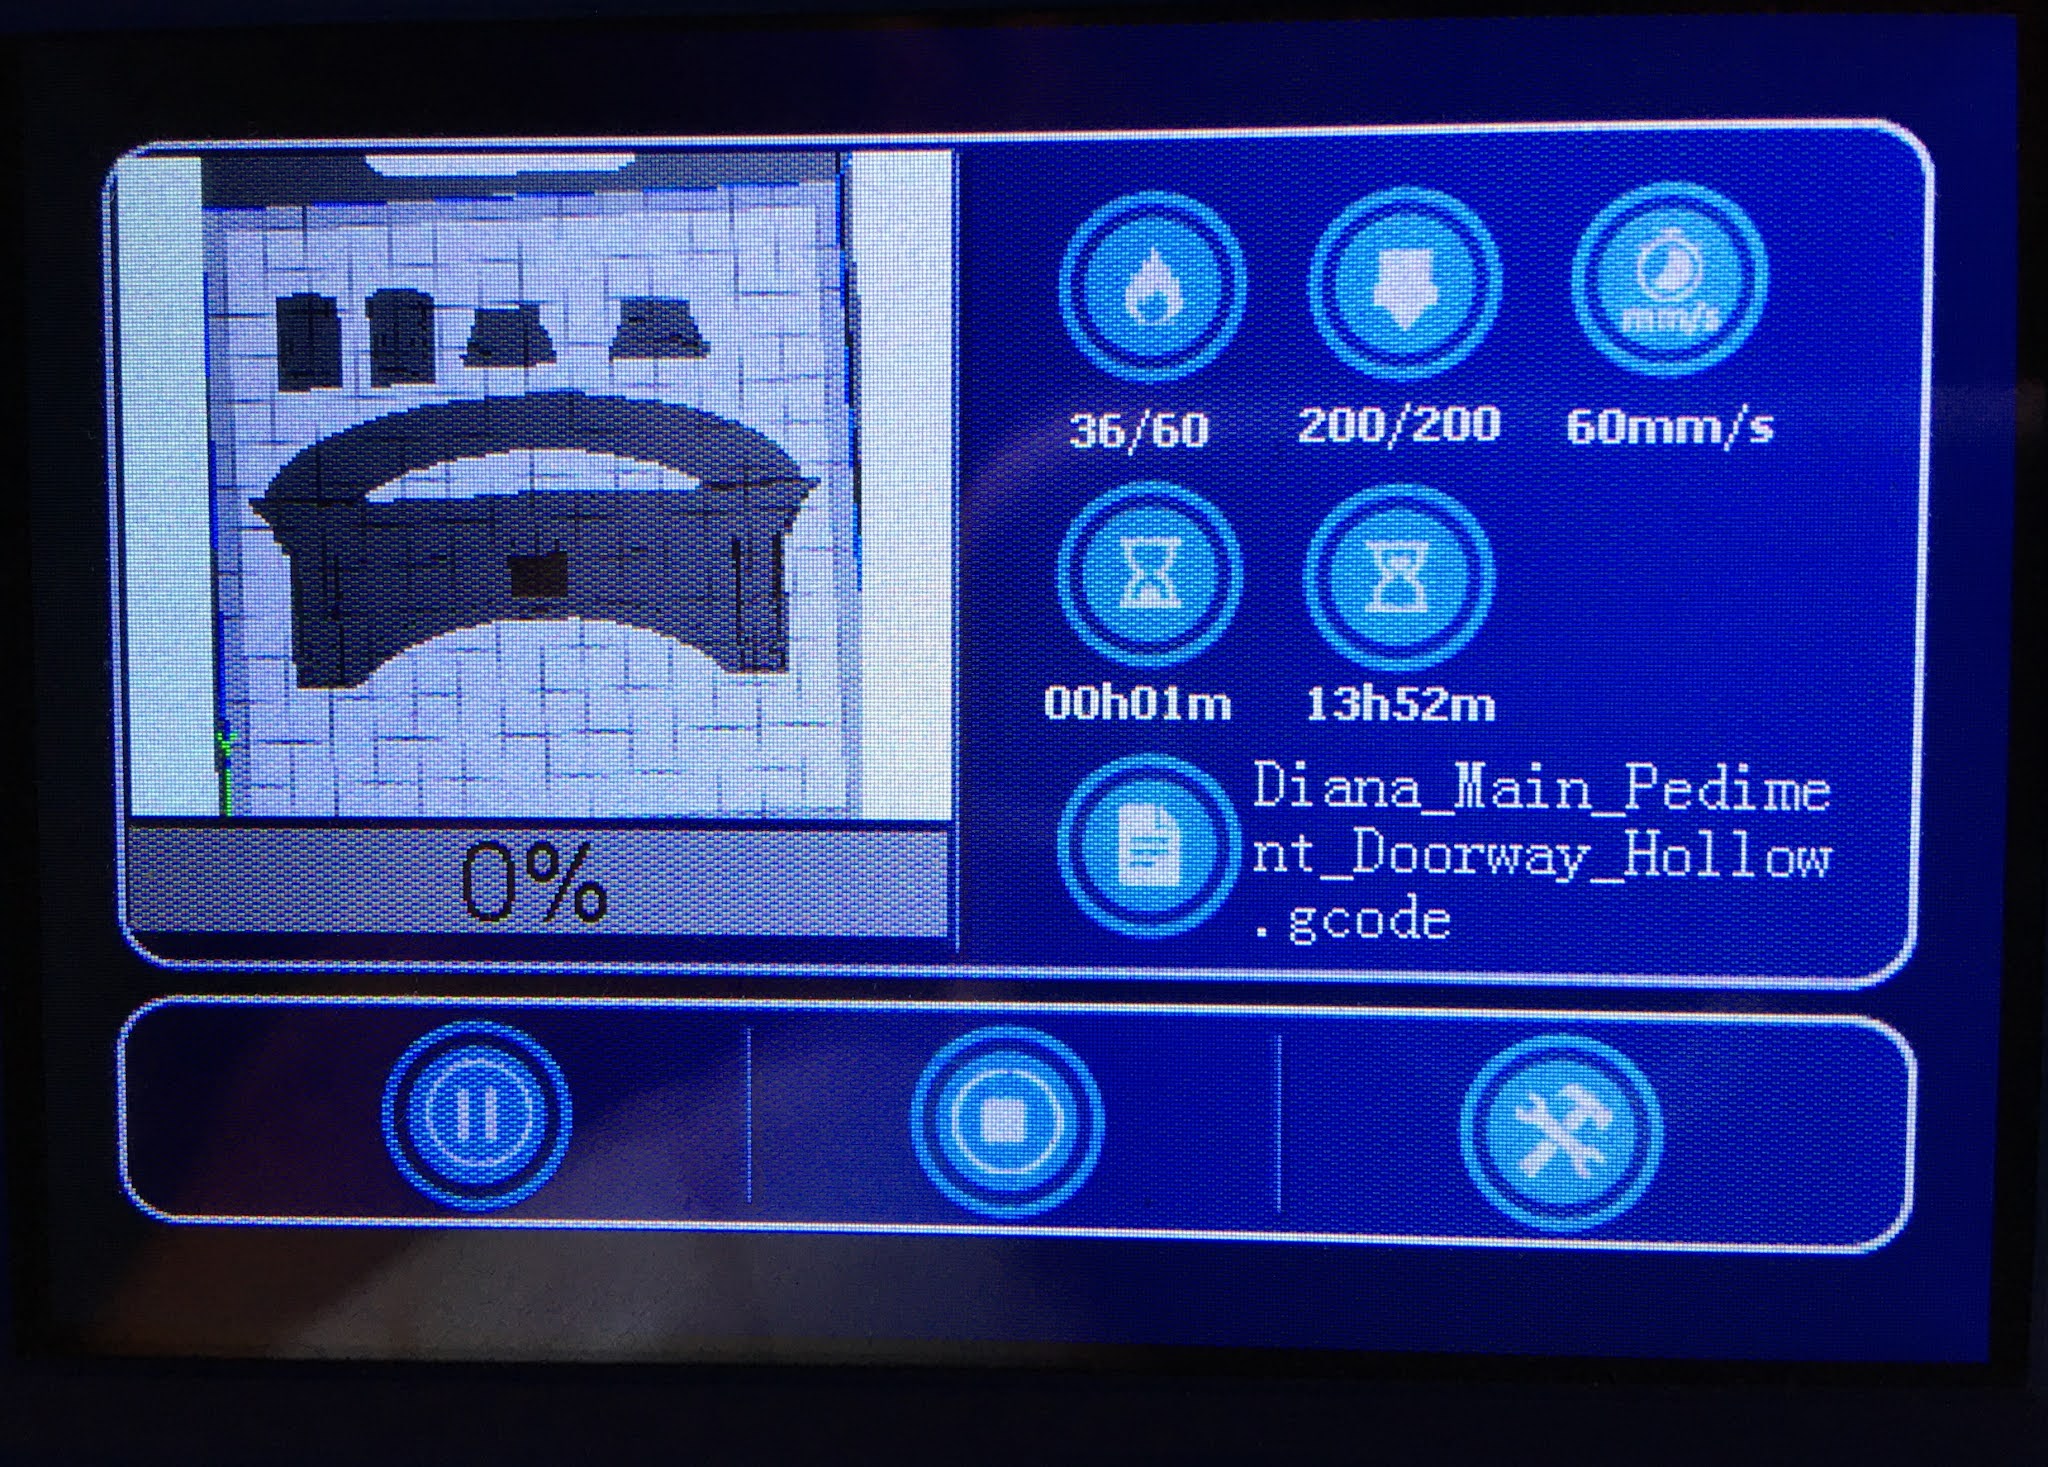
For the pediment piece to the doorway entry, it took just under 14 hours to print. I did not get to bed until long after midnight that night. Luckily, the print went perfectly so the only hard part was staying awake!


The hour glass on the left represents how much time has elapsed and the one on the right tells you how long you have left to go. After four hours and fifteen minutes, it seems like very little progress.


After 4 hours and 15 minutes.

This is what you see if you sit mesmerized in front of the printer, as I often do.


A long while later...


And finally finished...


Once the main piece and the side trim and detail pieces were printed, I could see my design in the physical world. I really like it! This is going to be one grand entryway!


The other pieces went really well, too, and will require only minor finishing! Here are the corbels. I printed the file two times to make a total of twelve of them. The customer only needs eleven, but you can always use an extra fancy bracket somewhere in a house like the BAT house.


For the large window and all seven small ones, after printing, I had to test out my design. The cornice supports were easily pulled off with pliers and fit over the window frames perfectly.


I removed the wooden sills and trim and replaced them with the new 3D printed sill with attached corbels. I also added a strip of 1/16" x 1/4" basswood to each side of the frames to add an extra layer of detail. It mimics the BAT windows much better, now.


With all of the printing in progress, I concentrated on designing the front and basement doors. Here's a refresher of what the BAT doors look like:


To construct these, I will be cutting them in three layers of 2 mm chipboard: An inner core and a carved interior and exterior layer to sandwich it. The basement door will be solid, while the front door will have a panel of glass at the top like the original door.

To add the molding detail, I created an insert which will be 3D printed and slotted inside the carved top layer, interior and exterior.


My first test print of the molding inserts went fairly well, though one of the knobs fell off. A little revision to the design is in order.


I exported the pieces to be cut in chipboard as an .svg file from Tinkercad, then uploaded the file into Cricut's Design Space software. It worked like a charm, and the pieces are ready to cut. I just need the final design approval from the customer and then I can get started.


Once the door pieces are cut, I can assemble them and mount them into the door frames. I printed pediments to top the wooden door frames, too, so they'll need test fits and possible adjustments.


Hopefully, for the customer's sake and the Beachside Bungalow's, too, I'll be shipping this project out in a couple weeks!

Until next time, my friends!

xo xo,

Jodi

Thursday, September 30, 2021

The Custom Order Continues...

Not much in the way of content for this week's post (a relief to some, I am sure, lol!). With limited mini time, I just continued the work designing architectural elements to be 3D printed for the Park Avenue Dollhouse. Last week, I completed the main doorway pediment and trims. That left a large window cornice and it's sill with corbels, seven small window cornices and their sills with corbels, eleven roof corbels and finally pediments and trim for the main and basement doors.

Large window, mock-up door and roof corbel.

The customer mailed both doors, the large window and one of the slim windows to me. This way, I can test fit the 3D printed pieces for a perfect fit. These elements are included in the Park Avenue kit.

If you recall, the customer wants to pay homage to the brownstone's facade from the movie Breakfast At Tiffany's. Because the Park Avenue kit is not an exact replica in scale or layout, some adjustments had to be made.

Park Avenue Kit Left, Breakfast At Tiffany's Façade Right.

By making rounded cornices for the tops of the square window frames, I think the look has been achieved and, once installed, will be recognized as the BAT facade in spite of the structural differences.


For the sill with corbels, the customer will just remove the sill and trim piece from the bottom of the kit's window and replace them with the 3D printed upgrade. 


From beneath, you can see that there is a recess that will fit down over the top of the original kit window's frame for easy installation. 


The six windows that go in the bay protrusion of the facade will have simple rounded pediments for the tops and bottom sills with corbels. I made 3 designs, and the customer picked design C.


The basement window will be much the same.

There was not enough space above the door frames to create a rounded cornice for them. Instead, I took the lintel feature from the doorway pediment and made that into a decorative piece that can be attached to the top of each door frame. In addition to the corbels that hold the pediment up, there are pedestal pieces which attach to the bottoms of each of the door frames. They are also based on the design from the pilasters that frame the main doorway's pediment piece. The doors themselves are going to be much closer to the BAT inspiration door, but for those, I'll be cutting them with the Cricut Maker. I can create them in Tinkercad, then just export them in the file format used by the Maker - .svg. 


For the corbels that will support the roof cornice, I used the same acanthus leaf bracket to comprise the details. They are the exact measurements as the more simple brackets that came with the kit, just fancier.


Kit's corbels:


Now, the real test will begin. Finding the right combination of settings in the slicer program will be the next hurtle. I've got five separate files to print, two of them twice. What I need most now is all the prayers, finger crossing and luck I can get! Hopefully, by next week's post, I'll have actual, physical pieces to share with you!

The corbel file in the slicer program.

After two hours of printing. Still 6 hours and 50 minutes to go. This file gets printed twice!

In the meantime, I finally got the 1/8" x 1/8" oak and maple in the mail from Bill and Walt's. That means I can start on the butcher block countertops for the Beachside Bungalow, time permitting. With an application of wood wax, the depth of color and richness should really come out!


So much exciting work to do, so few spare hours in the day! Happy October everyone!!!

xo xo,

Jodi


Thursday, September 23, 2021

A Thrilling Custom Order

This week I received an email with an exciting and challenging request! A fellow mini enthusiast is the lucky owner of the Majestic Mansions Park Avenue dollhouse kit. She is planning to pay homage to the movie Breakfast At Tiffany's by recreating a close resemblance to the famous facade. She's asked me to do my best to replicate the arched doorway pediment, trim and corbels. Those are a job for the 3D printer, but the main and basement doors, which she has also requested, will be a job for the Cricut Maker. This will be the most complicated design and print work I've taken on, so far, and it is so thrilling!

Park Avenue Kit and Breakfast at Tiffany's Brownstone

Because I am a novice at 3D designing, my knowledge is limited to Tinkercad and what I can do with it's basic library of shapes. Luckily, there are a host of web sites like ThingiverseCults, and others. Some designers offer their amazing .stl files for free! Once the files are downloaded, I can import them into Tinkercad. I turned to DavidG7 for his excellent and generous leaf corbels, and was able to figure out the rest of the pediment and frame with Tinkercad's shapes. It's helpful when searching if you know what architectural term is used for what. I had to bone up on them!


I know if you haven't ever taken any time to play in Tinkercad, it's hard to believe that with just four basic shapes, two free corbels and a free fig leaf you could make historic looking architecture for your dollhouse in about five hours. But I swear it's true! I encourage all of you to go have a play and see what you can make! You may just be putting a 3D printer on your Christmas or Hanukkah wish lists!

Square hole, square, half circle, pyramid, free corbels and fig leaf.

Here's what the assembled pediment and doorframe trim will look like. 

8" tall x 5-1/16" wide x 1-1/8" deep.


Close up detail.


Side detail. The real test will come when it's time to print.


One of the challenges we miniaturists face is trying to work with the space we've got while still replicating the look of real life homes. This was especially challenging here because the real life BAT doorway is so much larger than the doorway on the kit. The ceilings in the BAT house are 12 feet high so the windows and doors are huge. The doorway opening is around 11 feet. I'd need an 11 inch opening to create a true replica in 1/12th scale. In the kit, the ceilings are only about 8". I had a 7" doorway opening to work with (4" less!), and then there was only 2-5/8" to the bottom of the window opening above. With these limitations, I am unable to create a true replica that still allows a 5.5" dollhouse doll to fit through the doorway without looking like a giant. But with what I had to work with. my results are pretty stellar!

Here's the real life version and my effort side by side.


The customer is also considering having me design replacement windows to look more like the BAT house. The challenge here is that the kit window openings are much, much slimmer than the real life windows. It takes space to make a curve, and the openings for the windows are square. Ideally, you'd cut rounded window openings and then create chipboard frames. But a lot of us don't yet possess the skill or the tools to fulfill all our dreams exactly. Adding a curved pediment to the tops of the frames might just give a close enough resemblance to the look she wants. 

1 9/16″Wide by 5 1/16″High = about half as wide in scale.

That's about all I had time for this week. Dad left today to make his way back home to Arizona. I feel so lucky that I got to spend time with him in person twice this summer - once to kick it off and once to finish it. Enjoy the first days of fall! I'll be back next week with who knows what!

xo xo,

Jodi