Search My Blog!

Use the Search box below to find keywords that you're looking for quickly and easily!

Search Feature

Showing posts with label Display Shops. Show all posts

Wednesday, November 14, 2018

So Thankful...


As those of us here in the United States prepare for Thanksgiving on November 22nd, we're reminded to stop and take stock. Not just of the things we've put up from harvest, or the holes we need to fill in the pantry, but of all of the things in our lives that make us happy and look forward every day. I have many, many blessings to count, but one that I am most especially grateful for are my inspiring, creative and incredibly talented mini friends and followers!

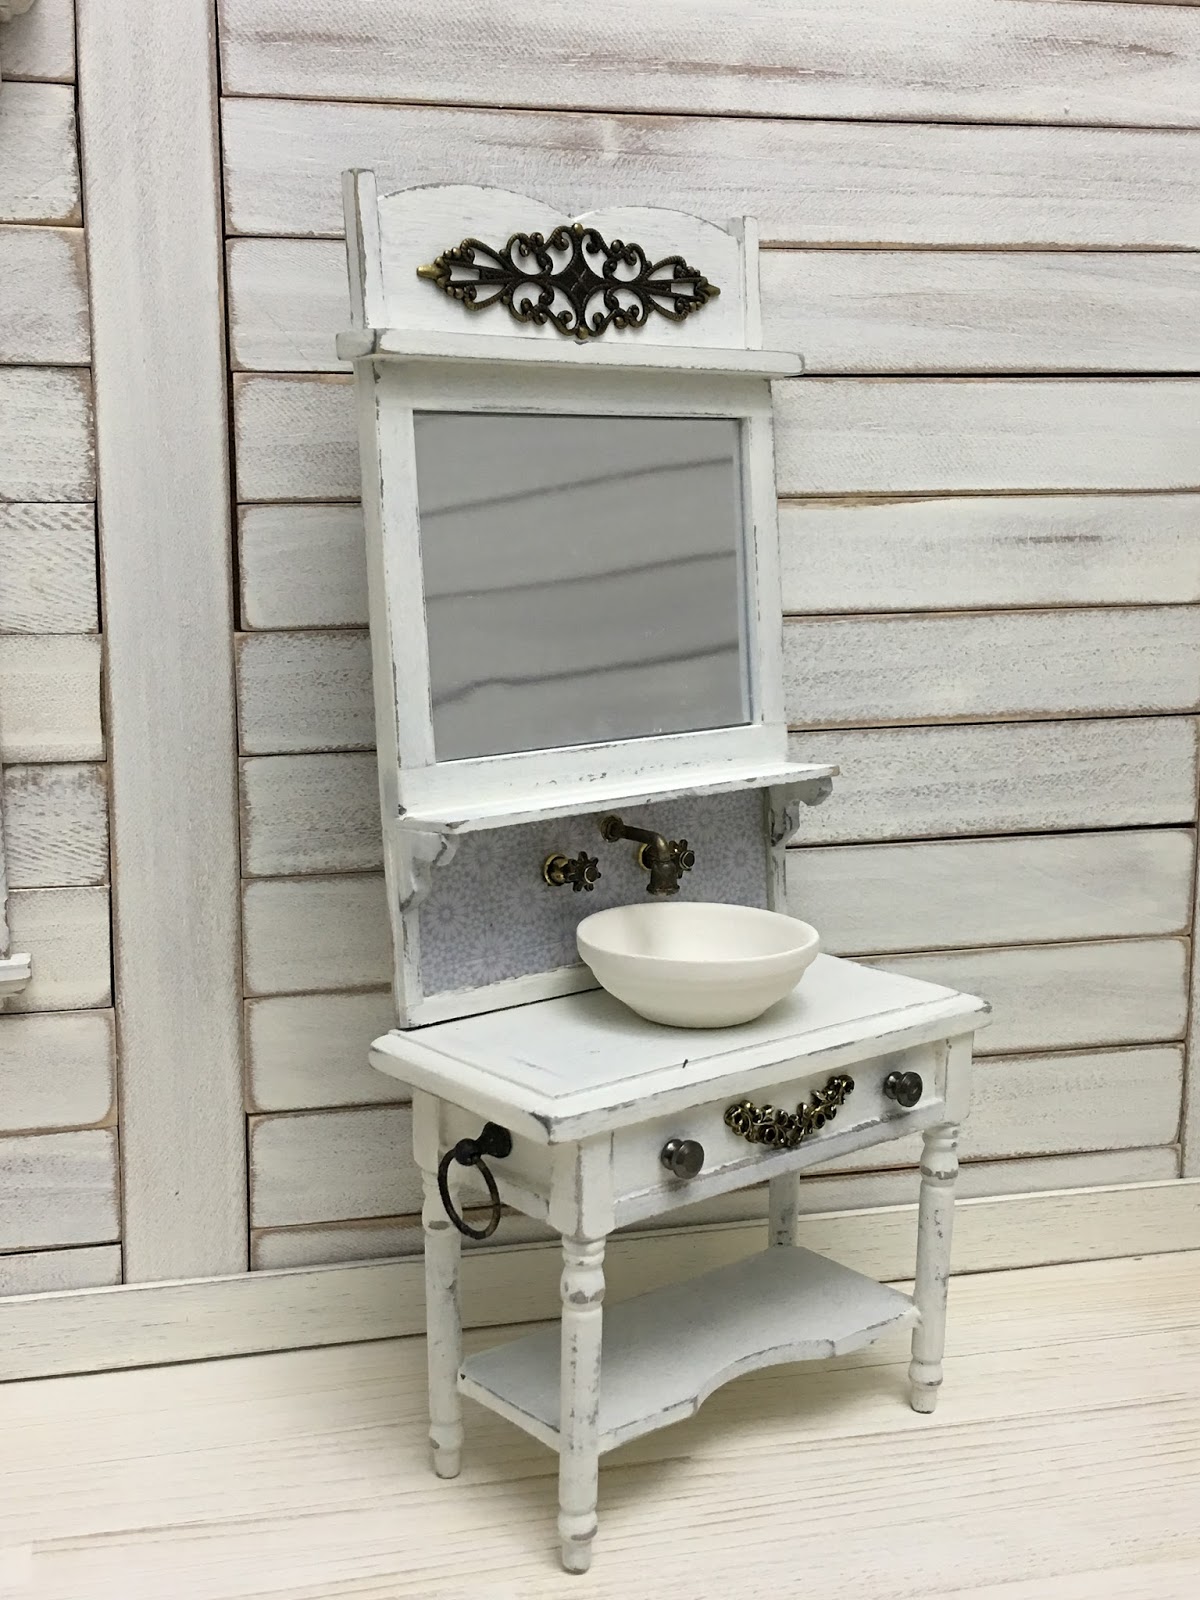
Last winter I was working on a number of miniature bathroom sinks and vanities, and Samantha from Blueprint Minis was beginning to learn how to paint in miniature. Somehow, we worked out a swap. I'd make a vanity for her San Franciscan's basement tenant and she'd make an autumn painting, destined for a future fall themed build, for me. I definitely got the better end of the deal, because Sam's paintings are extraordinary! And because she sent me ~E~I~G~H~T~ of them, I thought she deserved her own mini gallery opening!


It is astonishing to hold these little paintings (the largest measures just 3-1/2" w x 2-1/2" h) and see all of the detail, each tiny brush stroke, the shading, the way the light plays on the trees. Gobsmacked is what I am, and so incredibly happy that they are all mine!!!

This one is titled "Country Lane", and that peek of purple sky set against the vibrant orange foliage makes my heart sing with joy! I'm going to imagine that
road leads me home...


This one titled "The Dog Walker" was one of Sam's first tries at autumn landscapes. She's been trying to improve it, but there's no need - it's perfect!!! Can you see and then imagine painting a person and dog so tiny? Look at the color of the tree shadows! This Is what Love feels like!


This one is called "Falling Leaves".  Sam has managed to capture the sunlight lighting up the path and making the leaves sparkle in it's brilliance! I can hear the birdsong of the last holdouts, enjoying the morning and all the splendor fall brings!


This moody treasure is titled "Autumn Trail". Sam has incredibly captured the low light and damp forest ambiance. I can hear the leaves crinkling under my feet as I pick up my pace before the last light fades.


Sam has named this one "Backwoods Track", and says it's not her best work. Now I know she's being too critical because I truly love those fiery leaves! And look at that blue sky and how she makes a path look as though it wanders off into someplace!


I literally sucked in my breath when I first saw "River Walk" Those colors! The sunlight! That bridge!!! The tree shadows! That awesome crooked tree! I want to be in that place right now!


Look at the perspective and the mist rising from the lake in "Morning Mist"! The orange and yellow set against the blue sky and the mountains in the background! This one strikes a chord, because I live within 2 hours, as the crow flies, from three different volcanoes! I Love that tree and it's delightful branching!


This incredible piece is titled "Fall Forest", and aptly so because look at those gorgeous pine trees! The splash of blue is so unexpected and yet elevates the landscape into frolicking forest merriment! Just look at those amazing rocks and the reflections in the water!


Sam, you have really knocked it out of the park with the landscape, the colors and the settings! If I saw these at a miniatures fair I would have bought each and every one!!!

Sam also just got a Cricut, so she made mats for each painting and a lovely card adorned with fall leaves and a poem!


The poem reads...

As the warmth dissipates
and the winds herald
the upcoming cold
As trees wither
and sigh their last breath
We'll bask once again
in their vibrant color


I am going to keep the gallery scene just as it is so that I can continue to enjoy (and show off) Sam's incredible paintings! Who know's when I'll start on the Glencroft kit, and how long it will be before I actually have an Autumn House.

Thank you, Sam! ~T~H~A~N~K~💗 ~Y~O~U~! I so appreciate your masterful painting, and feel so proud to own so many of your originals!

To everyone else, and especially to my new followers... I Am So Thankful For All Of You And So Happy You Are On This Mini Journey With Me!

xo xo,
Jodi

Friday, January 26, 2018

In Sink

I've had some inspirational a-ha moments and quite a few where I stared off into space wondering (or dreading) what the next steps would be. Having more than one thing going at a time and keeping track of what's left is really giving my brain an exercise! To look back and summarize though, it would be fair to say I've really enjoyed the exploration.

I did some more manipulating of the basic barewood sinks just to create something unique and interesting. I added some parts, removed some parts and just let the imagination loose.


I had an idea a while back about using cup hooks and earring backs to make faucets. I played around a little, and I am satisfied with the outcome (though there is always room for improvement).


I bought these cup hooks and these earring backs. They each come with lots of variety so that future options can be explored. For these faucets, I used the bell shaped clear silicone back. I drilled the hole a little larger so the cup holder shaft would slide in but still fit snugly. Then I slid the earring back on and painted with Krylon Short Cuts metallic paint pen. I definitely could have achieved better results with spray paint, but with the current cold and humidity, I wanted a simpler option. Just playing with the pieces made me think of Candle Snuffers and 1/4" scale non working sconces, too!


To make the taps/spigots, I used the metal bell shaped earring backs for the bases, adding a spacer bead for the tap and jewelry pins to cover the hole and hold it all together. Added bonus: the taps actually turn!

The brilliantly creative Fran Casselman was very kind and sent me an excellent faucet idea and How To. She also generously gave me permission to share it with everyone! Thanks Fran! This is definitely a "try someday" project, and it just so happens I need new socks!


It was easy to drill a hole and add an eyelet for the drain in the bucket sinks, but some of the other sink vessels I want to use are bisque, porcelain and glass. I am going to need research and practice before I try to drill through these materials, so I needed a simple alternative that let the work continue NOW. Many sinks have the plunge type plugs covering the drains, so that is what I decided to employ. I used the Tim Holtz round metal fasteners in my stash. To make them sit a tiny bit proud of the surface, I slipped a plain cylinder silicone earring back over the tabs, then cut down to size with wire snips. This allowed for more gluing surface and provides a steady base..


I played with many different styles and finishes to test the accumulation of "have to try that someday" supplies in my stash. It was fun to just go with an idea and not worry about the outcome in relation to how things would look in a particular build. I really enjoyed that!  I was thinking fun and funky B&B when I came up with the names and the themes.

The Mermaid


The Hacienda


The Old West Hotel


The Blue Bayou


The Shabby Camellia


The Boone River


Each one is going to get it's own specialized accessories: baskets for shelves, candle, soap dispenser and vase of flowers, hand towels, linens and special mirror. With so many still left to do, I am going to have to decide whether to commit to this idea or finish the other 20+ when next inspired. The joy of minis is that you can choose whatever strikes you! Whenever it strikes you!

Marion - here they are in the sink shop. With so many more sinks to do, I am going to have to expand the building! ;O)


I am so looking forward to whatever is striking your fancy, and I can't wait for all the inspiration I know it will bring to me!

xo xo,
Jodi

Monday, December 18, 2017

Brick Walls & Experimental Wood Staining


In keeping with the rustic feel of the Duplex Room Box, I decided on a brick wall treatment for the second shop space. I like the quick results I get with the Magic Systems sticker and mortar kits, so that's what I used.


I want the look of painted brick, so my "grout" and bricks will be warm white. Normally, the under color will end up being your "grout" color so most people use gray or white on the walls and get the kit with the red mortar powder. I got the kit with the white mortar so it would be easier to paint over.


It's kind of fun putting the sticker stencil on. I pre-peel the brick waste cut outs from the backing paper. I've learned from experience that if you don't, they sometimes stick to the stencil while you're peeling and it causes moments of panic that just aren't necessary. Better to mindlessly remove them while Netflix is on.


I actually forgot to take photos of peeling off the sticker - bummer because it's a fun and gloppy mess to look at! Then, I forgot to take photos before I painted the bricks. :o/

I end up with some rough edges on my bricks from when I peel the sticker stencil away. I solve most of this by letting the bricks get almost dry, then just gently rubbing my thumb and finger over them. It works great! I did manage to touch a couple of spots before they had set and kind of messed up some bricks. Notice the lower back corner area on the photo below. Oops!


I thought it would be fun to experiment with some different products for the wood floor (I am using the same Houseworks wood floors I used in the first shop). I took a scrap piece and tested the following products:

  1. Minwax Stain Marker, Provance
  2. Ranger Alcohol Ink, Pebble
  3. Ranger Oxide Re-Inker, Vintage Photo
  4. Ranger Oxide Re-Inker, Walnut Stain
  5. Ranger Distress Stain, Hickory Smoke
  6. India Ink & Isopropol Alcohol


I have used the Minwax stain pen a few times and always really like it. The color was a little too dark and too brown for the look I wanted for this room. But it is a good product, it is not water based so it smells, but that also means it doesn't cause your wood to curl.


The alcohol ink was really interesting! I love how it colors the wood and am definitely going to do more experimenting with it. I think it might be great on wood furniture. Getting color without adding layers of paint could be so good!


The re-inkers were interesting, and while I like the rich colors, it may be better suited as a wall finish. It stayed a little greasy feeling, too.


The Distress Stain was my favorite of the bunch. What you are seeing is from just one coat. It really brings out nice highlights in the wood, and the color could complement a number of color schemes in a room.


A close second was the India Ink and alcohol mixture. The model railroad website where I read an article on it said to use 1 to 2 teaspoons per pint of alcohol. I didn't want to experiment with that much, so I added about 1/3 a teaspoon to about 1/3 of a 16 oz bottle of 99% alcohol. The first coat barely did anything but wet the wood floor. So, I added the other 2/3 teaspoon and put on one more coat. I think this could be really interesting. The ink tends to pool a bit together on the wood, which really leaves a nice aged patina. I think with a couple more coats this could be a fantastic way to get gorgeous weathered boards!


So I decided to use the Distress Stain. It dispenses itself through a sponge on the top of the bottle. Think Bingo dobber. It kind of snagged here and there on the wood floor, even though I had it sanded smooth to the touch before starting. I don't see why you couldn't apply with a paintbrush, but I didn't try. I really love the way it came out!


Then I added the baseboards, crown molding, window and door (hinged in the same manner as the first room).


I may add a bit of ageing to the bricks, but for the most part it is done! Now I get to start making stuff to go inside! I have so many kits that I really want to do, so many things that I really want to try! I think that's going to be the focus for the end of 2017 and into 2018.

And maybe still, before Christmas, I can post some photos of Ellie and Jim enjoying the season in the Sweet Christmas Cottage!

Peace and love to each of you!

xo xo,
Jodi