
Looking at the front of the cottage, especially the front door area, it needed a lot more oomph. So to start with, I wanted to explore some wreath options. I've made real life wreaths before, but never mini ones. So, I decided to go through the drawers and see what I could come up with. The extra ones that didn't make the final cut can be sent off along with some other goodies (when I find time to make them) for some special friends I know...

Based on the supplies I have on hand, here were my options for wreath making and how I made them. Maybe you'll find something helpful, or they may spark an idea for you.
The first material that came to mind was the grapevine material that I used to make the rose tree for the arbor. I have plenty left, but the problem is that it was too stiff and brittle to bend into a small enough circle.

So, I boiled about 4 cups of water in a Pyrex measuring cup in the microwave and let the grapevine steep for about an hour.

That made them cooperative, and all I had to do then was to cut a few lengths, shape them into circles, then hold them in place with floral wire.

I had these heart shaped wreathes in my supply drawer. I'm not sure where I picked them up, but they're probably easy to find. Or, using the boiling water method, you could easily make your own. It just looks like they're folded in half, then held together in the middle. What looks like skinny brown twig wrapping them is actually rusty floral wire.

For a super simple wreath, I just slathered one of the heart shaped wreaths with Quick Grab Tacky Glue, then added foliage from some Bill Lankford Creeping Phlox that I've had floating around in my landscaping drawer for years. I cut a piece, stuck it to the wreath, let it dry, then gave it a trim to shape it.

For one of the grapevine wreath circles, I added some leftover Aster stems from the garden,


It needed a bow, so I thought I would share how to make an easy bow making jig and bows. You'll need a pretty stout corsage pin. Mine is about 2" long and I'd say about 26 gauge. Then you'll need an earring back with the circular plastic thingy attached. And finally, a regular earring back. You'll also need some silk ribbon. I used 1/16" and 1/8" wide ribbon.

This is how to set up your jig. The earring back with the circular plastic thingy is the work platform, and the regular earring back is just a cap for the end of the pin so you won't poke yourself getting it out of storage.


To make a simple bow, leave a little tail on the end and slide a ribbon, centered, onto the pin. Slide it down to the earring back work platform. About 1/4" seems to be a good working distance to have the earring back from the end of the pin.

Now make a loop as long as you'd like from the long end of the ribbon. Just before you slide it all the way to the work platform, apply a dot of clear drying glue to either side of the pin. Then seat the ribbons together and let set up for a minute. I use the Quick Dry Tacky glue because it grabs quick, doesn't stain the ribbon, holds well and dries clear.

Now make an equally sized second loop. If you get it too large or small, just remove it from the pin and try again. You'll get the hang of it quick enough! Before you slide it all the way down, add the glue again. Let this set up on the jig to dry. To remove it, carefully put your tweezers between the earring back work platform and the ribbon and gently slide off.

Then just cut the ends to your desired length. Cutting them at an angle looks nice. Bow making made easy! But wait! If you want to make a bow for a gift box, just keep doing this process until you feel like you have enough loops. The Christmas bows below have 24 loops and are made with self sticking ribbon.


There are a lot of ways to attach the bows to the wreaths. For this one, I added a floral wire to the center, twisted, then twisted it onto the wreath.


For the next front door candidate, I thought using some of the leftover Camellia flowers would be nice. To give some additional greenery as a base, I added some reindeer moss to about 60% of the wreath.


Then I glued on five flowers...
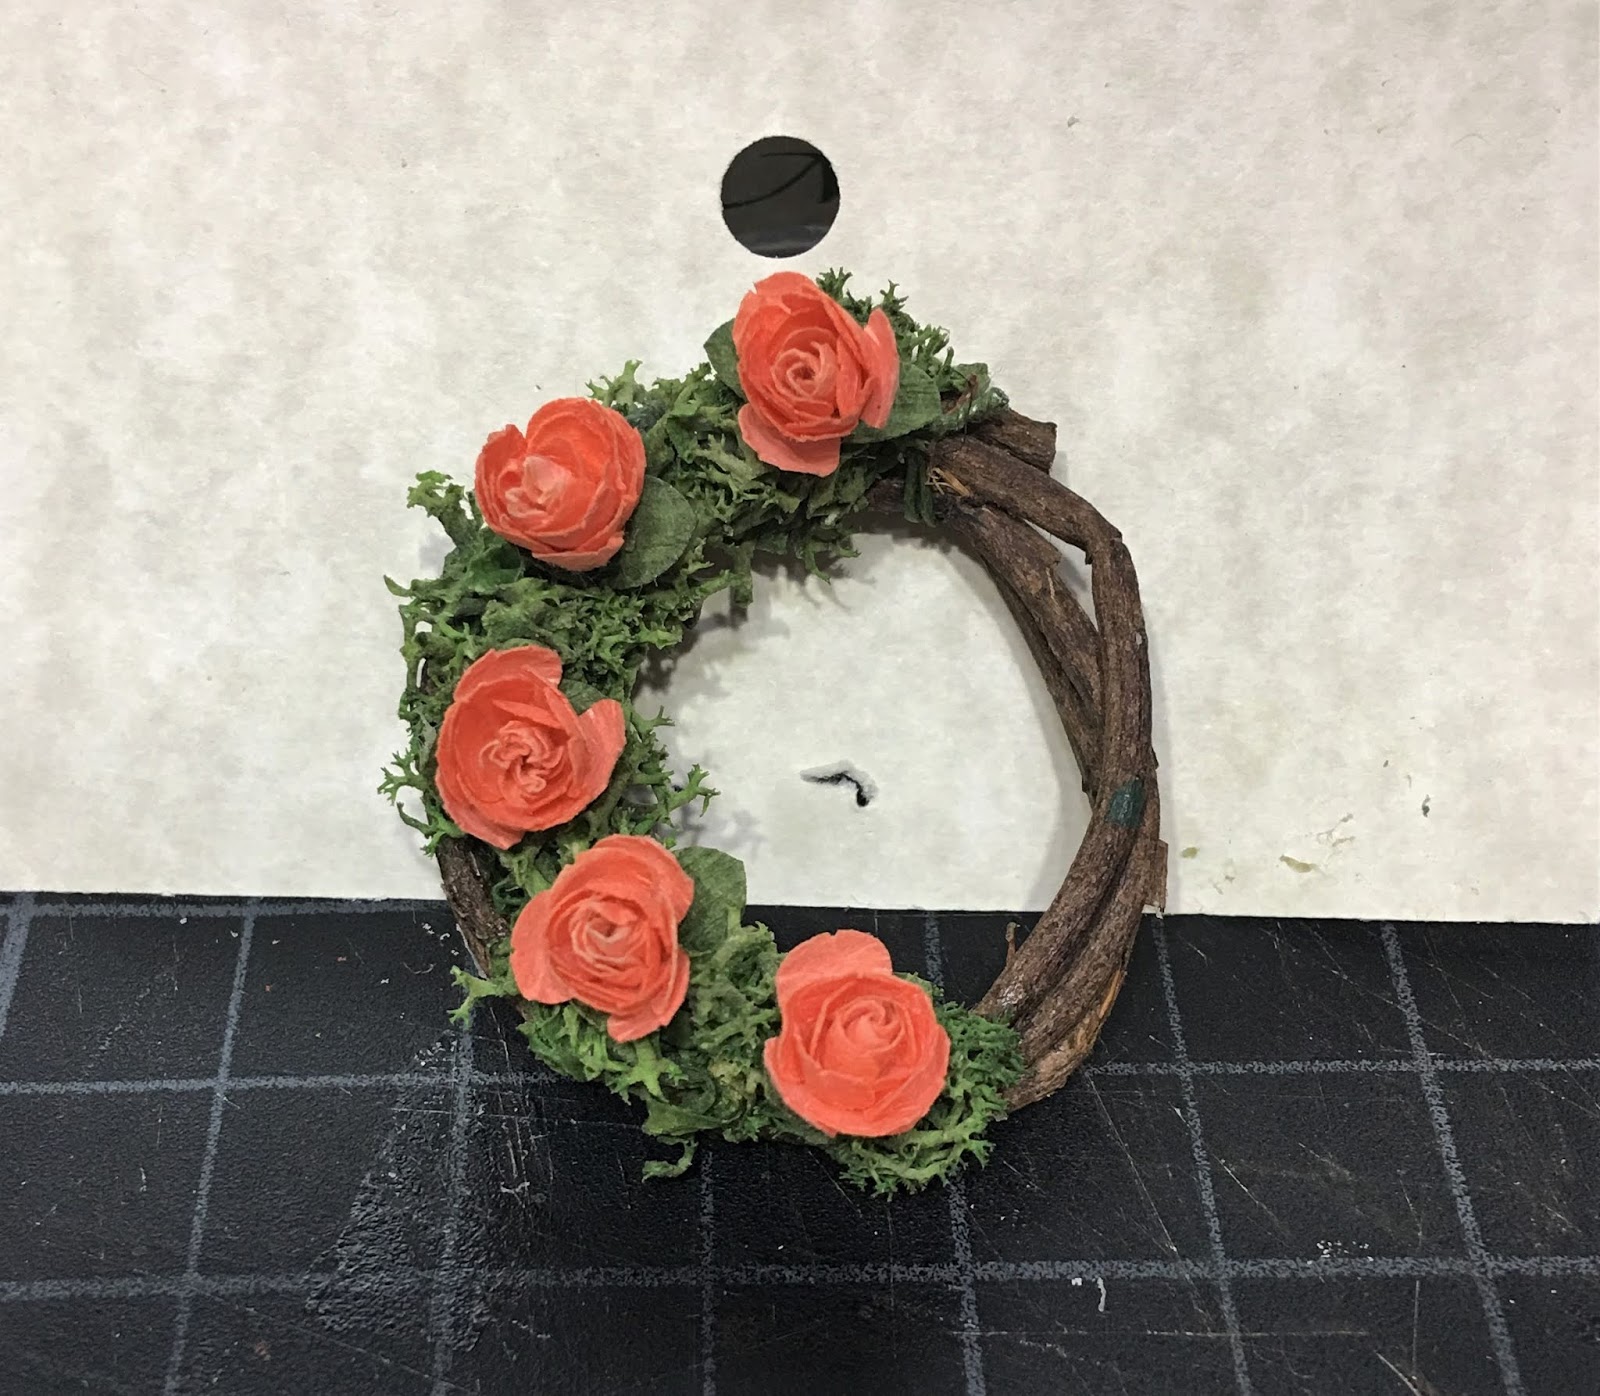
Then some additional leaves...

Then punched some tiny flowers from paper...

Then added a bow. I inserted a corsage pin through the center where the two loops met, threaded that through to the back of the wreath, then bent the rest to make a hanger. A dot of glue under the bow and where the pin comes out of the back will hold it nicely.

For a super cheap and easy wreath, I cut a few circle shapes from styrofoam, then cut out a hole in the center, then sliced in half to make it a better thickness. I coated all sides with Tacky Glue to give it some support and stability, let dry, then painted all sides in green.


For the base. you can coat it in reindeer moss, or any fine miscellaneous ground cover in the color of your choice. I had several different kinds of "Garden Growies", so that's what I used.


I coated all surfaces in tacky glue, then dropped them into a small container with the ground cover to coat. Once thoroughly dry, remove any loose material and trim with scissors to shape.

This makes a fine backdrop to add flowers, beads, bows, birds, letters, dried seeds, small miniatures such as a garden trowel etc. It's fun to go through your drawers and play until an idea seems like a good one. You can see how I finished mine in a later photo.

To make the hangers for these, I used 4-1/2" of 1/8: ribbon and a 2.5 mm jump ring.

I slid the jump ring onto the ribbon, then slid the ribbon through the center of the wreath. I added a small dab of Tacky Glue to the left end of the ribbon...

Then pressed the two ends together.

Once dry and set, I spun the ribbon 180 degrees so that the glued ends were in the center of the wreath, slid the jump ring up to the end, then glued the ribbon together. Once dry and set, I glued the ends back around on itself so the seam was behind the wreath.

You can adjust your ribbon to whatever length you need it to hang, just double it and add a little extra for the wreath width and the seam.

Here are some of the ones I finished. You can also use lycopodium to make a Christmas wreath. Just apply the glue to your wreath, then wrap the lycopodium clockwise overlapping the narrow tips over the base just a little until it completly covered. Then just add a hanger, a bow and some beads in your favorite Christmas themed colors. You can also add gingerbread cookie men and cookie cutters like I did for last year's Sweet Christmas Cottage.

I settled on this one for the front of the cottage, but can easily switch them out seasonally or whenever I get a better idea. Do you see those nine empty pots around the step? Yes, I have yet more flowers to make and plant. And I have to fill the planters in the fences, But I did get a couple key projects done!
No comments:
Post a Comment