Search My Blog!

Use the Search box below to find keywords that you're looking for quickly and easily!

Search Feature

Wednesday, August 31, 2016

How To Grow A Miniature Garden In Two Days...


I am happy to say that my 19 day work marathon finally wrapped up last Friday night! It's amazing how quickly things fall apart when you don't clean for three weeks! I spent the weekend getting the house back in order and was ready for minis on Monday!

At this point in the HBS Creatin' Contest build I could have gone in several directions. The open side roof piece and the roofing needs to be done, then there's the fascia, and I have a long list of little projects that all need doing. It was a toss up, but I decided that some mini vegetable gardening sounded the most rewarding.

Have you ever watched the Food Network show called Semi Homemade? I haven't seen it in years, but I love Sandra Lee's philosophy: Why do it all from scratch when you can save time with a few ready made ingredients? For this post I am going to share how I used ready made minis, kits and good old mini ingenuity to create the vegetable garden for the little piggies...

I started with some carrots, beets and tomatoes from NattyCollection and some vegetable kits from TheMiniatureGarden on Etsy.


 I highly recommend all of the products from both artisans, but I wanted to expand and combine things to make them more realistic and more my own.

Tomato Vines
The tomatoes on the left are from the kit. they are plasticy one hole beads. The ones on the right are like FIMO, but softer and a little pliable, which was really handy for making alterations. I thought it would ne mice to combine the kit and the clay tomatoes.


I needed to make the vine wires attach to the "clay" tomatoes, so I drilled little insertion holes in the top and glued in the wires. For the kit tomatoes, I did the same but they already had the hole.


Then I bent the little wires to form a loop and cut away the excess wire.


Once everyone had their loop, I strung several of the tomatoes onto long wires.


I made the structure of the tomato vine using wire for the main stem and then smaller vines branching off of it.


I added the strings of tomatoes at random spots, wrapping the extra wire around the main stem.


Next it was time to add the leaves and flowers. I added veins to the leaves then glued them on as a tomato vines leaves naturally grow. Looking at photos really helped! I also attached a wooden stake to each plant.


They were starting to actually look good, but I thought adding some green and unripe tomatoes would really add some nice detail. I looked around for what I could use, and painted styrofoam balls worked out perfectly!


Here they are before potting so that I could determine how tall to leave them.


And here they are sculpted and planted in their barrels. A fun and rewarding little project!


Zucchini Plants
The zucchini plants started out as a kit. The kit does not include actual zucchini - only the leaves and flowers. I decided to make my own to add a bit more visual interest. I just cut off the ends of some take-out chopsticks, sanded them to shape, then painted them. I used my little star-flower paper punch for the little flowery thing on the ends, I am not even going to pretend to know vegetable plant anatomy, and tonight I am just too lazy to Google it!


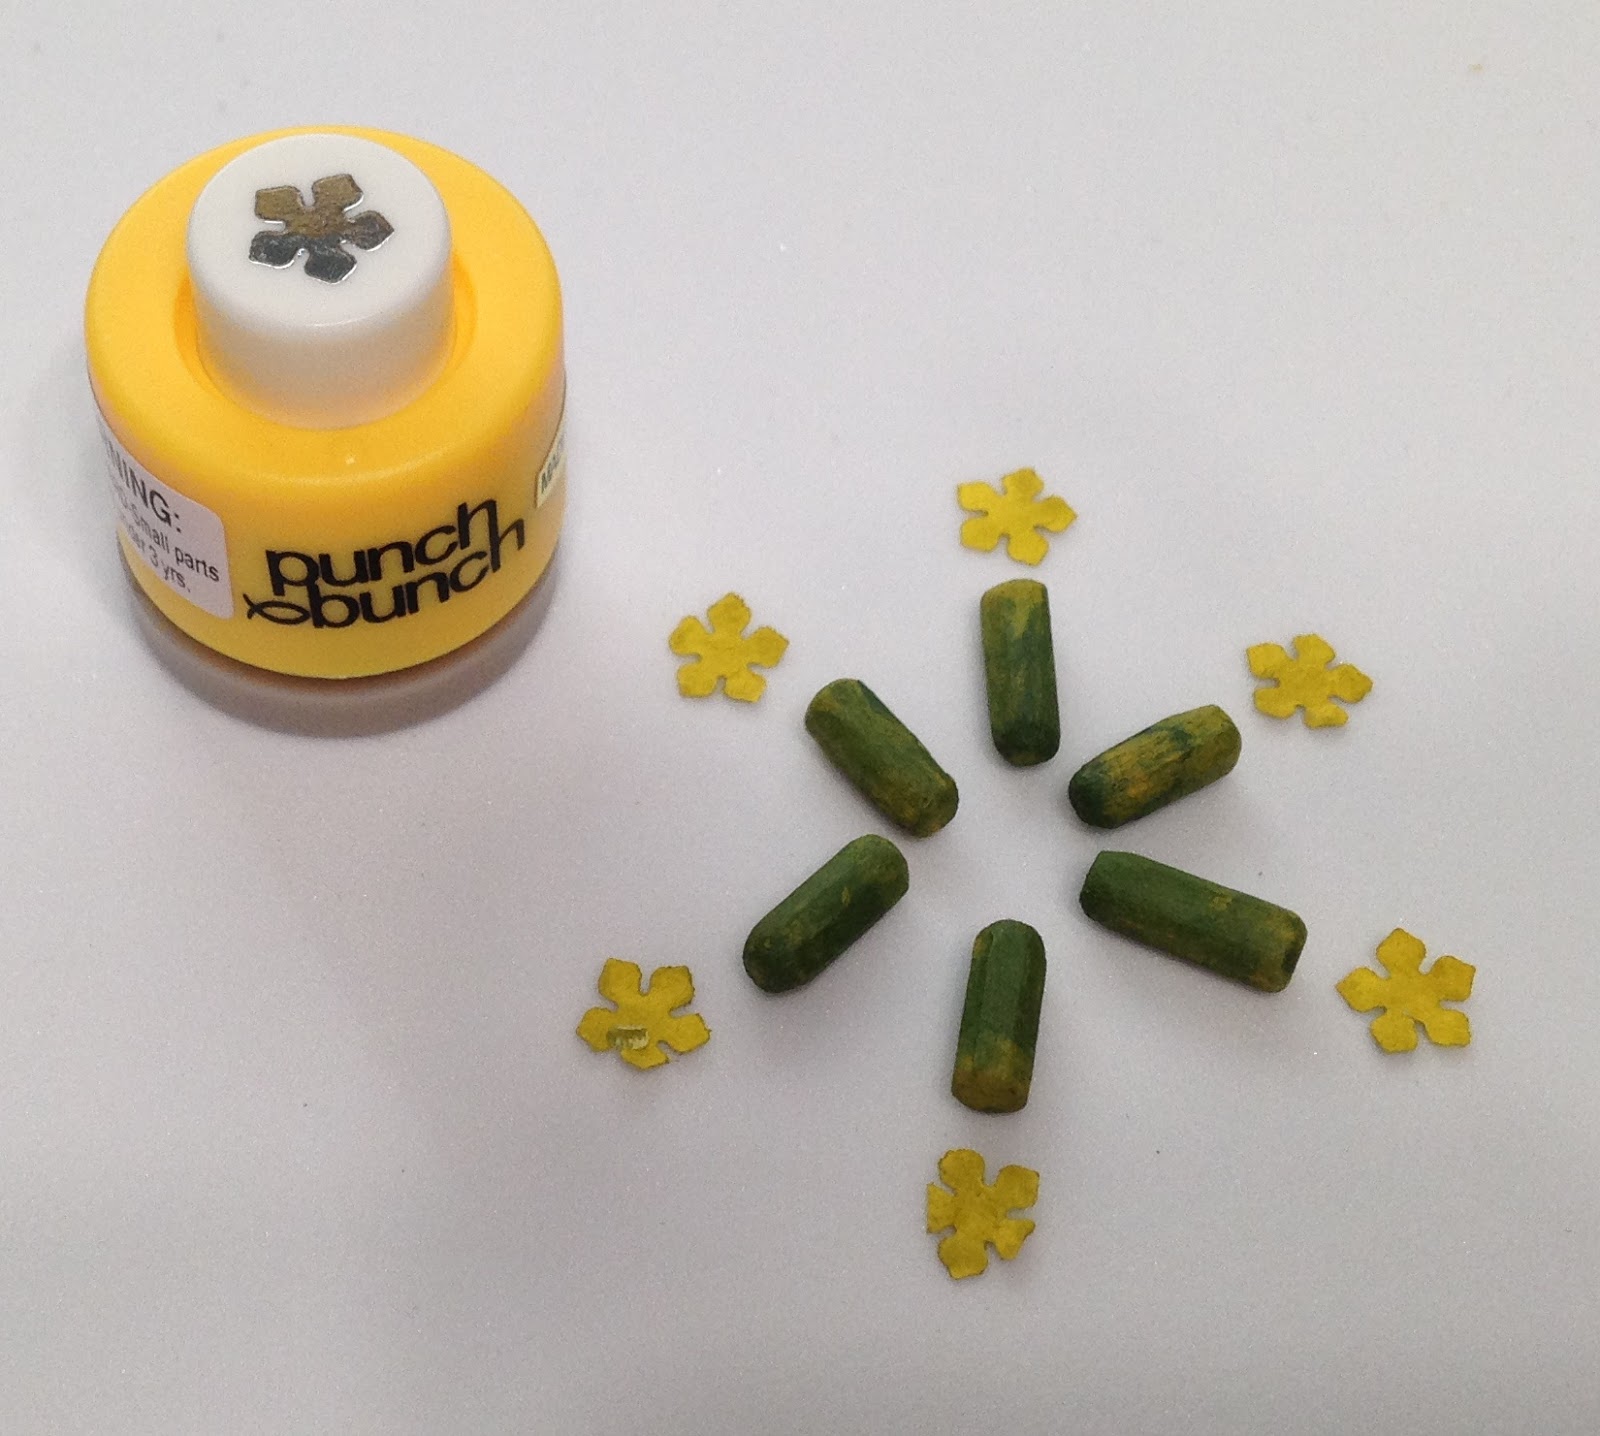
I was pleasantly surprised to find that I had all of the paper punches I need for future zucchini plants! In fact, I cut out more pieces to beef up the kits!


Here's a photo of a zucchini plant's leaf. See the spotting? It was easy to replicate using a little dry brushing with a pale gray paint.


Now it was time to vein the leaves, crinkle the flowers, add the wire stems and assemble everything. Once again, Google photos really helped, as the kit instructions have only outlined renderings.


I just love the vibrant colors! These will add so much visual interest to the little garden, and they were so simple to make!


Lettuce
The lettuce kit came with some strips of thick green crepe paper and some wire. Next time I'm at Joanne's or Michaels, I'm going to buy some! I see lots of lettuce in my future projects! It was probably the most fun of all the vegetables!

After cutting and shaping the paper, I ended up with enough leaves to make 8 heads. Three of them had one extra leaf. The first leaf gets glued about 1/8" onto the wire, then gets rolled up tightly. Each consecutive leaf gets glued a little offset from the previous leaf. Once all of the leaves are glued, you use tweezers to fan out the leaves. For the red leaf, I just watered down some purplish/red paint and dabbed it on. LOVE, love love the lettuce!


Green Onions, Swiss Chard & Leeks (oh my!)
Who knew that so many awesome mini veggies could be made from these simple and everyday supplies:


For these little veggies, a pictorial will do nicely!


Reworked Clay Carrots & Beets
NattyCollection makes fabulous mini food and other items, but there is a certain style I was after with the garden for this project. I guess more organic looking is what I was after. Like I mentioned earlier in the post, these veggies are soft and pretty pliable which allowed me to make alterations.

For the carrots, I was able to twist out and drill the carrots to add my own tops made from painted Lycopodium. I dabbed some glue on the end of the stock and pushed it into the drilled hole with the aid of a piece of wire. It's not a perfect carrot top, but it has a much more natural look.


For the beets, I cut about 2/3 off the bottom and affixed them to a "dirt mound" to give the illusion of a planted vegetable.


I attached all of the veggies to dirt mounds, coated the mounds in a light layer of glue, then added Woodlamd Scenics dirt on top. I also dirtied up the carrots and bottoms of other veggies.


I will wait until the last steps to attach the vegetables to the base and create the actual garden. When the roofers come they always make such a mess and kill all of the plants anyway. Better to wait...


I'm not sure what to tackle next, but I hope it will be as fun as the vegetable garden was! It's so nice to be back into the mini swing of things!

Have a safe & happy Labor Day weekend!

Jodi

Monday, August 15, 2016

Free Shipping Week At Shapeways!

Still in major workload mode, but wanted to take a moment to share the news that Shapeways is offering FREE SHIPPING this week! Here's a link to my Shapeways store


My Miniature Madness

Shapeways Store


There are many other awesome miniatures in all scales, so I hope you get an opportunity to look around this week! This week only we're shipping all orders over $25 free. Anything on the website, anywhere in the world ships free! Offer expires Sunday August 21 at 11:59 PM PDT.

Now back to work I go... 

Sunday, August 7, 2016

How To Make A 1:12th Scale Rain Chain + Product Review: Fred's Wood Weathering Stuff


As far as blog posts before work get's crazy, this will be my last hoorah! The word is that a 1:00pm conference call tomorrow will kick things off and then the rat race is on!

First up, I wanted to make the little pigs a nice rain barrel for the front porch. I had an unfinished wooden barrel, the pump assembly from the Chrysnbon sink kit and a spigot from a garden hose set.


I wanted it to look something like this:


I'd need to make some modifications to my barrel, like chisling in board lines, making the metal straps prominent and adding some rivet detail. And definitely give it a good old country aged flavor. On my last order from HBS/miniatures.com I saw a new product called Fred's Wood Weathering Stuff. It looked intriguing, so I picked up a bottle to give it a try.

I started with a smaller barrel just to make sure it would go in the distressed direction that I had in mind. The instructions say to keep layering on coats until you achieve the look you want. This is after the first coat:


This is after the second coat:


This is after the third coat:


The directions also say that it will affect different woods in different ways. I found it to be a nice aged and weathered finish, and am excited to use it on other woods and painted surfaces in the future. There is no odor at all - I was kind of expecting it to be vinegar based, but there is no odor at all. It will stain clothing etc., so be careful when you are applying it. Overall, I give it two thumbs up!

I repeated the three coats onto my larger barrel, but took the detailing a step further. I made vertical board marks using a small flat blade screwdriver to chisel them in. Then I used a dark brown to highlight the barrel straps and the grove between the boards. I used the same brown watered down washes to highlight areas where grime might accumulate over the years. Then I added rivets or nail head dots using a metallic bronze glaze. I used the same glaze to tone down the brass spigot. For the pump I added a black plastic "pipe" to reach the bottom of the barrel.


Now for the rain chain... There are a million styles and materials in the real life versions, so this is where you get to let your imagination go wild! I made the one for Encounters using a plain copper chain. You can use the glue bottle tops from Tacky Glue, you can use a variety of beads, you can use saucers - just dig through your stash and you'll find something!

I had a lot of the Farrow tiny plastic tea cups and saucers left over from my failed attempt at still in design mode chandelier prototype for the Shabby Chic Soap Shop. I liked the bell shape and thought they would work nicely for rain chain cups. I grabbed those, some black chain and a screw in eyelet.


I cut the handles off and sanded any uneven plastic leftover from manufacturing.


Then I found a drill bit that was just a touch smaller than the width of the chain links and drilled holes through the bottom of the teacups.


I measured the height from my roof edge to the top of my rain barrel and decided that five cups would work nicely.


To string my cups onto my chain, i looped a piece of piano wire through the last chink and used that to thread on the cups.


Some cups were a tighter fit than others, and I found that forcing them only made my chain break. After the first repair, I figured out that going slow and putting equal pressure on both ends of the chain made the cups slide up the chain nicely. They fit so snugly, I didn't even need to glue them. I spaced them out evenly, and added in a couple decorative larger jump rings at the top and bottom.


To paint the assembly, I needed to rig up a paint booth - one where I could turn the chain 360 degrees to coat all sides. I drilled a hole into the top flap of this Amazon box, then attached the chain with a piece of copper wire threaded through a loop, up through the drill hole, then flattened it out so I could spin the chain as needed to paint.


I coated the entire chain assembly in flat black and let dry. Then I sprayed and overcoating of aged bronze metallic.


Here is a mock up of the assembly - not where it will end up yet because I still have some detailing to do to the barrel. It just gives you an idea of something you can do that's easy, fun and will add another level of detail to your project!


This will be one of the last things marked off my Creatin' Contest To Do list for a few weeks, I'm afraid. But I have so many more fun and interesting things to look forward to! That will keep me motivated to work hard and fast so I can get back to the excitement of creating a mini world!

Wishing all of you the best!
Back soon!

Jodi