Search My Blog!

Use the Search box below to find keywords that you're looking for quickly and easily!

Search Feature

Thursday, April 28, 2016

So Many Details...


The Sugarplum is such a little kit, but that's a good thing if you already have a house full of finished miniature projects and don't plan to ever stop making more. The kit was intended to be a Tudor style, but when I looked at the kit, I saw fru fru moldings and lots of textural detail in my mind's eye. Because it's small, I can do a lot in terms of detail, but not get burnt out by having a ton of it to do. I admire those of you that work on monster kits! I would really lose patience (I have been known to do this. Just ask my poor Starbucks and the other two deserted Street Of Shops kits in my buffet). My attention span needs work...

Since the whole Dreadful Egg Carton Stones debacle (more on that later) I have been on a roll! I won't bore you with a lot of details on the details - a picture is worth a lot of words...

Starting the entry shingles...


Finished entry shingling...

Whitewashed entry shingles... Oh and installed door!

Installing the porch roof - notice the enlarged and finished porch floor...

Installing the porch braces...

Bay - check, window + plexi - check, round window - check, whitewashed shingles - check!
Just need to go around with caulk and touch up paint! We're making progress (by we I mean the little six year old inside my head who's jumping up and down right now!).

Now, for the update on the Dreadful Egg Carton Stones...

Chalked...

Sealed... Mod Podge won... And...

Done!!!
Next... Waiting on more half scale shingles. The regular sized diamond speed shingles I ordered in December from Greenleaf are GIANT! Since this kit is so small, I'm thinking smaller shingles is a good idea. Meanwhile, more trim and touch up!

I hope all the little details in your life are falling into place, too!

Tuesday, April 26, 2016

The Dreadful Egg Carton Stones

Last week I was delighted at all of the mini time that had suddenly been dropped in my lap. It seemed like things were progressing quickly, and I could see the project taking shape. You know - the exciting part when your vision becomes tangible!

Then, the next step arrived - the dreaded egg carton stones. I was enthusiastic about doing them! That was until I had worked on them for many, many hours over two days. Then I realized my pace had slowed to a crawl. So much for progress...


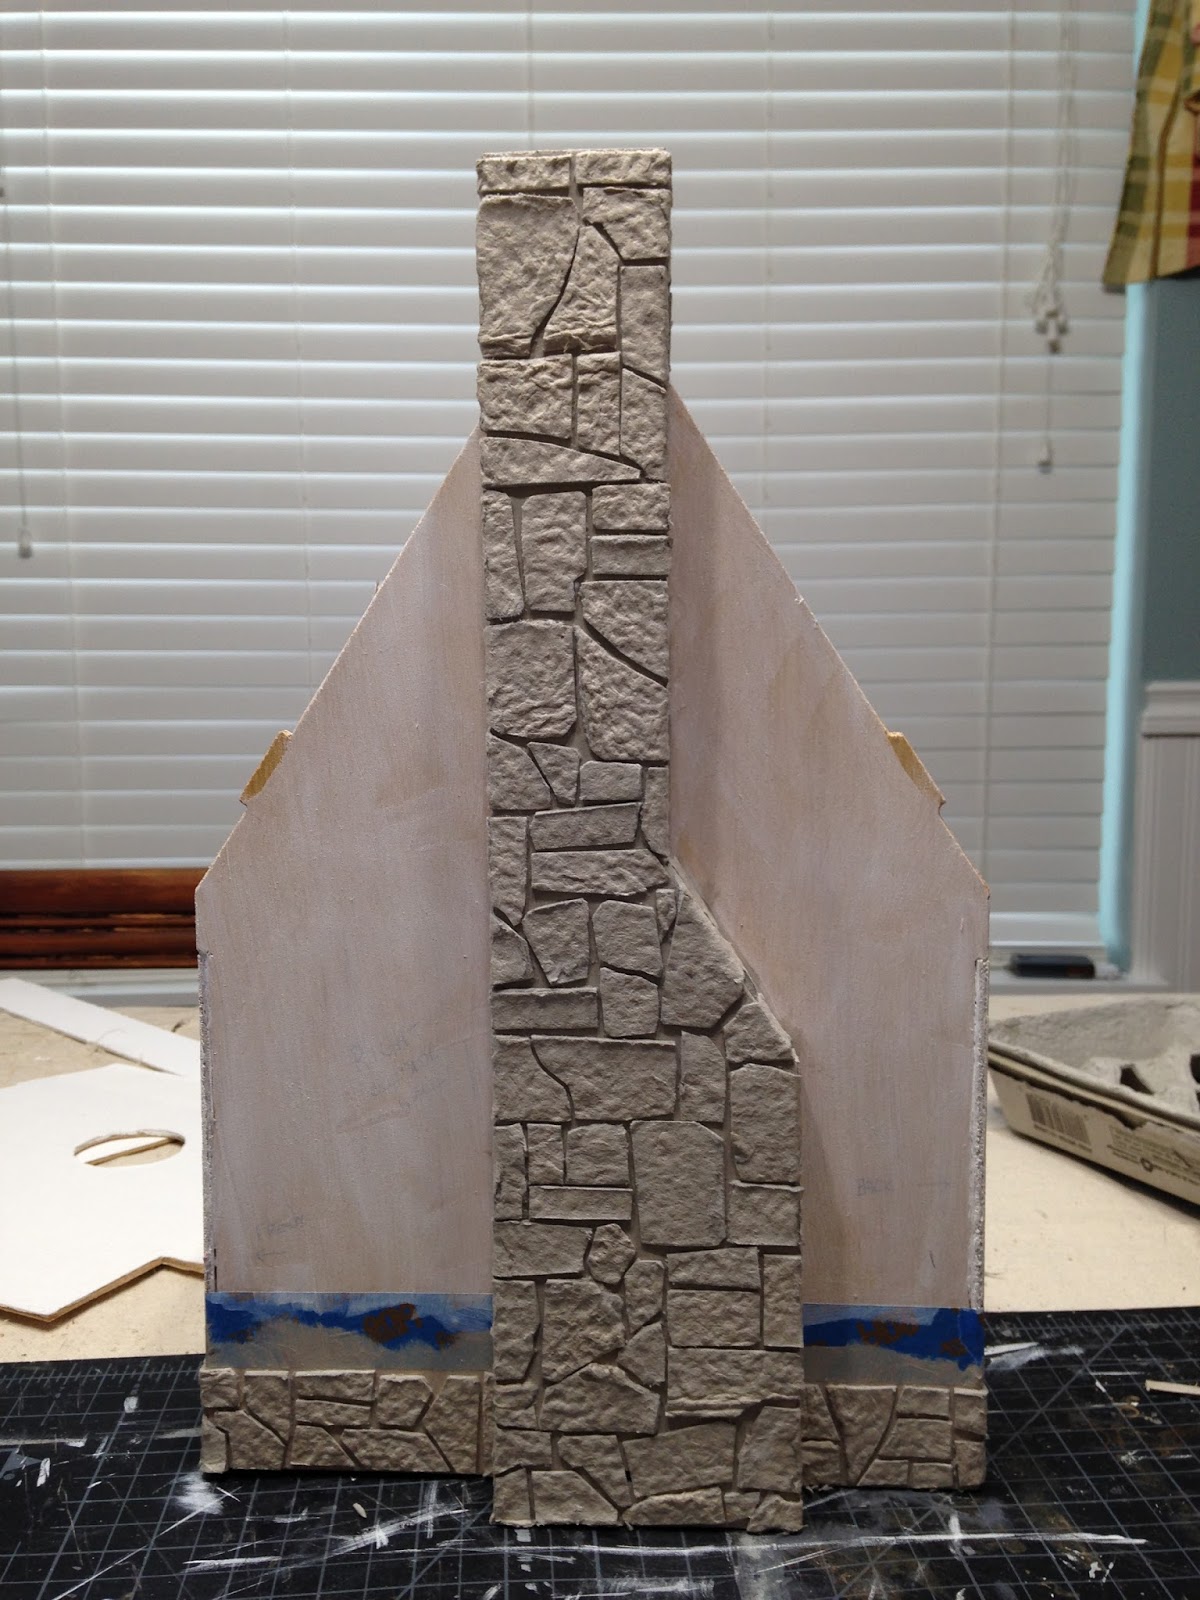
The cutting and applying part, though excruciatingly long, went fairly well. I used the pattern from the vacation photo of the Mt. St Helens path wall as a guide. I loved how they looked and thought maybe they just needed a bit of dimension.


Okay - I'll just sponge on a little paint in contrasting but muted colors. That ought to do the trick. Well, it might have, if I could just leave well enough alone. But I can't. 47 years on this planet and still I can't just Leave Well Enough Alone! I swear, they looked fine on Saturday evening.


They didn't become completely disagreeable until I had the Grout Idea on Sunday! You see, I had several different grout options, but each also had a drawback:

1. The powdered grout from the hardware store where you just add water. Drawback - It was already colored, and being a bit of a medium brown just didn't fit with the vision for the project.

2. Spackling compound. Drawback - Too easy!

3. The tub of mosaic tile grout that I purchased from Northwest Art & Frame in 2002 which by now of course was a completely hard and solid rock inside the container. Drawback - Why, none of course! Let's prove a point and bring to life and make new again something completely dead and useless! Frankenstein was not crazy! He was a visionary!

So once option #3 was chosen and committed to I began to attempt to resuscitate the dried up grout. I took a rather large Xaxto implement (to scare) and cut the substance into chunks and out of the container.  Once I had dispatched about half of said grout into a paper towel I added about 1/4 cup of hot water to the container with the remaining (now scolded, freaked out and ready to submit) grout. I let it sit a few moments after which time I further forced it into submission by smashing and stirring it vigorously with a large paint brush handle. After several minutes of such treatment the grout relented, and was just as liquidy smooth as the day it was purchased. Ha! Try to waste my $3.99 will you! To this now yielding batch I added more and more of the paper towel contents until I, once again and satisfied, had a full jar of perfectly good grout. :O)

I mixed in a little complementary color, put it in an applicator bottle and began the grouting process.......... It Was A Mess........... Apparently, little bitty chunks of the resistance party remained, clogging up my applicator bottle, exploding under the pressure and causing a great disaster of a mess. I stopped trying to apply the grout into the cracks, I began to, in frustration, pour great globs into my hand and apply the grout smearing and pushing and hoping some would make it into the places it was supposed to be! It Was Awful! Then it got worse...


Now, with warm wash cloth and sponge in hand, I began to attempt to try to remove the grout off of the rocks only to find that in the motion of scrubbing off the grout that the surface of the Egg Cartons were coming off too! Never Have I Ever Had This Kind Of Holy Terror With Egg Carton Masonry!!!

At this point I went to bed. To distract myself from the grouting horror with which I have never seen the like, and being at home alone (due to hubs and son doing an out of town job), I thought listening to the Dark Waters YouTube Channel would be just the thing to fall asleep to........... I have come to the understanding, after lying awake and afraid to move until 4:00 in the morning, that I am an appalling decision maker, and that apparently, my bad decisions come in groups. Unless you want to truly terrify yourself while home alone with "real" encounter stories, Never, Never Listen To Dark Waters!

The next morning I made the decision (remember? Me + Decisions?) to just coat all of it in a wash. I mixed a little of the grout color into some water and brushed a coat over everything. It does look a little better, but still so one dimensional. Now I have decided not to do Anything! I need to wait a few days and  see if I can figure out what to do next. More sponged on color? Some Mod Podge? Leave it alone? I am just afraid to do anything.

So, in the meantime, I am doing some trim and some detailing. Thank goodness, that is going much better than the Egg Carton Stones!


And, in other Bad Decision News I have resolved to quit being such a big sissy and just enter the darn HBS Creatin' Contest. I finally had a fun idea (my ideas are still okay) for the structure, and it's so fun to share with everyone! Don't think I'll start until this project is done, but I bet that decision will come back to Bite Me too!


Thursday, April 21, 2016

Lots Of Mini Time!


The hubs and son have been away from the house working a lot lately, and my "day job" is in a pretty relaxed period again until the end of May. This means that there are long stretches of mini time, and that is great news for me! I have been able to work on the shabby chic soap shop and it feels like I've gotten a lot accomplished this week! I am really going to have to come up with a better name for it, though!

I got a lot of the inside trim installed, and it's nearing completion. I'm at that stage where I can only go so far on it until some other pieces fall into place. I need to make decisions on raw wall edges etc before I can finish the trim there, and also have to install the roof before I can install quarter round etc... Once all of it is done I'll need to attempt some tiny caulking and touch up the paint job - or mess it up depending on the look it needs to have.


So the progress of the day has been to work on extending the front porch and getting the chimney attached in preparation for the egg carton stone that I have settled on.


Using the left over plywood from the second floor that is now only a shelf, I enlarged the porch floor to 3-1/2" x 6". I think it will make the front of the shop a little more inviting.


I also took some of the same material and used it to extend the porch eaves to cover the larger floor space.


Once that was done I gave everything another dry fit, and figured out what modifications I needed to make for the thicker chimney. I needed to cut some of the roof material away. I made two attempts, both not having taken away enough, and then taking too much on the third attempt. Oh well, "you know what" happens. Us miniaturists are used to camouflage, smoke and mirrors so it will all work out in the end...


At present I am, of course, waiting for glue to dry. Then it's on to the egg carton stone making process. I took a couple photos from Mt. St. Helens on vacation last summer, and just love the rocks they used to line the walking paths. I might just try to replicate it, if I can...


I hope you all are having a lovely and stress free moment where imaginings are conceived and dreams are born!

Wednesday, April 20, 2016

Doing Something Fun!

Just for fun in the firebox I decided to go with stone as opposed to brick. I have a partial roll of the Magic Ston sticker stuff, so this was a great opportunity to use it up.


For those of you who have not worked with the Magic Systems products before, here's how they work...

1. Paint the area you are going to cover with what you want to be your grout color. Let dry.


2. Cut out enough length of the sticker to fit the area. I like to remove the stone or brick stickers before I apply them to the surface - it is much easier. Affix your sticker to the area, making sure to firmly press down all of the lines.


3. Mix your mortar with enough water to achieve an oatmeal type consistency. If it's too dry add more water in tiny increments. If it's too wet you're screwed........  nope, just kidding. Just add a little more mortar mix a bit at a time until it thickens.


***Side note - the Magic Systems kits come with an assortment of colored powdered mortar mix. It is also sold separately. Don't get tricked into spending a bunch of money on this stuff. Regular powdered sanded or un-sanded grout mix from the hardware store is exactly what this stuff is. It is a fraction of the cost of the stuff sold for miniatures. One box should last you a lifetime of mini projects. Buy a light color - you can always add acrylic paint to the mix to achieve the color you want. Want a rougher surface - add some sand.***

4. Using a rough paintbrush, dab out a fairly thin layer to cover all of the stickered area.


5. Gently peel back the sticker paper and see the pattern left behind. You can gently smooth rough edges or pat down for a smoother look,


6. Let dry. Once dry, you can paint with color washes or sponge on more texture to achieve the look you want. In my case, I wanted my firebox to look as though it had been cleaned and painted for use as decor only. That is why the stones and grout are the same color. If I had been using it for a "real" functioning fireplace the grout and stones would have more contrast.

I like the stuff, it's easy to use and kind of fun. It goes a lot quicker than egg carton stones, but I like doing those as well. In other words, what is six to one is half a dozen to another...


I didn't care for the brownish tone once I'd held it up against the fireplace, so I just coated over it with a lighter grey. I also added some of the ceiling paper scraps to the niche and gave that a couple coats of white. I'm thinking I'd better not attach it to the house just yet. I'll have to fiddle with the roof, and that is not nearly next on the To Do list.

I've also been working on the inside trim - did I mention that there is a lot of fussy work on this project? I certainly need to work on my "fitting molding together nicely" skills. Oh well, in the end it is supposed to be a little shabby. More on the interior transformation later...

One last thing... Do something that makes you really happy today! Sometimes the "have to's" make us forget that life is to be lived and enjoyed!

Monday, April 18, 2016

Finding My Joy!

What a productive day! I woke up early, the sun was shining, and the ideas were just flowing!


I sort of followed the instructions on the Sugarplum, but had to skip and deviate a little because of the modifications I'm making. For example, step # 4 says to add the second floor, and since I am omitting the second floor I just skipped that step. Step # 5 was to add the little partial wall strips to the sides of the back opening. I decided to wait on these so that getting inside to work on the fireplace and trim would be easier.

I did follow steps 1 - 3, attaching the front and side walls to the floor. With patient fitting and trimming, it all went together like a hand in a glove. While the glue dried on the three walls and floor, I covered the bay window in wallpaper (scrapbook paper) and attached the interior window frame. It wasn't too long before I was able to attach that to the structure.


While all of that was setting up I started to play around with the fireplace. Since it's a soap shop converted from and old historic home, it will not really be a working fireplace. I just want it to look like it has been freshly cleaned so that it can be used for display purposes.

The kit makes it so that the chimney butts up right against the house. This doesn't really give it much depth or appeal either inside or outside the house.


I decided to give it a more realistic and dimensional look by building a box around the chimney. This way, I could create a fire box for the fireplace and take advantage of what was meant to be the upstairs hearth, turning it into a display niche.


I created boxed in areas for the fire box and the niche. I'll add brick or stone to the firebox and some embossed paper to the niche. This will make them much more interesting to look at!


I'm working on a hearth made out of marble stationary and some mat board. There will be some tricky cuts to make - I'll need to make slits for the wall and get it to sit nice and flush to the floor. Then I'll decoupage the paper and hope it looks like smooth marble. Hopefully, I'll like the way it looks in the end.


Meanwhile, I am taking advantage of the nice warm weather (new record high today of 88 degrees) to spray paint much of the trim I'll need. What you see here is only part of it! There will be much more to come, but this will get me started on the main shop floor.


I am having so much fun with this project so far! I am never happier than when I am in the midst of some tedious little detail. Listening to scary bigfoot encounters or singing along to some happy little tune. I hope you all are also finding your joy today!