Several months back I had purchased a lot of 7 old dollhouse furniture pieces on ebay that I knew could turn into treasures with a little creativity and some love. They were so cheap (under $2.00) I really could not pass them up!
 I knew this sad little bed could be the inspiration for several pieces. I'm going to use the frame to make a log bed for the barn, and later I will use the head and foot boards to upholster for a fancy bed.
These "wood" pencils are available on Amazon in several different lengths in a pack of 10 or 12 for about $4.00. I've had the grapevine wreath stashed away for some time, and the sticks are huckleberry branches brought home from a hiking trip a couple of years ago. With my mini eye, I see awesome country type furniture!

First I had to carefully deconstruct the old bed so as to keep the reusable pieces in tact. Then I sanded with 80 grit sandpaper to remove the nuclear varnish that Chinese manufactured minis are famous for. WARNING: As you sand the varnish off, your nose gets full of crud and your throat feels a little sore. Use a mask if you have one. I got a little rough and needed to re-glue a support to the rail.
 I decided it would be better to attach the main logs onto the frame with screws in order to have a more stable bed to start off with. I pre-drilled holes into both the braces and the logs to make getting the screws in easy. Since the logs were actually pencils, I had to trim several of them down to length.
Four main logs, and four screws later we had the base. Now comes was the fun part - getting creative with the style. I had a dollar store Fairy Chair that I could borrow bent wood pieces from. You'd never know it from looking at them, but they are actually held in place with staples. This means removing them, re-positioning the pieces you want to keep, then reinserting the staples where necessary.
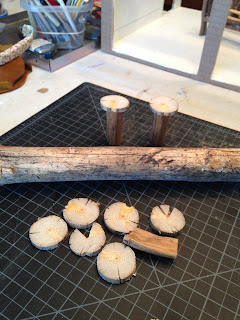
 Of course with all things mini, you have to patiently do things in steps as glue dries. I am not good at sitting idle, so I decided now would be a great time to make the little end tables for the bedside sasquatch lamps. I collected a giant walking stick on last summer's Redwoods vacation, so I was able to cut several 1/4" tops on my rip saw until I found ones I liked the wood pattern on. The bases are from another wood stick treasure I got on our Gifford Pinchot vacation in 2012. A little gue, stain and varnish and ta-da!
I also sanded, assembled, stained, varnished and installed the hardware on the House Of Miniatures dresser kit during "drying time". Other than pictures and a rug, I think the little bedroom is about complete.
 Here was the reward for a good creative day's work! I won't show the bed with the bedding on yet until I get the entire bedroom decorated and ready for unveiling.
Have a great weekend everyone! Get creative with something! The worst thing that can happen is that you make something horrid and then get to laugh at yourself! It's all good, either way!


No comments:
Post a Comment
Note: Only a member of this blog may post a comment.