Search My Blog!

Use the Search box below to find keywords that you're looking for quickly and easily!

Search Feature

Monday, May 9, 2022

Beachside Bungalow Porch Preparedness

It's been a couple weeks since my last post, but I really have been working on the Beachside Bungalow's porch every spare chance I get. Since I am making nearly every accessory, I have been doing a lot of prep work to make and decorate them before I could start putting the porch together. By prep work I mean finding/creating/configuring items in Tinkercad to be 3D printed, and designing custom furniture pieces in Design Space to be cut with the Cricut Maker. I'll share my prep progress here now in order to save a ridiculously long finished porch post later.

Of course a beach house porch needs lots of beach themed items. I started with surfboards. I knew I wanted to include a few styles on the porch, so I went to Thingiverse to look for the perfect models. I found three - a longboard, a standard surfboard and a boogieboard. I saved them then imported them into Tinkercad to resize them to 1/12th scale.


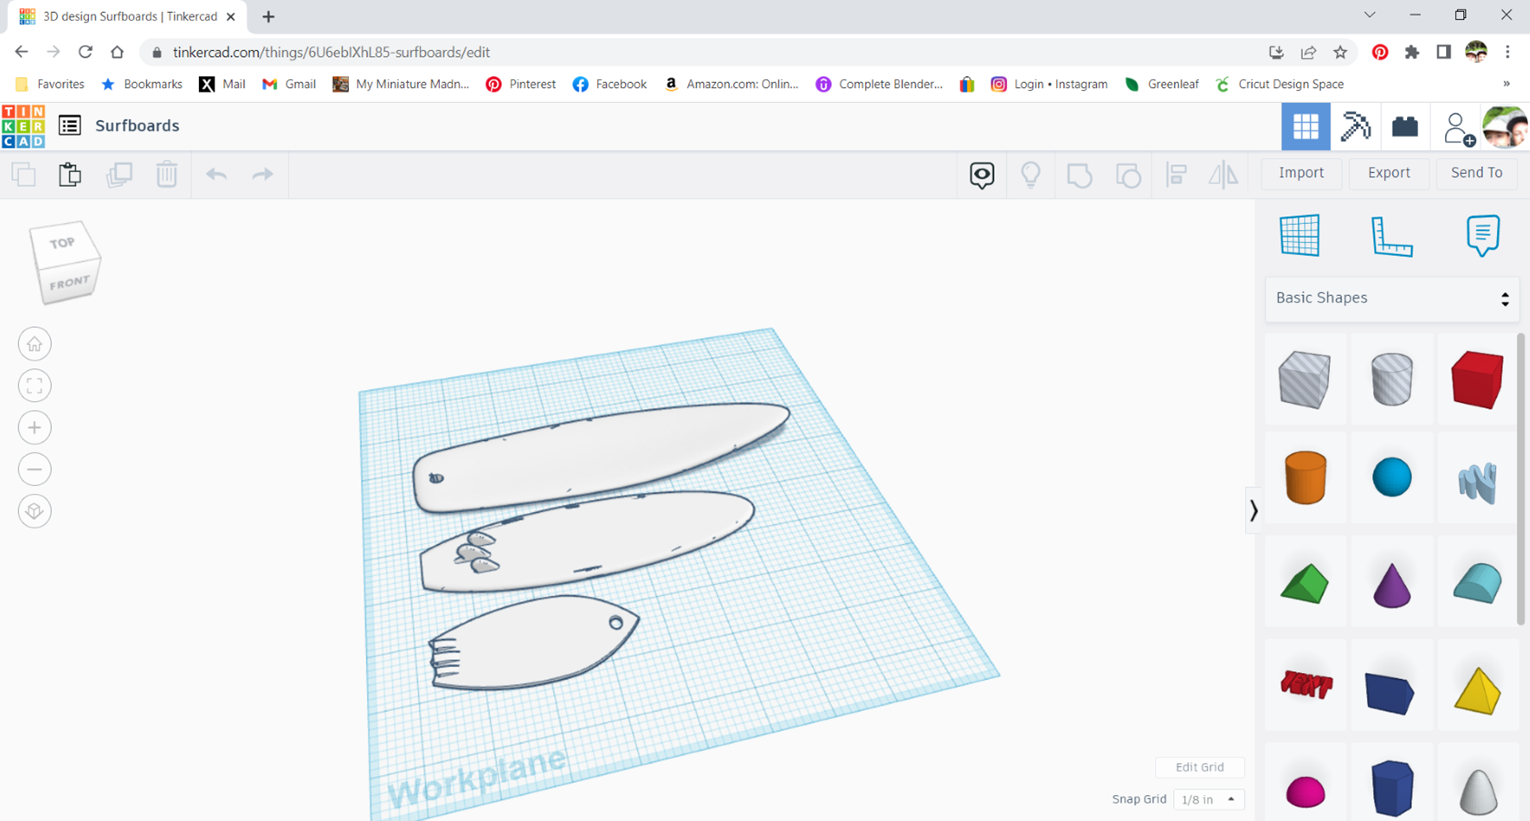
Once 3D printed, I had to come up with a way to decorate them. I am certainly not an artistic painter, but in Design Space, I found various surfboard designs. To make sure the dimensions were right, I exported two of the boards from Tinkercad as svg files and then uploaded them to Design Space. All I had to do was resize my images to the 3D printed sizes, then use the Print Then Cut feature to cut the images out. The longboard was a little trickier. Because of it's curved design. The svg export just stops the file at the start of the curve, chopping some of the length off of the surfboard. To get around this, I scanned the longboard into the computer, saved as a png file, then imported it into Design Space as an svg file. There's always more than one way to skin a cat. For those not familiar with English slang, I apologize for the gruesome phrase.

Surfboard art images left. Svg imports right.

Scan of longboard.


I painted a base color on the surfboards. Once the images were Print Then Cut onto regular printer paper, I just had to peel away the waste parts.


To stick the images on the surfboards, I used yellow label Mod Podge. I overcoated several more layers of Mod Podge letting them dry thoroughly in between. This made the boards appear to have a good coating of wax on them. I applied the images to both sides of each board.


I printed several other fun accessories with the 3D printer. Some were my own design, and some I downloaded from the generous creators on Thingiverse. Some got a few design tweaks, some just resized. The birdhouses on the right were all provided by a wonderful designer and given away for free on Thingiverse. They were meant to be printed full size for actual birds, but they scaled down amazingly well. The birdhouses on the left were my design. I made them to look like an old fashioned beach changing tent. 


Right as I began painting this one, I noticed that it looked conspicuously like a Honey Bucket. For those that don’t know the brand name, they are port-a-pottys that are brought in to various places like construction sites and concert venues to give folks a temporary place to "go". I decided to leave it as is - after all, birds “gotta go” too. Better in here than on your head, which I saw happen once to a poor bald man! At least he didn't have to wash bird poop out of his hair! 😉


From several different designers, I found shoes that I could reduce to 1/12th scale. My painting skills are definitely not as polished as Betsy or Birgit on tiny things, but from a distance they are passable. With all the sand at the beach, taking one's shoes off at the porch will be a house rule for Kairi and her friends.

Mailbox, boat cleats and various shoes.

Tiny Converse like sneakers.


You may have noticed that grouped in with the shoes is a mailbox. This was my second printed attempt at the mailbox, after I had combined some parts and resized others. The fun thing about this mailbox, other than it was a full sized design that was down scalable, is that the door really opens and closes and the flag is functional, too. I just had to resize and reinforce the holes so that push pins could be fitted. Kairi might just have some outgoing mail soon.


It just wouldn't be a beach theme without life savers and boat buoys. Thanks to Thingiverse, I was able to easily find these, too. A few adjustments and they suited my needs perfectly! I added a ship's wheel and anchor hooks just for good measure.


Two styles of buoys.


If you have followed the beachside bungalow build, you've already seen the lanterns I designed last fall. The porch was a perfect opportunity to print and paint up more. I am planning to install two that actually light up. Fingers crossed I can easily connect them to the "finished" wiring hub.


This was my first attempt at printing the mailbox before the adjustments. I also made an address plaque, but I'll save the finished photo for the porch reveal post.


I've also made several pieces of furniture designed in Design Space and cut out of chipboard with the Maker. Since I have yet to upholster them, I'll save them for next time, too.

Hope you are all making progress on your projects and having fun doing it! See you soon!

xo xo,

Jodi

Thursday, April 28, 2022

The Impossible Dream

At last, dear friends, I have finished the Powder Room! I really didn't mean to leave it for last, I just couldn't make a decision on what to do. At only 2-7/8" wide and 4-3/8" deep, it was a challenging space. Getting both a fireplace and a powder room under a staircase might sound crazy, but trust me - it's not impossible! Tiny, minute, fun size, petit, cozy, compact, efficient, pint-sized, itty bitty - no matter what you call it, it functions! With a little ingenuity, I knew I could make it work.


The Beachside Bungalow kit by Real Good Toys allows you to place the first floor's dividing wall wherever you'd like. When I cracked mine open, I'd never seen one with a powder room fit underneath the stairs. Challenge accepted! I determined to leave the bulk of the space "open concept" and use my wall to separate the staircase. And to make it even more challenging, I added a fireplace and a powder room under the stairs, too!


I was engaged in finding a solution before I put the project aside for the holidays (and then the flower shops), but I just wasn't sold on any of my ideas. Here is one of my first iterations of a space saving sink and toilet. Created to utilize the corners, they were designed in Tinkercad and printed with the 3D printer.


Roxanne thought that the toilet was kinda neat. Modern, easy to clean and totally functional. The sink, however, she didn't care for. She thought it was too cold for such a warm and cozy beach house. She encouraged me to try again with something more cottage-y.


I found loads of inspiration for under stair bathrooms, but nothing captured my imagination until last week. That's when I suddenly had an idea for a vanity that involved the Cricut instead of the 3D printer. I got out my graph paper to draw the dimensions of the room. It really helps me to see the space right before my eyes as opposed to looking into a room. Now I was able to envision a vanity that would be unique, a perfect fit and utilize all the space available. I drew it within the confines of the space on the graph paper to make sure it would fit.


I cut out the shape to see it in the space. So far, so good. There was still room to get a body in and access the toilet.


My design has a curvy shape, and I am not the best cutter with an Xacto knife. That is why the Cricut Maker is so perfect. I scanned my graph paper sketch into the computer, then uploaded it into Cricut's Design Space program as an svg file. Now the Cricut Maker could cut my vanity pieces out of chipboard.

Vanity Top

I also made up the support pieces and an outer and inner frame for the mirror.


Once the pieces were cut I began to assemble.

Top with sink hole, back, back, side, side and bottom.

I painted the top in preparation for the countertop finish. To add support for the rounded front of the cabinet, I used a toilet paper roll. Guess where I was when I came up with that idea, lol! It just seemed so apropos.


I cut the roll down the center so that I could wrap it around itself to get the right circumference.


Then I cut it to the right height.


Then I held it in place under the sink to get a good fitting. The paperclip held it to the size I needed until I could get the glue and clamps handy.


But first I had to install the sink. In this case, a miniature aluminum bowl. It will be a small sink but this is a teeny powder room.


I glued it really, really well, using wood glue to weld it to the underside of the countertop. Don't want the sink falling out!


Then finally I could glue and clamp the TP roll support under the counter.


Once the rounded support was installed, I could add the last two support pieces.


Now it was time for the cabinet front. Using Cricut kraft cardstock, I came up with an idea to attach the curved section separately from the side pieces to allow it to form better to the curve. I measured from support to support, then added the depth of each side support to the length, I made folds that were the same depth as the supports and glued them to the outside of the supports. Make sense? That gave me a natural rounded front.


For the sides, I did the same, only these would be flat because there was no rounded TP roll behind them. The small gaps on either side where the sections met were filled with my wood glue caulking method. I lined up the bottom piece with the back of the vanity along both sides then traced the final shape of the front onto it. I cut this by hand to get the perfect fit. You can see that photo below after I added the legs.


To make the faux doors, drawers and trim I used the same kraft cardstock and had the Cricut Maker cut them, too. They are comprised of two solid layers and two frame layers for each, gluing the layers on top of on another to get the right thickness.


I forgot to take an in progress photo of applying the cabinet fronts, but to get the center drawer and door to curve, I gently forced it around an acrylic paint bottle. Here is the vanity after I have glued on all the fronts. The legs were 3D printed extras I had left over from the sofa and chair recovering project. I added a scrap wood layer under each leg because I didn't quite have the height I needed to get above the baseboard in the powder room.


And here I have added a Dresden bead detail around the bottom to cover the chipwood raw edge. I added a ship's wheel brad to the center cabinet door for a little nautical whimsey.


Everything always looks better with a coat of paint on it! I went with the faux stone countertop method just like with the ensuite bathroom's vanity top to give the house some consistency.


Taps and drain added...


Installed in the powder room with a paper tile backsplash and corner mirror to give the illusion of more space. The vanity was still just a tad too short to stand over the baseboard, so I added silver spacer beads to the bottoms of each leg.


The toilet is the third or fourth 3D printed iteration for this tiny room. Each version got a slight adjustment. Since all of the other 3D printed things in the house were left in natural PLA white, I left the toilet natural, as well. I did try to paint one toilet with porcelain repair paint, but it is not at all forgiving. If it does not go on perfectly, it looks terrible. It is about four times as thick as old nail polish, and applied with a stiffly bristled brush. There must be a great glossy spray paint in existence for PLA and I am determined one day to find it!


The girls had harbored doubts about the powder room's feasibility from the start, though they didn't want to hurt my confidence. They were so pleasantly surprised at how functional the space really was that they wanted me to get a photo of them together in the room! If you're not shy, one can even "go" while the other washes her hands at the same time! You see, where there is a will to have an extra bathroom in a dollhouse there is a way!


With the powder room done, that completes the interior of this little beachside bungalow! 


First Floor

Second Floor


Now all that is left is to finish is the back opening trim and then to decorate the front porch. I have some ideas, but am open to wherever this creative current is carrying me.


But first, there's going to be some serious partying going on tonight! Five years is a long time to wait for a home, and Kairi is ecstatic!


I hope to be back soon and report that this Beachside Bungalow project is officially, totally completed!

xo xo,
Jodi