
The tasks that I was just itching to do this week on Tasha's Kitchen were: Skylights, Exterior Cladding, Front Sliding Panel and Lighting Fixtures. Some nights, at bed time, I was just sad that I had to stop working and that I needed to sleep at all! I love being so excited and motivated to work on minis!

I'll start with the skylights since those have actually been completed and waiting to be installed for a few weeks. I don't know if I have ever seen mass produced skylights in miniature, but knew from the conception of the idea that I would need to make them myself. I pondered the best way to go about this for a couple weeks, looked at photos online and then ultimately decided to make both the interior and exterior frames out of 1/4" corner molding. On the interior, the molding covered the inside of the window opening and wrapped around to form the interior frame. I painted them white like the ceiling so they'd blend in.

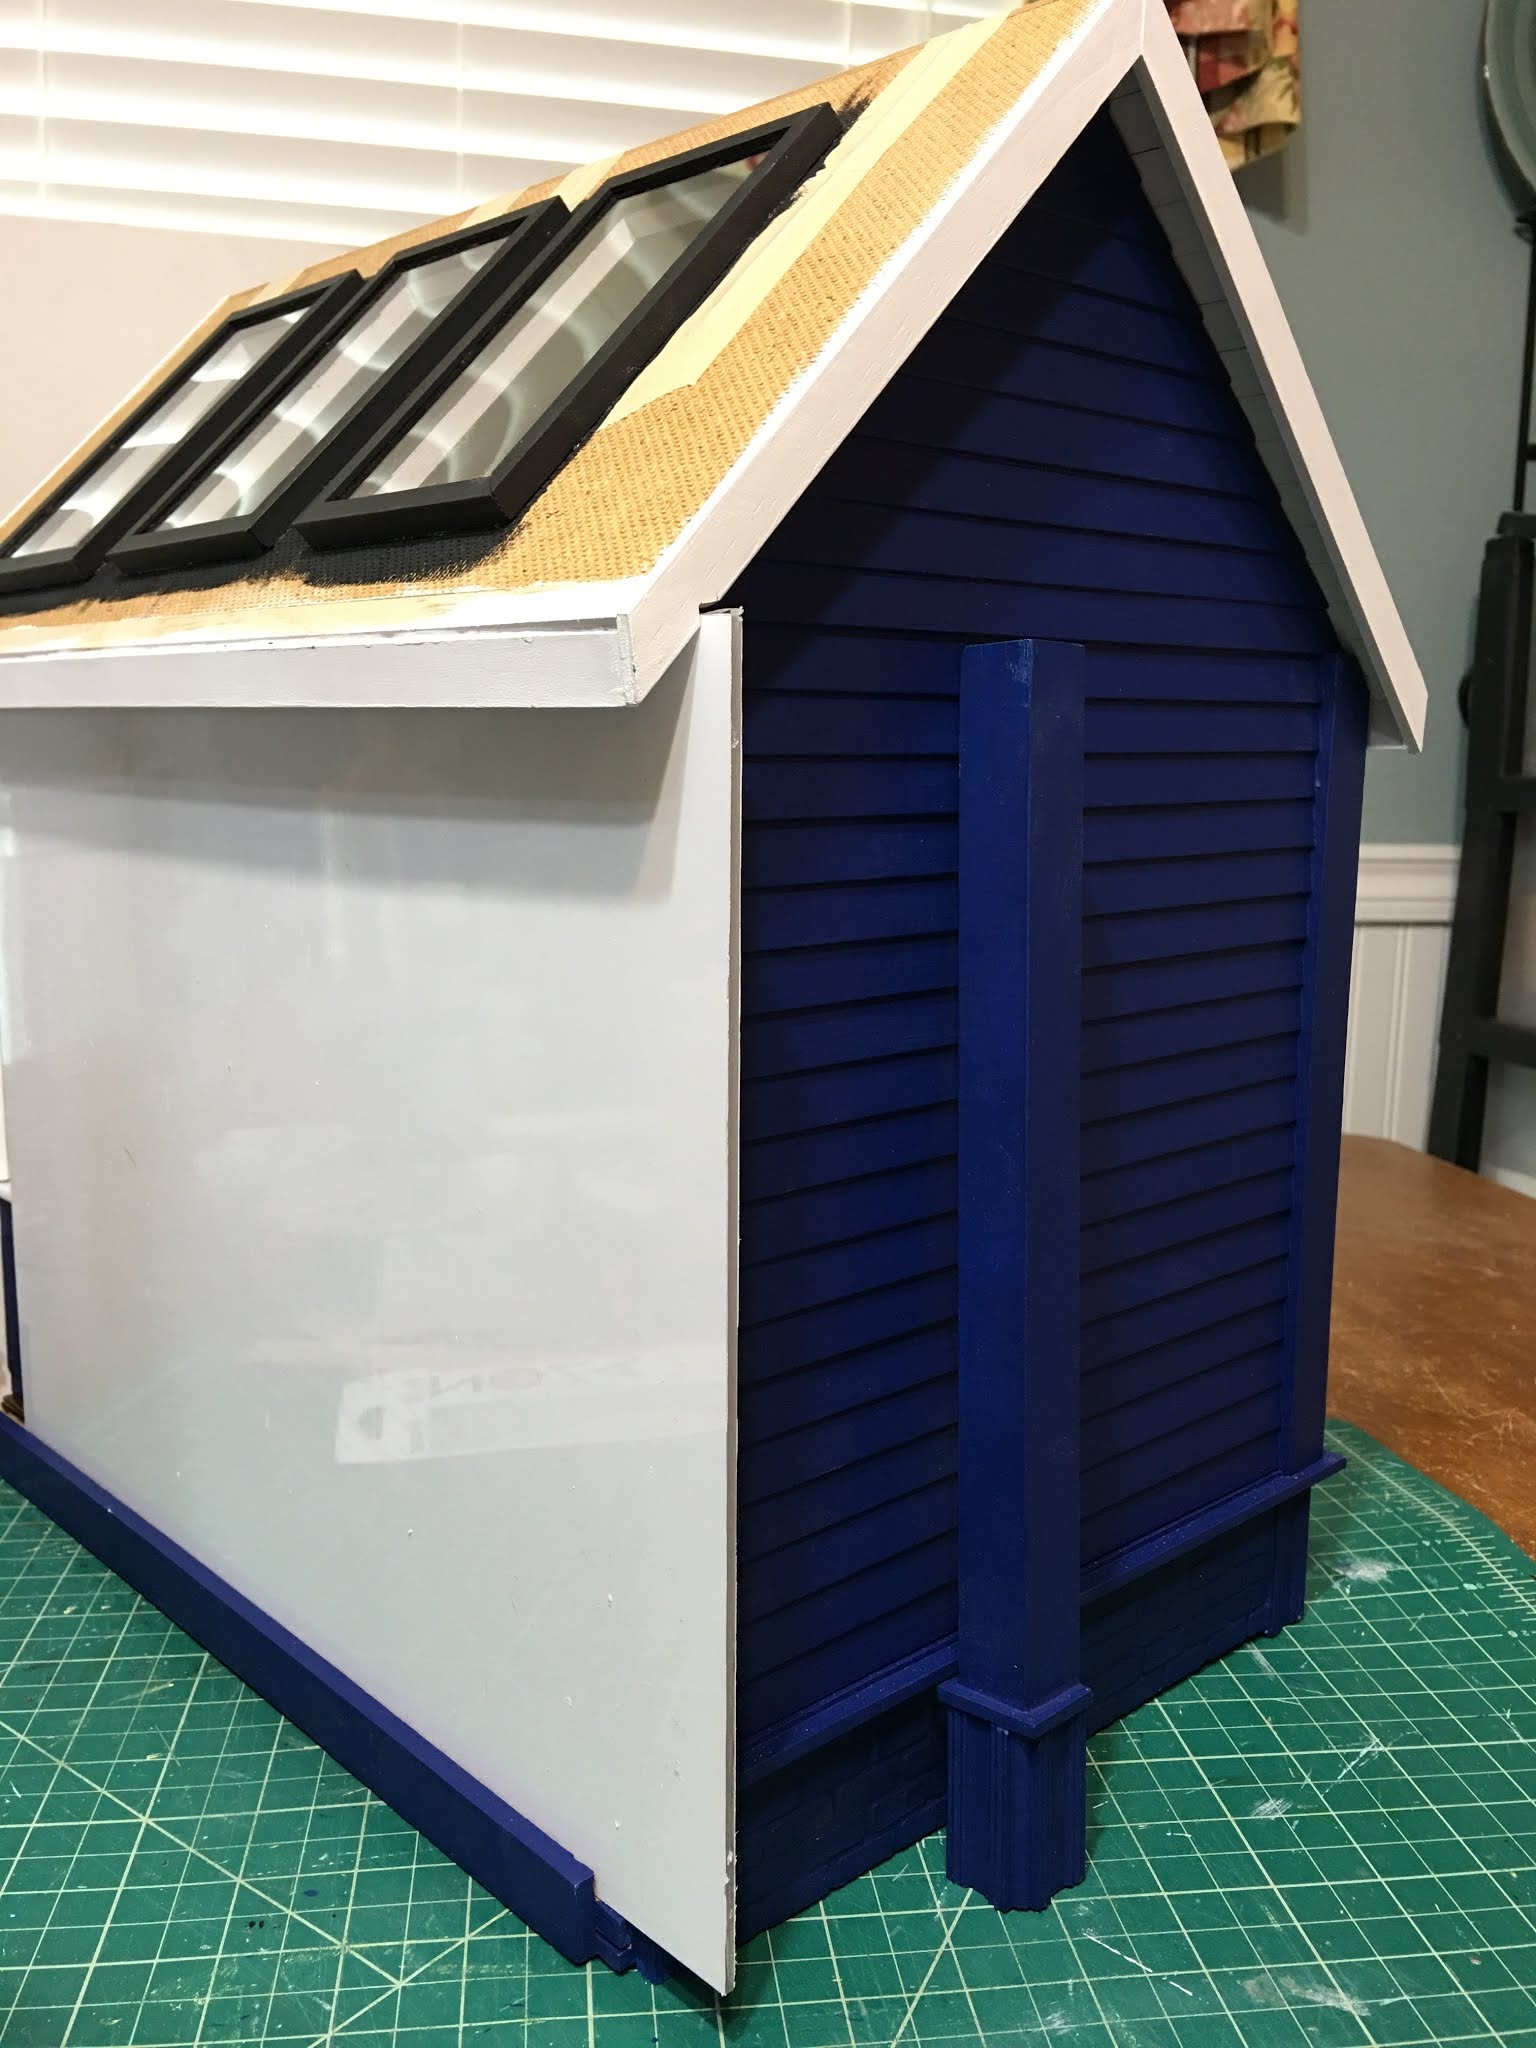
For the exterior, I also used the corner molding but built the frames as separate pieces. I made the outer frames, cut 1/16" Lexan to fit into them, then cut an interior frame from 1/8" x 1/8" basswood to sandwich the "glass" in. These frames were then attached to the exterior of the roof, sitting proud of the surface like many skylights do.


Next was the exterior. This kit was really neat in that it provided pre-cut clapboard siding for the right and left exterior walls, and thick corner molding for all four corners. The siding even had the 45 degree angle pieces pre-cut for the gables! Because I had added the extra 1-1/2" of height to make the walls higher, I needed to make up that difference on the exterior walls and on the corner molding pieces. I decided to create a foundation for the room box out of some nifty old white bricks I have. For the corner molding, I used a combination of ridge cap and plinth molding stacked up to make fancy corners.


 |
| The kit did not include any material for the back, but I have something special in mind. |


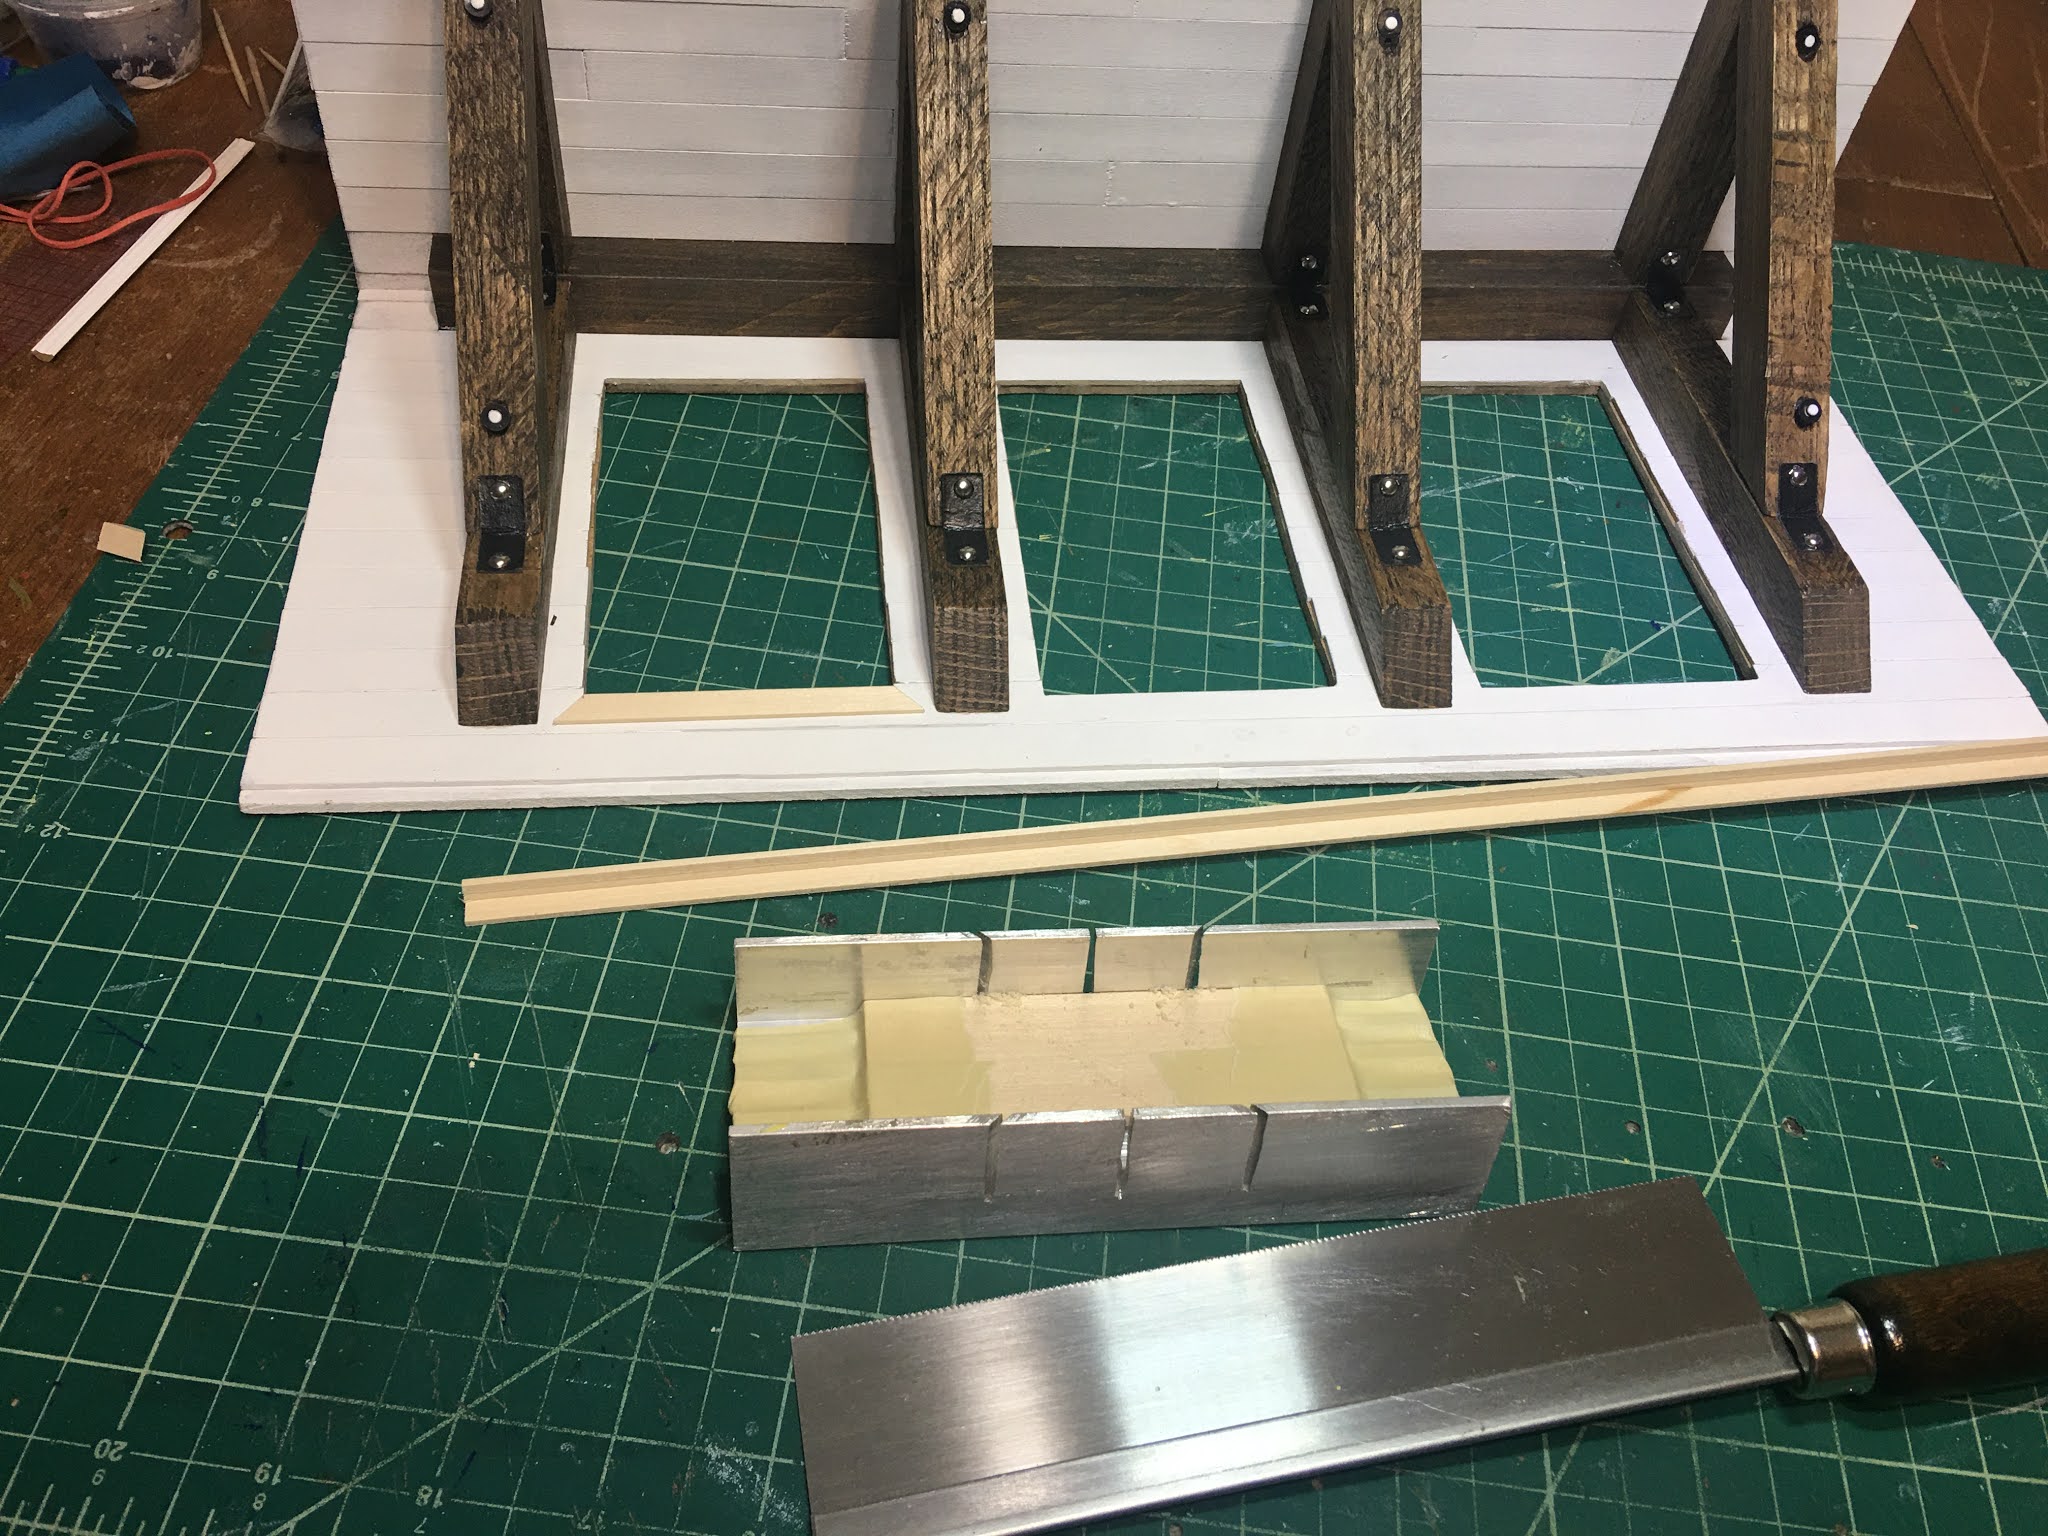
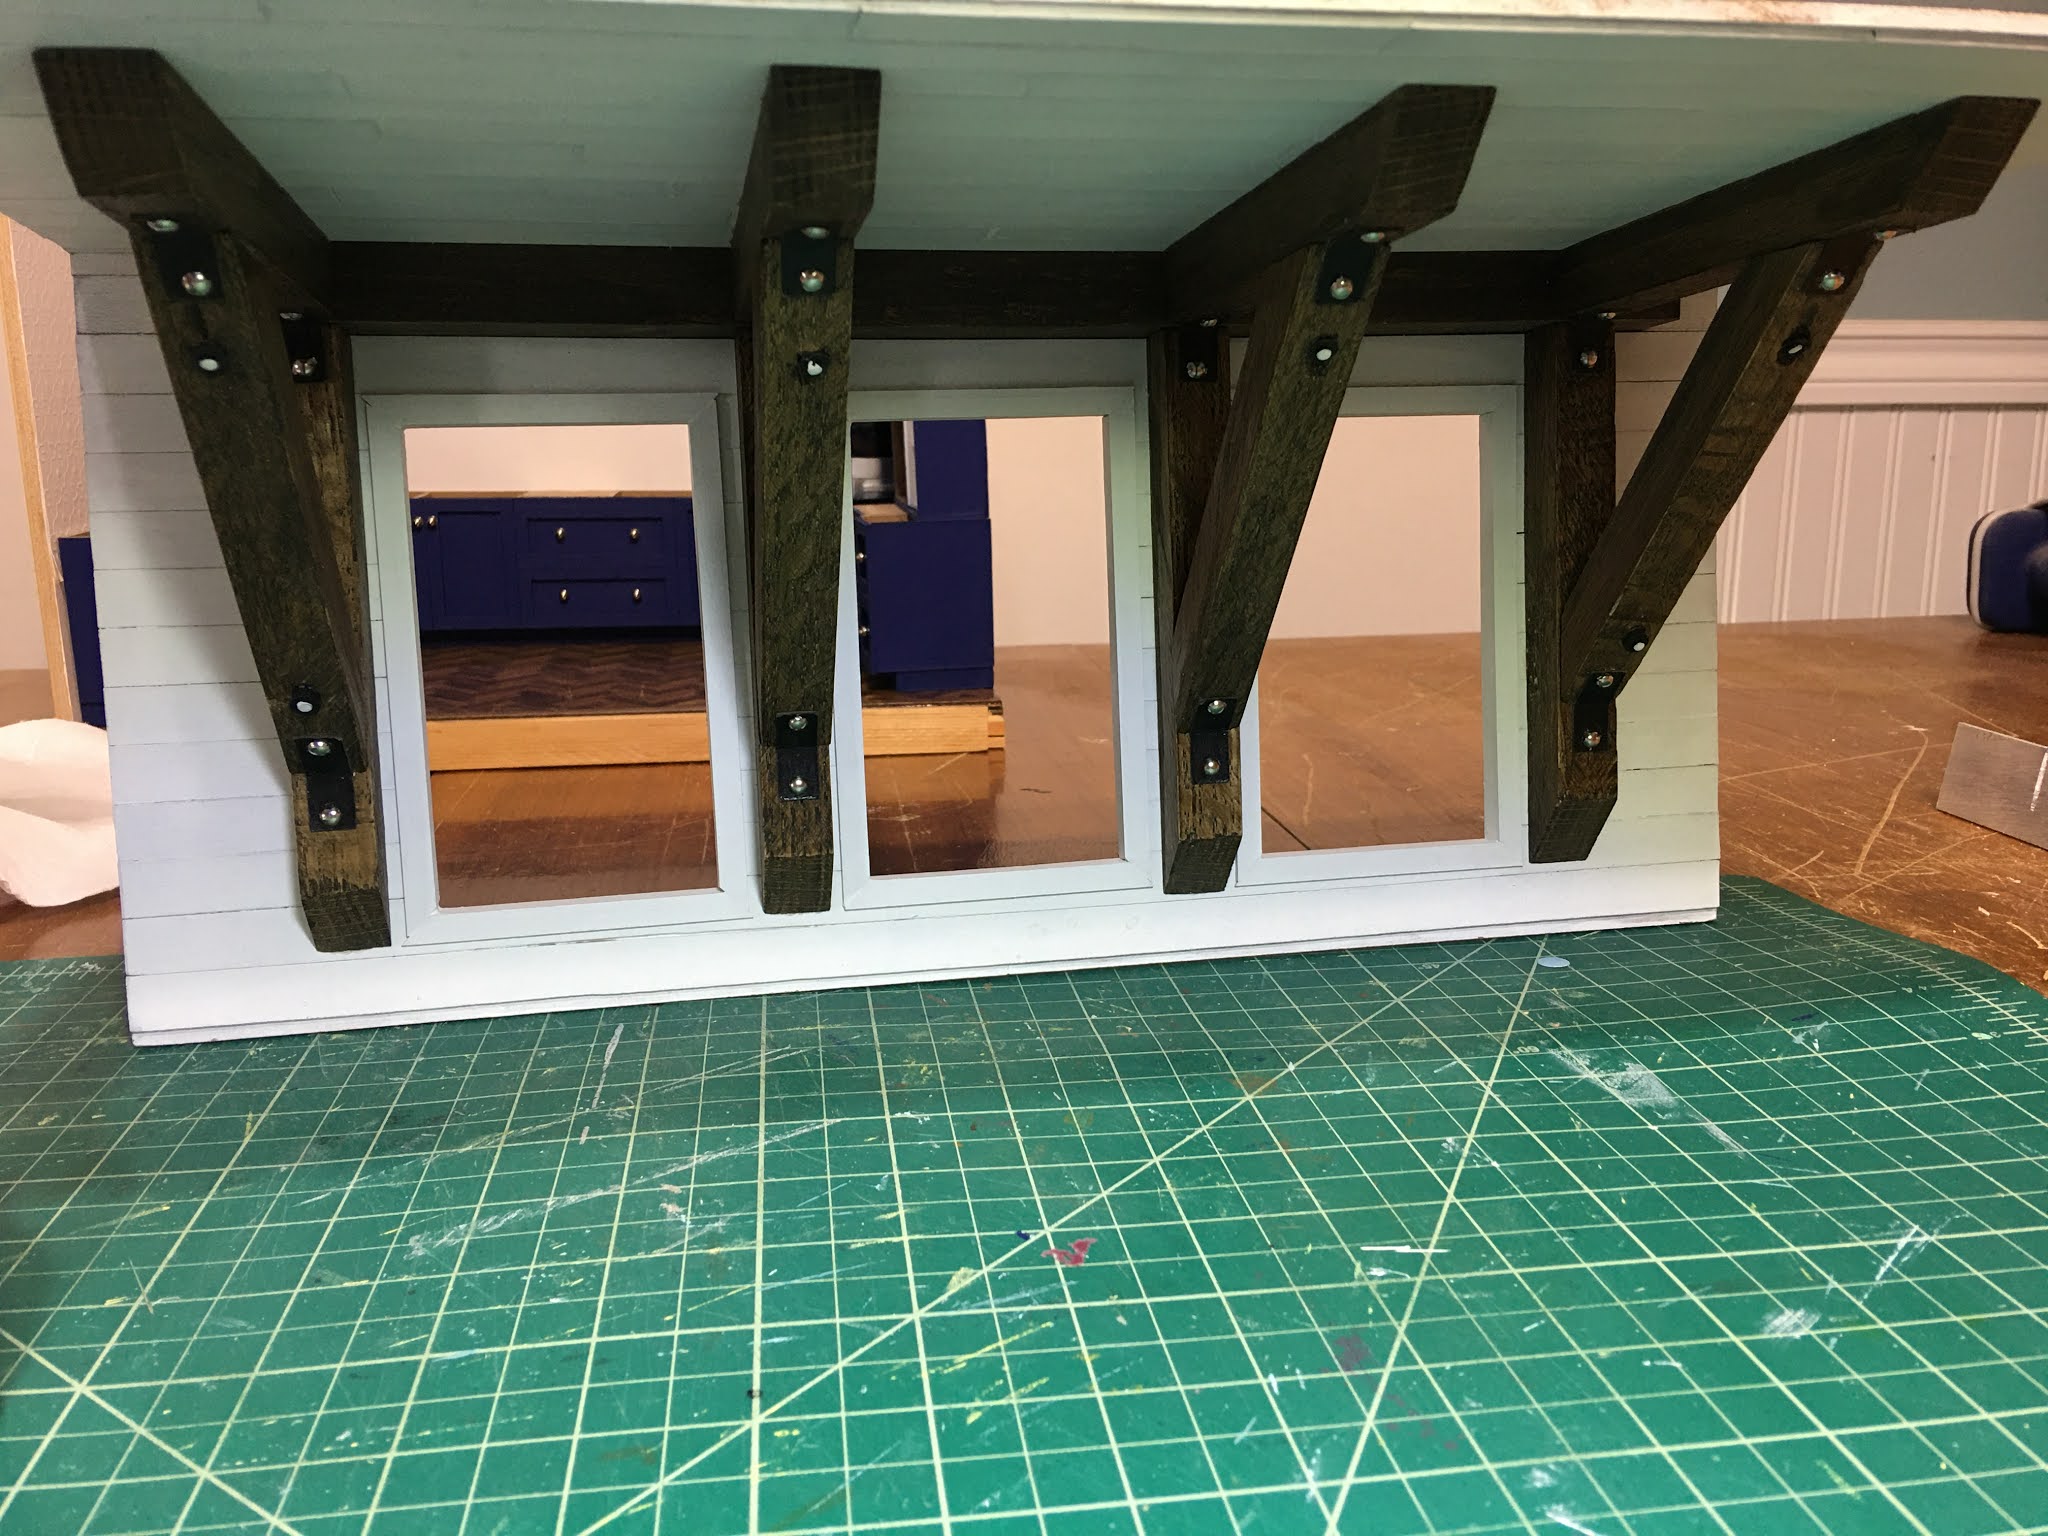
Since the right front corner molding piece will need to be removed to slide the plexiglass front in and out, I used ten 3mm magnets imbedded into the molding and on the room box to hold it in place. These are tiny magnets, but are very strong! Just holding the piece close allows you to feel the power of attraction! By drilling 3mm holes about 1mm deep, I was able to countersink the magnets so they sit flush to each surface.

I decided to go with the same navy blue that I used on the cabinets for the exterior. Once the painting was nearly finished, I applied the bricks, grouted them with spackle, painted them white and did not like the contrast. I tried them with the navy and liked them much better. This way, they are a textural feature rather than a competitor for everything else. Also, the navy will show less wear and dirt so will be less of a maintenance issue for Tasha. I installed the window and a small but elegant detail with the black shutters.


I added fascia boards all the way around the roof - boy what a difference a little detail can make!


I cut the front sliding panel from a large sheet of 1/8" thick Lexan - I'm so glad I purchased it when I did because it is 2-1/2 times more expensive now! I needed a 14" x 10-3/16" piece. Anything larger than 12" can get expensive, especially if you have a plastics company do it for you. Using the plastic cutter and some patience, it is easy enough to DIY. I won't risk removing the protective plastic until I take final photos before wrapping it for Tasha's birthday in July.


 |
| Remove the corner piece and slide the dust cover out. |
The last task I was itching to accomplish for the week was creating the pendant lights. I had three of these plastic containers in my stash and thought they would make a good basis for some lanterns.

Utilizing the 3D printer again, I made some decorative tops with holes through the center for the wires, then drilled a hole through the tops of the containers. I also created a cap piece to attach to the ceiling that you'll see in a later photo.

I strung Evan Designs 5mm bulbs up through the bottom of them, painted the tops a unifying black with a Posca marker, sealed them with matte Mod Podge, made the bulbs opaque with white paint and yellow label Mod Podge, encased the wires in a series of shrink tubing and then glued on the clear shades.


 |
| Ceiling caps have been added. |

I am thinking the same type of lanterns can be made in the future with glass jars of all kinds and shapes. How exciting! I love them in the kitchen and can't wait to light them up!


Speaking of lighting... I know what my task list will include starting this weekend... Look at this labyrinth of wires!


I've also got a fun idea for the back of the room box, which will include some handy storage for all of the items that Tasha will have to play with. Hopefully, next week, I'll have some fun progress to show after scratching more creative itches!
One last word to encourage any of you that are finding yourself stuck or uninspired to create...
Perfectionists are often that way because of a fear of failure. If you are seeking perfection, you probably tend toward getting in your own creative way. Just do your best. If you want to do better, try again. Share with someone who won't judge you but will celebrate the spirit of creativity with you. Us fellow miniaturists are great for that! Whatever you do, do not let fear, for any reason, stop you from scratching that creative itch. You must give your own unique masterpiece the opportunity to materialize. Who cares if it's not perfect? The point is to be joyful and to have fun!
xo xo,
Jodi
This is gorgeous! Every detail is perfect.
ReplyDeleteThanks Emjay!
DeleteIt is always exciting to see what you create with and how you solve problems. The pendant lights are perfect and should inspire others to try to make their own--, maybe me. You are so right about worrying about everything being perfect and your encouragement helps us to carry on. I've been trying to assembly my upper cabinet. It's a mess and not going together as I had imagined, so back to the drawing board. Tasha's Kitchen will be a keepsake, something that she will treasure. Made with love. PS--followed your advice on the Elf oven and it turned out perfect. Thank you. Now, I need to go to bed. :)
ReplyDeleteThanks Ann! I have been there a lot - things not going as planned because I forgot to remember some small detail or did not know what I did not know. All you can do is to be patient with yourself, have lots of extra materials, and try to enjoy the process even while you are learning new things. Each try gets better and easier. Good luck and can't wait to learn from your experiences! Hugs!
DeleteJodi, los tragaluces han quedado perfectos, la luz se introducirá por esos grandes ventanales iluminando la preciosa cocina!
ReplyDeleteMe gusta mucho como queda el exterior en azul al igual que la cocina, me resulta muy elegante. La idea de utilizar esos pequeños envases y convertirlos en las lámparas ha sido una idea genial, me encantan como quedan, no puedo imaginar algo mejor!!!
Estoy intrigada con qué colocarás en la parte trasera, pero estoy segura que nos sorprenderás!
Totalmente de acuerdo con tu afirmación de que si no llevamos a cabo una idea, por nuestro perfeccionismo, dejaremos de divertirnos y de crear, las cosas "imperfectas" muchas veces, suelen ser únicas y mucho más creativas!
Besos.
Thanks Pilar! I'm glad you like how things are coming along and I am hoping that the idea for the back works as good as it is in my mind! If only we could create more time, lol! Mine seems to fill and overflow a little too much these days.
DeleteThe kitchen has a wonderful crispness inside and out. Thanks so much for showing us your ingenious techniques: the skylights, the exterior finishes, the lighting, and the clever magnet solution to secure the sliding panel. I would never have thought to use black accents with navy blue, but it looks so elegant. Well done!
ReplyDeleteThanks Sherrill! I could only find one example of a navy colored house with black shutters Googling, too. Not common, I guess, though lots of lighter blue houses have them. If I could commit to a secondary color or to fully embrace the nautical theme, it would have been an easier choice. Keeping it neutral is a challenge!!!
DeleteI like your roof with the windows. Its gonna be more lights from outside.Well done
ReplyDeleteHugs Britt
brittsvirkochminiatyr.blogspot.com
Thanks Britt! I can't wait to test all of the lights together to see how much light there will actually be in there. I hope the skylights and LEDs make for a nice, bright display!
DeleteThank you for taking us with you throughout the creating process of your Tasha's kitchen project, dear Jodi, and thank you so much for sharing your ingenious techniques with us. There is still so much to learn yet, I think one is never to old to learn, it is what keeps us young, right ;)?
ReplyDeleteI like the way you've put in the lights, and using this teeny magnets to keep everything closed up. In the past I also used a dust protector, one as yours here, for roomboxes, but also added as protection against itchy fingers from visitors, who sometimes unfortunately think miniatures are ordinary toys....so often they want to take miniatures in their hands, to see them better.
Your kitchen project has become a pearl, a true mini gem, and I can't wait to see what you will do with the backside of it.
Stay safe, take care, dear Jodi, have a lovely weekend!
Hugs, Ilona
Thanks Ilona! I think you have a good point about minis keeping us young - if we are looking forward we are not noticing so much the aches and pains of our aging, lol! And an even better point to keep the dust and exploring hands at bay! Handling minis gently is a learned skill!
DeleteBeautiful style and colors. I really like the windows on the roof and the lights. Great idea for the sliding panel.
ReplyDeleteThanks Faby! I wish I had made these panels for all of my projects! So much dusting to keep up on!!!
DeleteJodi I wish I could give you a huge hug. I'm so excited reading this post, you are so clever, the windows, the units, the magnets and the lighting, especially the lighting. I want modern pendant lighting in my next house but just couldn't figure out how to do it - until now. Thank you Jodi x
ReplyDeleteThanks Polly! I'm so glad the fixtures inspired an idea for you! Can't wait to see how you'll carry it out! Having unique lighting is something I think we can all get behind, and saving a few $$ on them is always a welcomed aspect!!!
DeleteOnce again, Jodi, you show such brilliance in figuring out how to make what you need and pull everything together so perfectly it could be a picture inside any real life interior design magazine. So beautiful! And thank you so much for the inspiration and encouragement you always provide for those of us with still so much to learn. You are truly a godsend for miniaturists everywhere. Big hugs. - Marilyn D.
ReplyDeleteThanks Marilyn! As you know, finding a unique and clever solution with our minds and supplies gives the best rewards in this hobby! To know we've inspired brilliant ideas in fellow miniaturists is a greater feeling, still! Thanks for your kind and enthusiastic encouragement! Hugs!
DeleteIt looks so good! I love the blue. And the shutters and skylights look great.
ReplyDeleteThanks Sheila! If not for Tasha, I may have never explored navy blue to this extent! It's great to see where a color will take you!
DeleteGood grief, how effective you are. The kitchen could be someone´s real kitchen in 1:1 scale. It looks fantastic. The blue color is very brave, but perfect in this case.
ReplyDeleteThanks Sirkka! I was just saying how if not for Tasha excitedly sharing design photos of navy kitchens with me, I probably would never have gone to trying a blue kitchen. But what fun to try something out of the ordinary! I highly recommend it, as it leads to all kind of great discoveries!
DeleteYour posts are always worth waiting for. This one is a fantastic example.
ReplyDeleteI love the skylight. You are right about changing the color of the bricks. Most of all I love the magnets idea witch can be useful for keeping dust protecting covers on my miniatures.
Hugs, Drora
Thanks Drora! I am glad you like the monochromatic effect as I do! I can't wait to see what Tasha thinks! I wish I had thought to put dust covers on all my projects, too!
DeleteHi Jodi, thank you again for showing us all the process to build up this magnificent and wonderful kitchen. One can tell this is a labour of love. I am sure Tasha will be delighted and will feel all the love you have poured into it in the form of your amazing and endless creative energy. Love the skylights, they just are marvellous, imagine having them in your own house, wow, that´s why minis are so great, you can have in mini what you can´t in RL. I also love the facade, the colours and all the neat details. And the pendant lights are an amazing idea. As I said, you are making the most wonderful kitchen!
ReplyDeleteThanks Alex! Glad you like the progress! Here in the gloomy northwest United States, getting as much light into the house as possible is always in our minds. I have a skylight in both upstairs bathrooms and absolutely love them! Even the gloomiest days don't feel like night in them! I wish I had thought to put one in the entryway and one in my bedroom, as well!
DeleteEstoy enamorada de tu cocina, la de Tasha, y las lámparas han quedado fantásticas !!!!
ReplyDelete¡Gracias Eloisa! ¡Me hace muy feliz contar con su apoyo entusiasta!
DeleteCon tanta maravilla en el interior, yo me había olvidado del exterior.
ReplyDeleteHa quedado maravilloso aunque a mi me había gustado el contraste de los ladrillos del bajo de la fachada en blanco pero siempre digo que no es lo mismo ver fotos que tenerlo delante y ver las escenas con luz natural.
Me encanta el montaje de los tragaluces y la luz natural que va a entrar en la cocina.
Felicidades
Un saludo
¡Gracias Marian! Creo que me habría gustado más el ladrillo blanco si también hubiera pintado de blanco la parte inferior de las molduras de las esquinas. Pensé por un momento en pintarlos, luego pensé en cómo el contraste podría hacer que los ojos se desviaran hacia el exterior de la pantalla en lugar de entrar. Espero que Tasha esté de acuerdo, pero si le gustaría tener blanco, siempre puedo repintar, ¡jajaja! ¡Gracias por tu sincera y amable opinión!
DeleteMe gusta como has hecho las ventanas. No se me habría ocurrido utilizar ese tipo de moldura y realizar independientemente el exterior y el interior. Han quedado muy bien. El resto de la estructura también. Ha sido buena idea utilizar los mismos colores en la fachada. Las luces son preciosas.
ReplyDelete¡Gracias Isabel! Me costó bastante pensar cómo alinear las aberturas y colocar el vidrio en un sándwich. Pero cuando pensé en usar la moldura de esquina, resolvió todos los desafíos. Encontrar la moldura de 1/4 "y esperar a que llegara cuando nuestro sistema de correo ha sido tan poco confiable también fue una colina que escalar. ¡Pero estoy muy contento de que hayan terminado y de que la idea funcionó al final!
DeleteOh, what a wonderful post! *wink* I really loved to see the results of your creative itch! It's amazing how all of this is looking now. The elegant color scheme for example, I think it was a great choice to use the same color both for the in- and exterior. As it is a small project it makes everything a unit, so good you skipped the white bricks, this was in fact a bit too much contrast. For contrast and interest you've added just the right amount with the black shutters and the white strips. I can only agree, it's always amazing what difference these kind of details make. And not to forget the skylights... so stylish and well done - and a great way to have natural light for a better view inside. And speaking of the view to the inside - the way how you've used the magnets for allowing access is very clever.
ReplyDeleteThe hanging lights are gorgeous - it's amazing to see the possibilities of a 3D printer when it is in the hands of a brilliant miniaturist. What a wonderful look! An awesome project in every way - and I wonder now... did I ever tell you before that you should have a box of tissues at hand when you're giving it to Tasha??? *grin*
It's a great idea to use the back wall for storing supply stuff allowing Tasha to play and change for the season. No surprise you did not want to go to bed, seeing all you have achieved you must have had for sure a creative overflow. And the ending of your post was very touching, I can only agree with what you said. Being somebody who has to struggle with limited abilities due to my issues with the whole arms I'm not able to do some of the stuff many of you do with ease. For example cutting wood strips with a cutter is not given to me. I need to get along with what I can and often have to find my own way how to do things... but as my bearies and I have never been struggling for realism that's okay and always enough in the BiWuBeary world. ;O)
Have fun with your next steps... and especially happy wiring!
Hugs
Birgit
Thank you dear Birgit! I am so glad that you like the progress and methods used this week! It feels so good to be close to having this dream project ready to give to Tasha. There were a lot of puzzles to solve and challenges to overcome! I can't tell you all of the ways she is a continual blessing to me. Though it might take her some time to understand and appreciate everything that goes into a miniature project like this, I hope most of all that she will feel loved and treasured each time she sees the kitchen in her house. But I will have tissues handy - just in case!
DeleteIt's hard to put into words how much I admire your ingenuity and cleverness at achieving the amazing minis you set out to make! You have an incredibly whimsical and charming style all your own, and I love the happy, enchanting BiWuBeary world you create with your adorable cast of characters! Because you have to overcome physical limitations, your passion and determination for making spectacular minis is that much more delightful - you are an inspiration!
Oh the wiring - always a dilemma! I hope I have good news to share soon!
Hugs! 💗
Oh my word it is coming together so nicely! You are so right with the fact that something as ‘minor’ as the facia board can make sure a huge difference!
ReplyDeleteAnd thank you for the last paragraph. I sometimes get bogged down by the aspect of perfection and then dissatisfaction that my creations are not perfect...when in fact the journey is the fun. And I can also go back and redo when I have more experience! I needed those words!!!
Thanks MaryFran! We all get stymied, doubt our abilities and hesitate to share our work out of fear that it isn't "good enough". But the making of minis is meant to help us explore our creative ideas, branch out or skills, buoy our self esteem and inspire others with the same passion for creating. For every post or share there are 10 critics, but also 100 inspired people who will give an idea a try. I love that!
DeleteOh my goodness! You have really created wondelful dollhouses and shared your ideas with us. You have inspired us with your brilliant ideas.
ReplyDeleteI have enjoyed watching your professional way of making miniatures. There is so much to learn about it.
Thank Sirkka! I am so happy to have you along on the journey!
DeleteGracias Jodi por compartir todos estos trabajos con nosotras, es un deleite para la vista y una fuente de inspiración inagotables. Transmiten todos tus proyectos una calidez y se ve el sentimiento que pones en todos ellos. Buen fin de semana
ReplyDelete¡Gracias, Rosa María! ¡Es tan especial tener compañeros mini amigos creativos con quienes compartir el progreso! ¡Especialmente cuando podemos inspirarnos y ayudarnos unos a otros para lograr nuestros propios sueños!
DeleteJodi, you find the best solutions for your architectural challenges! The exterior walls have the perfect combination of textures to make them interesting and painting all of it blue was definitely the right choice.
ReplyDeleteJust before reading the last paragraph of your post, I was thinking that I should give up on the two houses I'm working on. Not because I'm in my own way, but because one can't get any proper lighting supplies in South Africa and I'm so envious of your little bulbs. Then I thought to myself, I do have a whole bag full of old-fashioned 12V bulbs. All I need is a bit of creativity and a different way of making my lamp shades. (They do heat up so one has to be careful of paint and plastics near them). Even though I can't copycat, you inspire me to try new things!
Thank you Megan! I am so happy that the fixtures got you thinking of creative solutions with your lighting supplies! Maybe just open cages around the bulbs would look amazing and give them enough air circulation to remove the heat danger. Do you solder? I thought I remembered that you do. Nautical light cages, maybe? Oh this could be so fun! I hope you come up with the perfect solution!
Delete