

I'd always envisioned a wall of shelves for the back wall, so like the Storybook Cottage kitchen cabinets, I employed the help of the Cricut Design Space program to help me. I love being able to draw precise measurements for things like the depth and height of shelf supports, and there is no cleaner way for me to cut through chipboard sheets like the deep cut blade does on the Cricut. I made the upper arched front shelf piece, a lower drawer front panel, drawers, top support, bottom support and side supports with the Cricut.

I usually have to run my Xacto blade through the cuts afterwards because the 1/16" chipboard material is just slightly more than the Cricut likes to handle. I only like to program one pass with the blade, as well, because more passes can sometimes lead to really rough results. The nice thing is that the chipboard can be gesso'd and sanded, so even sheets that come out looking like this can be salvaged.

The horizontal shelf boards themselves were made from 1/8" basswood sheet ripped down to a depth of 1-5/16" wide by the length of the wall space which is 9-7/8". A nice amount of shelving in spite of the small space!

Here, the lower drawer unit supports are going in.

Here I have added 3D sticker detail to the drawer fronts and am testing the fit of the first shelf. It is 1/4" wider than the other shelves because the upper shelf unit uses it as support.

Another test fit after the first coat of paint, then adding the handles (which are actually door knobs) using a paper jig to ensure identical placement of the handles.


Then shelf supports made of 1/8" x 1/8" basswood strip go in, then shelves, then a light bulb for each upper arched shelf opening, then the front panel and the top piece.


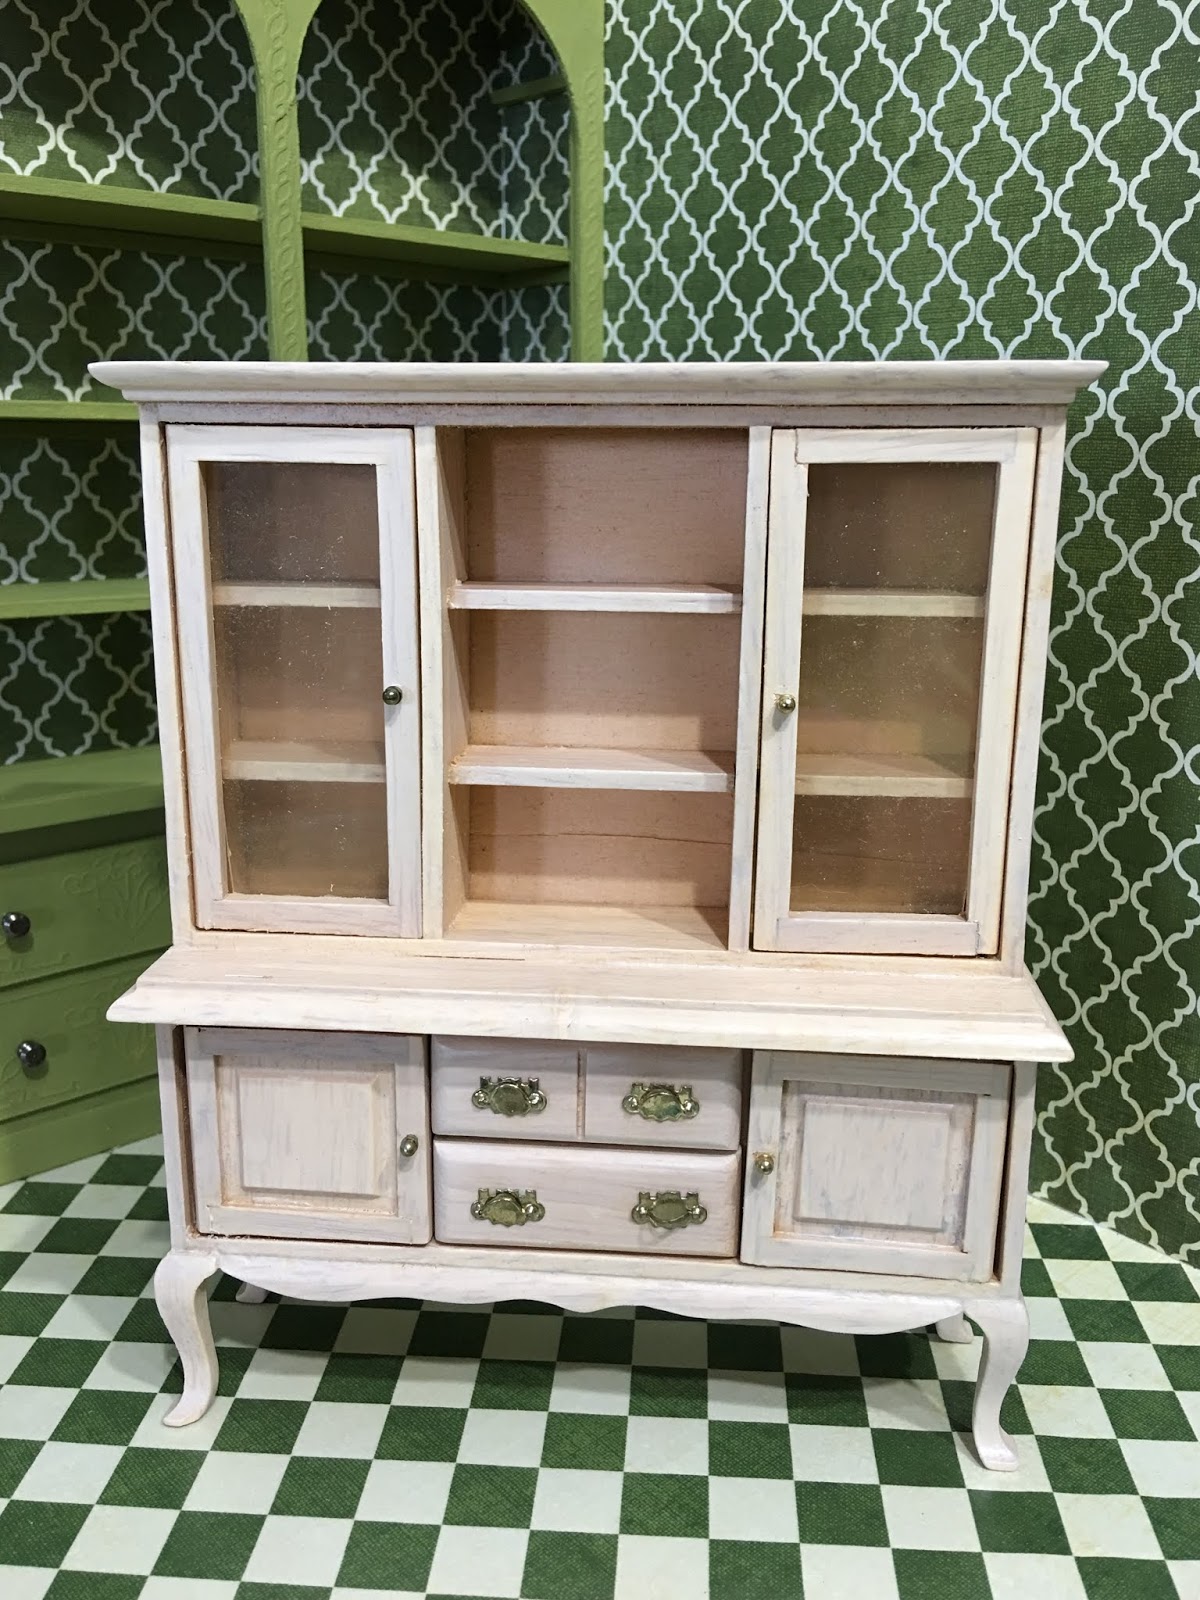
Next, I had to decide on furnishings. I had a Town Square Miniatures hutch that I bought in an eBay estate lot. I got a hutch, matching table and chairs for $20. It was all a bit rough, but nothing a little TLC, sanding, painting and remodeling couldn't fix. I removed the hardware and one of the center shelves from the upper portion to have a larger display area. I removed the gold hardware then painted it Georgia Clay, a burnt orange. I removed the yellowed "glass" and will replace it with some chicken wire after I'm finished giving it more wear and grunge in the form of some antiquing wax.


The next big fixture was the counter. I wanted this piece to be the central fixture in the store, and once I had the hutch space figured out I knew what floor space I had left to work with. I made an "L" shaped counter which is 4" x 4-1/8" out of 1/8" basswood sheet. It's got two shelves to store bags and gift wrap type stuff. The countertop is about 3/8" wider and overhangs all sides. I am still playing around with the orientation and position in the shop, and imagine that its final place will be determined by accessory placement later on.


For the countertop finish, I wanted a dyed concrete type of look. For this, I chose some warm complementary colors to the fall palette and used my typical paint and glaze sponge method. I used the Camel color as the base layer, then used the other three colors below mixed with glaze and dabbed it on with a slightly damp sponge. Once it was dry, I added a couple more glaze only top coats sponged on to keep the slight texture.

Once the large pieces were in place, I began making kits for crates, tiered plant tables, shelving and wall decor - whatever I had in my stash that looked useful. This gets me pretty close to knowing what fixtures I have to use as displays so that I'll have a better idea what I'm going to make to display in them. Hopefully, I have most of the supplies and materials I need on hand to make them. Some of the fixtures still need paint and aging, but if I'm not sure yet on the color or finish, I've left it unfinished in order to continue to contemplate.


Here are some photos to give you a feel for what the space will be like with the walls on. I definitely need to work on my lighting plan, as even with the open roof over the main part it's still really dark and shadowy. And I can't install the upper wall section that joins the main room to the bay area until the windows have been installed, so some things are still waiting on others which are waiting on others. You know - normal dollhouse construction operating procedure!


I've got a couple more drawers to go through to scout out useful stuff for the project, so things are still subject to change. The next major hurtles will be the windows, lighting and final structure details. Then, the fun filling up part can begin! I see a lot of food and flowers in store for this project, so I've got some challenges ahead. And if August goes by as quickly as July did, fall will be showing up fast! Maybe I should have started this project in May?
Here's to our remaining Lazy Days of Summer in the the Northern Hemisphere! Hope you're enjoying your days, wherever you are, too!
xo xo,
Jodi
Wouw, again a new beautiful project, what a beautiful store this will be, really old-fashioned with those beautiful colors, the cabinets are also fantastic, love it!
ReplyDeleteThanks Gonda! I am glad you enjoy the retro feel and the colors!
DeleteI love your colour scheme, the red and that wee splash of bright yellow one the wall is just fabulous.
ReplyDeleteI look forward to see your lighting solutions - I find that so tricky (and scary) to deal with and just keep putting it off.
Anna
Thanks Anna! I am glad you are liking the fall colors, and the lighting is a little scary to me, too. But with the rustic feel of the shop, I can "get away" with a retrofitted look so it's a little less intimidating! I just hope it all comes together in the end!
DeleteThis is so wonderful! Your Cricut does a great job of cutting, and I really like the 3-D stickers you've added to give it the look of an old, hand-carved shelf. There are so many fun little elements that I can already see in this store. I'm coveting those hanging shelves with the crate labels. :-) You've already made great progress, and I am really looking forward to seeing more. I know what you mean about the year slipping away, though. Couldn't believe I already had to turn my calendar to August. The days are getting shorter. *sigh*
ReplyDeleteThanks Deb! It has been a lot of fun to explore this project with the colors and old fashioned fixtures! The Cricut really makes the arched cuts easy! The shelves with crate labels are chipboard planters from Alpha Stamps and here's the link to the half scale version:
Deletehttps://alphastamps.net/products/planter-box-with-trellis-half-scale?_pos=8&_sid=6e857d06b&_ss=r&variant=21357816873039
Time just seems to go faster the older I get, and I guess all we can do about it is to make every minute count!
Thank you! I didn't realize they were from Alpha Stamps, and they have a half-scale version. Woo hoo!
DeleteI know! When I saw they had them I was excited, too! I hope you get some!
DeleteUna maravilla! Me encantan tanto el diseño como los colores de las estanterías,son tan frescas y divertidas! Esto promete ser genial!!
ReplyDeleteBesos.
Gracias pilar! ¡Me estoy divirtiendo mucho con este género!
DeleteI love your use of the Carlson's kits. It looks like a little corner store from the past, it could be in a big city or a quaint small town. I am yearning for fall and your color pallet makes me crave pumpkin spice and apple cakes. Well done Jodi!
ReplyDeleteThanks Carrie! I was amazed at how much fall stuff and rustic type items I had collected over the years and thought this would be a perfect small project to get them out on display! It feels so good to pull stuff out and actually start enjoying it!
DeleteSo vibrant! I love the contrast of the hutch with the wallpaper.
ReplyDeleteThanks Sheila! Autumn is a real showoff, isn't she, lol!
DeleteLove the colour scheme! The little views from various angles through windows - so fun! This is going to look great with accessories in autumn tones. I can smell the apple pie now!
ReplyDeleteThanks Shannon! The colors, smells, foods and festivities of autumn are exactly what I need to ease myself out of the summer I love and into our dreary northwest winters. I am trying to embrace it and hopefully, having a fun mini project to display will help!
DeleteVery Charming and the colours you've chosen for the furnishings are evocative of falling leaves in Autumn.
ReplyDeleteThanks Elizabeth! I have gone through my paint drawer and picked out every fall color I could find. I plan to use them all, lol!
DeleteAs I thought.. It's coming together beautifully Jodi. I'm loving the pop of red and yellow against the green and I love all your little crate shelves. So cute! That shelf hanging high on the wall with all the scroll work is amazing! And those last photos with the walls on are so adorable. It has a lovely vintage/retro vibe... I imagine pushing the door open making the bell hanging above the door ring, with my pumpkin spice latte in hand and shopping for all my harvest decor. :D
ReplyDeleteThanks Sam! I think some of the colors could use a wash just to tone down the brightness a bit, but it's so much fun to be daring with the color choices! I am hoping to capture a little bit of timelessness inside the shop and fill it to the brim with autumn delights! I have a bell for the door, so you are right on with where I'm going!
DeleteGorgeous Jodi and such a lot achieved in a short space of time. Even without what I know is going to be fabulous stock and displays you can already imagine the sight and smell of that lovely little store. When you have finished you definitely need to sprinkle with cinnamon so your viewers get every sense rewarded with your work.
ReplyDeleteThat's a great idea, Marilyn, thank you! I may have to add drops of scented oil to some of the seed pods!
DeleteA beautiful new project. The colors are perfect for evoking autumn. I really like the structure and I'm curious to see more.
ReplyDeleteThanks Faby! I am anxious to get the windows and structure tasks finished up so I can start all the fun accessories!
Deletevery nice achievement, excellent work, Jodi!
ReplyDeleteThanks Claude! It's so much fun I can't take credit for doing any "work", but I'm sure glad I have folks like you to share it with who appreciate the opportunity to be creative!
DeleteAs usual, this project too is going to be a masterpiece. It already has your "out of the box" touch and I can't wait to see it filled with autumn items.
ReplyDeleteHugs, Drora
Thanks Drora! It's so much fun to work with these vibrant colors and really try to tap in to all the sights and smells of fall! Meanwhile, the front and back doors are open, and each time a cool little breeze rolls through the house I am grateful! Hot and sunny summer days seem so long, but all too soon the chill in the air reminds us that times are always changing!!
DeleteHi, Jodi - The shelves for the back wall are so handsome! I can envision them filled with all those autumn goodies. This is a timely project; fall is approaching fast, and it'll be such fun to see all the surprises that await us in Autumn's Pantry. You've done beautiful work on the hutch (gorgeous color!) and the counter and countertop. And what a fabulous assortment of display pieces you've come up with! I love all the pretty wall-hung shelves, and the crates and small tables give the store a comfortably old-fashioned feel. I know that you're going to have such a wonderful time preparing all the "merchandise" for this treat of a store!
ReplyDeleteMarjorie
Thanks Marjorie! Just a couple more major construction hurtles with the shop and then we can get to the fun stuff! Hopefully, this week! While the hubs is home on weekends I have to turn my attention to the real life sized home maintenance stuff like moving shrubs, trimming trees and repairing sprinkler heads - all stuff that is so much easier with help!
DeleteI'm glad you think the fixtures add something to the interior and I am also relieved that I hoarded all that stuff in 2016 & 2017. It feels so good knowing I am actually using it, guilt assuaged! I hope things with the soddy are coming along cooperatively for you and that your summer has been a great one so far!
So much fantastic project - you've been busy as a bee! It was so much fun to see the shop at this state from different angles and through the windows. I too imagine the sound of the door bell already! ;O) Your color scheme creates such a warm and friendly atmosphere, perfect for the fall theme. And I am in awe with the big background shelf - amazing what you're able to do with a cricut. I really like how the wallpaper peeps through the shelves - although I suppose there won't be much left from this sight once you've started to decorate it. But that doesn't matter - because then I will be enjoying all the fascinating things from your stash. I have no doubt you have a huge collection of miracles and wonders to fill your shelves and all those lovely crates etc. with. And now I'm wishing you loads of fun with the windows - fingers crosses that everything goes like you want it to. ;O)
ReplyDeleteHugs
Birgit
Thanks Birgit! I am glad you like where the project is leading me! It surprises me each time I work on it with what it's asking me to do, lol! My ideas for the shelves and displays are still very vague, but the list of stuff I want to try and include keeps growing! At some point something has to give!
DeleteWow, how much progress you have achieved. The shop looks wonderful even at this unfinished stage. Love it. I envy your big tools, it has to be so fun and fulfilling being able to make your furniture and bring to life what you envisioned, but I am sure it's not just the big tools but also your creativity and hard work. I have to mention that the top of the counter looks fab, what an amazing finished you achieved, I love it. Well done Jodi, you have done a lot and everything looks great.
ReplyDeleteThanks Alex! Getting all of those windows cut and installed has really slowed me down - what a big job! But you are right - I would be in a lot of trouble with my ideas if I did not have the mini table saw and the Cricut. They really do make certain things a possibility and I really enjoy being able to utilize them!
Deletejodi, you are a wizzard! so fast and so accurate. but I must admit... first all these patterns on walls and floor made me a little dizzy ;-). but now that it all comes together it looks very harmoneous. well done!
ReplyDeleteThanks Marion! It's amazing what you can get done when you're alone four days a week! Yep - the patterns and colors are an overload! But hopefully, like autumn, in a good way when all is said and done, lol!
DeleteI thoroughly enjoy following a project right from the start and this is such a lovely one. Already I can visualise all the flowers and varied stock. I love that shade of green to - an excellent choice!
ReplyDeleteThanks Irene! I am so glad you have confidence in the direction the shop is taking and like the vibrant green, too!
Delete¡Me encanta! Está quedando genial. Los muebles y el colorido son preciosos.
ReplyDeleteGracias Osabel! ¡Me alegra que te gusten los colores y los accesorios!
Delete